Window flashing feedback: Innies-outies with 2″ foam
Greetings everyone –
I was wondering if I could solicit some flashing feedback for a rather unique assembly. It’s one of those moments where lack of experience and a long chain of previous decisions has created a bit of a challenge.
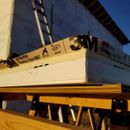
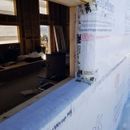
I think the photos speak for themselves, but basically the assembly is:
OSB – 2″ Foam – Stuccowrap – Lath – 3 Coat Stucco
In addition to the WRB being in the wrong place, the windows do not have nailing flanges because they were bought as mis-measured new stock. So it’s a bit of a mess…
My solution was to:
– Stick 2″ 3M 8067 to the window frame, with half of the release paper pulled (photo 1)
– Put down Flexwrap and tape the WRB to the rough opening per usual (photo 2)
– Install the window, peel the other half of the release paper and install 8067 facing the other way, adhered to the WRB. Essentially this is site-made Dupont Straightflash VF. (photo 3)
– Add a 6″ piece of 8067 to the top, adhered to the EPS under the WRB flap (photo 4)
– Fold down the WRB flap, tape off the cuts and tape it to the top 1/2″ of the window frame. (photo 5)
GBA Detail Library
A collection of one thousand construction details organized by climate and house part


Replies
Zene,
I had almost the same wall assembly (minus the stucco) and used flangeless windows.
You got most of it nailed. I kept my taping a bit simpler, just taped from the rough opening all the way around over the wrb except at the top where the tape went under the wrb. The windows were then spray foamed in place with a layer of flex caulk on the inside and outside . I think the layer of caulk is easier for air sealing than trying to deal with the tape.
Don't forget that the head flashing (or weep screed) above your windows needs to now go under the WRB but over the flashing tape.
I'm not sure how you are finishing your windows and not familiar enough with stucco, but if you are bringing the stucco in right to the window, it would be best to treat it like the bottom of an overhang and have a weep screed where it kicks in.
Also be careful with the weep holes on your windows, I've caulked over those by accident causing leaks on the inside.
I install a lot of flangeless windows due to using all wood windows on some of my projects. The thing I would look at is the tape product. Get a roll of Siga and a roll of Henrys tape (the white tape not blue) and see how they feel in comparison to the 3M. I have not used the 3M but the Siga (albeit the highest cost) gives me a better feeling as I am burying it inside of the most vulnerable water intrusion area of my project.
Very helpful - thank you both!
Akos - I’ve seen your method used for door installations and assume it is standard for flangeless windows. Using sealant instead of tape for the outside air/moisture barrier does seem simpler. I was just worried it might be more likely to fail over time, but that is purely speculative. What kind of sealant do you use? I ordered OSI Quad for windows and doors.
When you have an innie/inbetweenie, what kind of head flashing do you recommend? Just aluminum or galvanized L-flashing? Would standard drip cap do the trick? The problem I foresee with weep screed above the head is it would have to flex enough to conform to the foam opening and then be fastened through 2” or foam.
There are products such as E-Z bead that have an integrated backer rod. The problem is these really seem designed for flush mount windows. I need to figure out an elegant solution to flash the window, tuck in lath around the recessed window and maintain a bond break between the stucco and the window frame. I realize retrospectively I only addressed the first of these.
Alan - I will admit the 3M 8067 does not feel as heavy duty as the DuPont or Grace products I’ve used, but the adhesive is really impressive. I will investigate the tapes you suggest as this is definitely not an area to skimp on materials.
Zane,
I used a polyurethane caulk, mostly because what the supply house had. Tape is always easier to get right, with caulk you have to be more diligent with details for it to last (clean surface, backer rod, tooling).
For the head flashing, I had it bent to size from painted steel to match my window trim. My setup is a bit different as I went with cement board panels over rain screen.
There are a lot of stucco related details with your setup, which is best to talk to an expert. The overall theme I go by is that you should avoid channeling water towards your windows (Ie head flashing above, sloped sill bellow). If you windows are close to the roof and you have generous overhangs, the top is not as critical, sloped sill is always a must.
Mr Bridgers,
I have midi windows in my outsulation walls similar to what you have done. I would recommend against having the rounded detail above the windows that you appear to have. Water that washes down the wall will follow the round right back to your window tops. It may be that the sealing tapes used will be sufficient to keep water at bay, or it may not over time. In my particular case the stucco is a modified DryVit so the water loading characteristics may be different from traditional three coat.
In any case, the detail I chose for all windows and doors was a drip lip created with a simple L angle strip. Some were concerned that not having the rounded detail on four sides would make the house look odd. My concern was asking too much of the sealant between stucco and window frame and beyond that the tape sealants. I may be kidding myself for the long haul, but so far so good. I would also recommend looking for the best caulking materials compatible with the stucco you are using. The windows have had to be resealed in a few spots due to movement of the outsulation, however it is much less than anticipated.
I am attempting to attach a picture of one of my windows to show the drip edge. If you do opt for this detail, be sure to cut the drip edge to embed far enough past the curved bits to allow for a smooth blend. I had to fuss some of mine.
Roger,
I don't know what the standard details are for this situation, but looking at it as though I was thinking through how to manage potential water infiltration of the wall at the window-head I share your concerns. It might be fine in some climates. It would sure be risky here in the PNW.
Well so much for technical proficiency with attachments. I guess just turn your head.
Mr. Taylor,
Not quite sure if you are saying the detail I chose is risky. If I had not raised the drip issue at the time of setting up the stucco coat, I rather suspect I would have also ended up with the wall to header being rounded like the sides and sill. Even though we only get 11-14" of precipitation per year in my location, I still did not want to risk wall wash tracking back to the window/door tops. It doesn't show well in my lopsided picture, but the drip edge hangs about 3/16" lower than the return , which also slopes outward slightly. The nice thing about having the edge flush to the main surface is an dripping automatically falls to the sill away from the window since they are middies.
I agree that the PNW dishes up some major rain and wonder about the levels of wet retention for real 3 coat stucco.
Roger,
No sorry - I worded my reply poorly. I was agreeing with you that the curved head-sill might be risky and put too much of the work onto the membrane and window frame. I prefer your detail.