Why I really don’t like polyiso anymore (or why Roxul is way better choice)
HI all
Thanks to Dana and Martin (and others) for earlier comments and guidance on my new house build. To be filed under the you cant make this $hit up, it burned down right before we moved in (VOC spontaneous combustion – re stain rags on the pine ceiling/walls really can occur).
soooo, we get to take apart what we just built and analyze it. and improve upon it the next time (deconstruction under way now, framing to start about labor day).
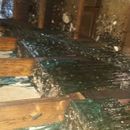
See the attached pic. The polyiso had already started to shrink a little bit at the seams. I think over time this gap would have grown. We used 3″ one layer, staggering and taping the seams would surely have been better even with the extra labor for 2 layers of 1 1/2″ (we covered the whole outter layer with Henry blue skin self adhered WRB to help control for wind infiltration before putting up the furring for air behind the fiber cement siding). It worked; the fire was ventilation limited and ran out of oxygen almost immediatley – as it proceeded to smolder and char without really burning with a live fire. Also, it created a 3 minute delay for flash back upon entry – the oxygen took that long to reignite the fire (look for cool fire department blog on ventilation limited fires which will now result from houses built with no or not much air infiltration – a whole new fire paradigm underway!)
back to the build… I think these little gaps would have eventually left us with condensation in small strips and areas on the inside of the zip sheathing (which did ironically well under fire load, but that is for another post). Clearly, double layer foam (if you insist of foam) with tape in between would have been a much better answer. Foil faced would also (supposedly) have shrunk less – so say the polyiso people.
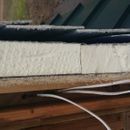
See the second picture; that WAS DOW styrofoam insulation we added at the last minute to get another inch and a half in the hallway under the stairs to keep the entrance foyer from chilling the main living area. Total putrefaction. we are going to 2×6 studs here and will just insulate the bay a little more.
On the exterior walls, we are now going to install 2″ by two layers for a total of 4″ of Roxul this time. Roxul was on 9 week delay last winter so we went with polyiso; we have enough time and lead to get mineral wool now and install after framing. (just for the record, the roof was 5″ and it was cross staggered 2″ and 3″ and that helped combat the gaps, but they were already present up there, too. We will do 2 layers of 3″ Roxul this time on the roof deck, cool roof with the plywood sleeper strips instead of 1×3 furring and ply over, with metal roof on top). Zone 4/5 (Coastal Connecticut). result is r20ish in bay and r16 exterior on the walls and R38 in studs and 24ish of Roxul on roof = no condensation and dry both ways. Yipee!
Another interesting tidbit was that we used pressure treated plywood strips cut 4″ wide for nail base (anchored into studs with 6″ oly screws made ironically up the road in Agawam Mass (NOT China as I assumed!) The plywood was easy to work with and cut to size and it was not crowned like 1×3 or 1×4 studs. The one really sucky thing about that was the 48″ (x 16″ tall) Hardie fiber shingles were a bitch to match up and nail to the studs on 24″ centers as the shingles are “designed for 16″ studs to have 3 repeat patterns in the 48” length, but cutting and getting them all to fit on the furring was a bear.
THIS time, we are just going to cover the air channels of furring strips with another layer of new plywood (and cover it with rain screen to allow the siding to breathe). YES, that sounds crazy money for a whole new exoskeleton, but the time saved and ease of having some face nailing and around windows, etc. will FAR exceed the savings of not putting up the plywood and nailing to fur strips. (2,400 sq feeet of wall, less windows/doors -/- 32 ft per sheet x $35-40 a sheet is about $3000, plus labor to install the plywood and the rain screen (still undecided, obadyke and delta trella leading the pack now with UDL 50 right behind) say $2k in labor to install the plywood… $5k all in divided by labor cost is roughly 80 hours of labor we need to save in the install of the siding – likely a push, but the siding will actually be installed on plywood and not over furring and with the ability to put up half shingles (because we dont have to line up over the furring strips to nail the shingles down) we will also use far fewer shingles and have a slight savings there, too. Maybe 1-2 square saved (at roughly $350 a square for hardie shingles = $700 in the fewer shingle department).
so… studs (2×6) followed by zip with taped seams, 4″ of roxul, 15/32 plywood strips for air cavity with another 3/4 ply over. rain screen/wrb and fiber cement siding nailed on outside. we lined up the wall cavity to the cool roof too – that gave us one continuous air vent from under the fascia at the base of the house all the way to the roof vent. That was pretty cool, too 🙂
Outie windows. double flashed at the rough and the box. the only penetrations were 3″ vent stack for plumbing, 4″ dryer vent, woodstove chimney, water into the house and the sewer drop, lights by the front and rear door (all penetrations zip liquid flashed and also taped in and out, plus fire caulked). kitchen was recirc hood and a Fantech ERV/HRV (dual/replacable or interchangeable coil allowed for dehumid/ERV operation in the summer as needed and dry hrv operation in the winter). The blower door was scheduled for the week following the fire. Next time…
Short story long – thank God Roxul is now making more product and we can get it in only one week or two, max. Polyiso really was a bad choice and poorly installed at that. Foam is even worse.
GBA Detail Library
A collection of one thousand construction details organized by climate and house part


Replies
All sheet foam goes through both seasonal & long term dimensional changes, and should be applied in staggered-seam layers to limit the striping.
A narrow gap will not usually turn into a wood-rot problem due to the seasonal adsorption from the cool-stripe. The semi- trapped air in the gap also has real insulative value, just not as good as solid foam or staggered-layer foam. The notion that you would have ended up with moisture problems is not well founded. There are existence proofs from the late 1970s where XPS shrank leaving fully half-inch gaps, and while that was a heat-leak issue it wasn't a moisture or mold problem. OSB and plywood WILL wick moisture laterally- the moisture load of even a half-inch gap is "shared" over 2-3" inches laterally.
Unlike polyiso, polystyrene (either EPS or XPS) will soften and melt before it catches fire, and has a lower ignition temperature to boot. Polyiso and it's chemical cousin polyurethane chars in place even when fully engulfed and burning and retains it's shape, much like burning wood does.
But nothing quite beats rock wool for it's ability to resist flame. It passes more air than foam insulation, but at rigid-board densities it's not enough air to really matter from a fire-propagation point of view. Even at modern batt densities it's fairly air-retardent.
The high vapor-permeance of rock wool is potentially a problem for air conditioned buildings with interior vapor barriers during the cooling season, but the ZIP OSB sheathing it self is something like a 2 perm vapor retarder, limiting the rate at which outdoor moisture can get to the wallboard. As long as the interior finish is something like 3-5 perm standard latex paint there's no chance of moisture build-up in that scenario, but with vinyl or foil wallpaper there can be.
MY personal issue with polyiso isn't the seasonal dimensional changes and gaps, but it's poor performance in low-temperature sheathing applications. In climate zone 5 or higher assuming any more than R5/inch for wintertime average would be optimistic. But dual-layering it with polystyrene of similar thickness on the exterior balances it out, since it keeps the polyiso warmer, closer to it's optimal operating temperature, and unlike polyiso, the polystyrene's performance increases in performance as the temperatures fall, substantially offsetting any performance hits that the polyiso might be taking at the temperature extremes.
Oily rags will combust spontaneously! This is a hazard everyone should remember when working with oil based finishes. I read somewhere recently, a flooring finisher had rags tossed in an empty pail in his truck on the way home from a jobsite, and they were smoking when he got home. No joke. Good practice is to store used rags in a lidded metal pail filled halfway with water.
I agree with Dana that your polyiso gaps don't appear to be a problem. But nothing comes close to rockwool for surviving a fire.