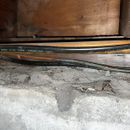
Mortar at Top of Foundation Wall
I’m in the middle of finishing my basement. I’ve been following a bunch of the articles on this awesome site with regards to insulating the basement walls and air sealing. I just finished demoing most of the exterior walls in preparation for EPS rigid foam board on the walls. I was planning to also put rigid foam on the top of the foundation walls from the sill plate to the wall edge. However, I noticed there’s some cement at the top of the wall that runs along the entire perimeter of the top of the wall. It’s a different color from the poured foundation walls. It’s very brittle and I’m no sure what purpose it serves? I don’t know if it was done more recently than when the house was built. I’m wondering is it safe/worth removing what I can so I can lay my EPS foam on top of the wall? Also to note the basement walls are bone dry and show now signs of water or efflorescence anywhere so I don’t believe it was to seal against water?
Attached a picture of it.
GBA Detail Library
A collection of one thousand construction details organized by climate and house part


Replies
aberrant,
That's mortar. Long before sill sealers, etc., the standard detail was to bed your sill plates in mortar, which helped with uneven foundation walls. You find houses in Canada built that way right up until the late 1980s.
You may be able to carefully chip it away flush with the plate, but you risk damaging the part under the framing, which is load-bearing.
That makes total sense. In that case it might be best not to mess with it and forgo trying to lay rigid foam on top of the wall? Or try to carve out the rigid foam around the mortar?
Deleted
You can remove it all, and then add shims under each joist where there is a gap to take up the loads. Once that's done, proceed with your original plan.
Usually don't disagree with Malcolm, but I think you could open a can of worms trying to remove this and add shims for your structural support.
Your idea of carving out the rigid foam where the mortar protrudes into the plane of rigid foam seems like the best course of action. Rigid foam is also somewhat compressible, so its not like you need to get it exact. And if you are really worried about air pockets, carve out the foam and once you know the rigid sheet fits (do test fits) spray a bit of minimally expanding spray foam into the voids you carved install the rigid board. The sprayed foam will expand to fill the voids.
CL,
You may be right. What worries me though it that these mortar-embedded plates tend to be fine if they are un-insulated, but once they are encapsulated by foam inhibiting drying, and at the same time become much colder, the possibility of rot increases. If the mortar is removed, and it is shimmed where there are gaps, at least those areas will have a capillary break from the concrete below.
I think you'd be safe removing the morter that is overhanging the edge of the top of the wall. I would take a cold chisel, place it vertically right above that piece and give it a whack. That should split the piece off from the rest of the mortar on top of the wall, after which you can safely finish off whatever is stuck to the face of the wall without much risk of damaging the remaining mortar on top. BE SURE to wear safety glasses when doing this -- the mortar chips tend to fly surprisingly far.
I wouldn't try to insulate the top of the wall here. I agree with Malcolm about the risk of rot. You could add a capillary break in the usual way (jacking up sections of the floor and sliding in strips of HDPE or other suitable material). You could also just insulate the face of the wall and the inside of the rim joist, leaving the edge of the sill plate exposed for drying (which is what I did on my own home, BTW). You get most of the insulation up this way, while also preserving drying ability where it's most needed. Remember that insulation is not an "all or nothing" proposition -- every little bit helps.
Bill
Have/had the same at my place and it was suggested I remove it. Most of it popped off with a putty knife. Almost none of it extended under the sill plate itself, and certainly no more than an inch, so I can't imagine it was doing much. I assumed it was a primitive airseal/bug control.
I discovered the sill had been shimmed level here and there with wood shims by the original builder and had some fairly large gaps. I added a few metal shims and sealed the gap w/can foam. So far no issue but it's been less than a year. I don't plan to insulate the plate - just the rim joist.
That said, I agree with Malcolm. In hindsight didn't seem worth the effort.
Both the houses I have owned in Minneapolis have had a similar detail and it was familiar to my structural engineer. But I've never thought the mortar was structural, I thought it was a way of keying the floor system to the foundation. Both of my houses were from the 30s and 40s and lacked a mudsill and anchor bolts, just a rim and joists insecting, bearing on top of the CMU wall. I thought the mortar was an attempt at anchoring the floor system and closing the tops of the CMU cells. On my second house the builder actually covered the tops of the CMUs with asphalt paper before putting down the mortar cove. Some kind of early attempt at a capillary break?