Sill plate to foundation wall hurdles
Hi all,
I’ve started my re-siding project. Here is my current wall assembly plan:
1. Wall sheathing
2. Blueskin VP100 or Mento 1000 taped
3. 2″ comfortboard 80
4. 3/4″ by 4″ furring strip
5. Hardie panel
When taking off my siding, I found a couple of interesting areas. I believe I know the answer but wanted to get perspective before diving off the deep end and entering an area I didn’t want to go. Issues questions below:
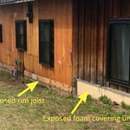
In my first picture (close up of covered deck area):
1. The deck ledger board was installed on top of the old cedar siding boards versus to the rim joist. The battens have old tar paper behind them with an uncovered rim joist and sill plate. I would like to liquid flash all this for air sealing purposes but am unable to do so. I would also like to drop my 2″ mineral wool and siding down this area. What do I do? Do I pull up the deck boards and create a way to self suspect the deck to remove the ledger so I can liquid flash and top insulation? Or am I missing something less complicated?
2. In this same pic, which you can’t see very well, part of the wood deck transitions to a concrete stair. This concrete walkway is firm against the old metal flashing which is covering old rigid foam and my guess a leaky rim joist and sill plate. What do I do? Do I remove and see just how hard it will get or do I leave in place and build my system around it?
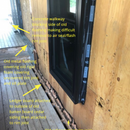
Photo #2, opposite side of home in open area:
3. Exposed rigid foam, I’m guessing I just need to remove now and properly insulate the foundation. Didn’t want to take on additional foundation project so is there a way I can set myself up later to do it or will it be too difficult with the flashing details?
4. This portion of the deck you can see in top left has the joist hangers mounted directly to an exposed rim joist, no ledger board. Do I again, self suspect the deck and flash rim joist and sill plate, then fasten new ledger board?
Lots of extra work, just want to know if I really have to follow Alice down the rabbit hole on this one.
Thanks,
Zach
GBA Detail Library
A collection of one thousand construction details organized by climate and house part


Replies
Hi Zach.
My experience is that putting things like this off, at best, puts them off, but generally, makes them harder and sometimes requires undoing work you have already done. Seems like now is the time to take care of all this, particularly because the rim/sill area is prone to being leaky and vulnerable to water damage.
Seems like the area you already have exposed, of course, and the area with the rigid foam would be pretty straightforward to take care of by just just cutting back the foam enough to get the work done. The deck joists, if you want to keep the deck, will need to be cut back so you can get to the rim for proper flashing and a proper ledger install. That means temporarily supporting the deck.
Can you inspect the rim area from inside? Before you decide not to do this work at this time, perhaps you can at least check out the condition of the sill.
Brian,
Thanks for your input. No I agree and I was going in that direction with what you're saying. I have a crawlspace and can inspect the rim. From what I can see on the outside, seems like the rim is in OK condition. Is there anything specific you're looking for besides pest issues, water/mold, splitting/rot?
Also, side question since I have your ear. I was originally going to go with a roll out WRB but now I'm thinking about the potential of a liquid WRB, specifcally was look at Viscon https://foursevenfive.com/visconn/ it has an adjustable perm rating of 0.33 to 23. Seems like this will save me tons of install time and trouble since I won't be taking my newly installed windows out (see previous photo). My biggest question around this is since I'm adding exterior mineral wool insulation 1.5-2", is the 23 perm rating high enough for potential outward wall drying?
Thanks,
Zach
Hi Zach.
As far as the inspection goes, mostly I'm thinking of the sill plate and making sure there is no rot at this point.
I'm not sure if there is a benefit of a vapor-variable WRB (I don't think you mentioned where the house is located). I think you want a vapor-open WRB. From what I have been told, over 10 perms is great, but at that point gains in drying potential are not so significant.
I do think that a self-adhering or fluid-applied product would be a great choice to handle both the air sealing and WRB in one shot and both could be used to span from the sheathing to the foundation in your situation (unless the gaps are too big for the fluid-applied products can cover).
Brian,
I'm in Eastern Central WA tucked into the Cascade Mtns at 3000' elevation. I believe this puts my climate zone at 5B; usually lots of snow in the winter experiencing average lows between -10oF and 0 with summer highs averaging around 85oF.
The last point you make seems what pushes me towards a fluid applied product as it could be a quicker install but able handle both air seal and WRB in one.
Had this one to deal with as the snow began to fly last October. Ledger right on top of the cedar. Never good. Interior all finished so I had to deal with it all from exterior. Hardfoam sealed to box sills and mud sill replaced and taped. Then Mento 1000 taped over that and sealed to foundation. I did get it air tight in the end with blower door test and imaging.