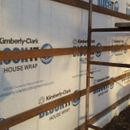
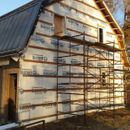
Weathered house wrap
I’m a DIY-er with a moderate amount of construction experience, and a bent for R & D…which is why I’m a big fan of GBA!
I am trying to finish a 28′ x 28′ shop that I built with PV solar in mind, and efficiency and durability as my primary goals. I’ve got 2×6 walls with t-profile strapping for wind shear. On that, I put 2″ of recycled polyiso (foaming the joints and broken corners, etc), and Kimberly-Clark Block-It house wrap, taping all seams. I plan to eventually dense-pack cellulose in the wall cavity. If my research is right, 2″ of polyiso in Zone 4a should be sufficient to avoid any condensation issues in the wall assembly.
Because I knew this could be in the weather a long time before I got the vertical steel siding put on, I used treated 5/4″ x 4″ decking for my perlins. If it matters, I can detail my window/doors assembly, which was inspired by info on GBA, but probably looks like a suspenders-and-belt approach. Again, durability generally trumps cost (especially labor) for this project.
Here is the question: this house wrap has been exposed to Kansas weather for over a year, and even though we got it on pretty tight, I can tell that the coating on the back side is flaking, and when it rains, the wrap is clearly soaking up some water. Am I stupid to go ahead and simply install my siding without replacing this? I was hoping that the 1″ rain screen gap would be insurance, but now I’m afraid it may be insufficient for protecting the wall assembly. Will the fiber-faced polyiso offer any significant resistance to moisture? I’m committed to doing it right, but removing all those perlins will look pretty daunting to my crew (ages 10-16 :-)), of whom only my oldest son and I are comfortable at the top of the gable ends (23′ to the peak).
Thanks for your help,
Arlyn
GBA Detail Library
A collection of one thousand construction details organized by climate and house part


Replies
I think the bigger issue is your horizontal battens. I haven't used that specific house wrap and don't know how textured it is but horizontal battens can create issues unless there is a bit of space between it and the house wrap or the top edge is beveled to allow for drainage.
Some house wraps don't handle standing water very well and soak through fairly quickly. You might want to check if this is the case.
If you are in an area with a lot of blowing rain, this might be more of a problem than the weathered house wrap.
Fixing this means taking the battens off, so might as well put up new house wrap.
P.S. It would be good to check out the install details below around rough openings. You want to get those right otherwise you can end up with rotten window sills down the road.
https://www.dupont.com/content/dam/dupont/products-and-services/construction-materials/building-envelope-systems/documents/K16282-Residential-WRB-Install.pdf
Thanks for the input. I'll reply to Zephyr7's comment about the horizontal battens, but I've attached a sketch of my window assembly. It differs from the DuPont model in that I've affixed it to the frame rather than the window. What I couldn't show well is that I am using ZIP stretch flashing in the corners, shingling appropriately from bottom to top with the Tite Seal flashing. The aluminum flashing layer is also shingled bottom to top. The sides are the same as the bottom, minus the back dam. For the top, I'm using a z-flashing to lap over the j-channel, cutting a slit in the house wrap so that the house wrap laps onto the z-flashing. I'll be foaming between the window and the aluminum trim. Does this look right?
I can’t see enough detail in your pics to really know what condition your house wrap is in. There are basically three things to look for to spot deteriorating housewrap:
1- if it’s torn from flapping around in the wind too much, it should be replaced. If it’s only one or two years, you can probably just tape the tears and be ok. Just be sure to use the right tape so that it stays stuck.
2- if you get a chalky white substance when you scratch it with your fingernails. The chalky substance is broken down poly chains and is caused by UV degradation of the polymer. If you have this issue, you need to replace the housewrap because you can no longer trust it to last.
3- if the housewrap has the “old bedsheet” look too it, a kind of see-through look with exposed threads (the best way I can explain it), this is degredation from abrasion. If it’s just a little spot, try tape. If it’s all over, you need to replace the housewrap.
I agree about the horizontal battens being a problem. Rain screens are supposed to breathe, so you really want vertical air gaps to allow for convection air currents to help with drying. Any water pooling on those horizontal boards up against the housewrap is going to be a problem.
I don’t think Fiber-faced polyiso can act as a WRB in the way that fool-faced polyiso can. The fiber/kraft facing is generally moisture permeable.
Bill
Thanks, Bill, for the reply.
1. There's no tearing from flapping; we have a few tears from mishaps that we'll tape as we go, but it's in decent shape on this count. We used Block-It tape on the seams as we put it up, and it seems to be holding well.
2. There's no serious chalking on the outside, but I don't know what to make of the flaking material on the inside.
3. I don't see any of this, but when it got wet, it looked more translucent, like any cloth-like material.
On the horizontal battens: I wondered about this in the design stage, but couldn't figure out any reasonable way of getting a gap between the foam/wrap and the batten. My vertical siding is the typical ribbed siding (see attachment); does that provide the air movement needed? If that could suffice, it makes me second-guess my plan to put foam closure strips at the bottom of the siding (between the rat-guard and the siding); my idea was to reduce insect pressure on the wrap and foam.
If the air movement through the siding ribs isn't sufficient, what about a 3/4"-deep saw-cut every 16" or so (half-way between the screws fastening the battens to the studs) that could serve as a drain? Or maybe I should run a router over every top edge to get the bevel that Akos mentioned...? I'm still stubbornly trying to find a way to avoid removing all the battens.
Thanks again for your time.
Arlyn
Arlyn,
You don't show where the WRB is in your sketch above. I think it's between the polyiso and the battens, right? Were the seams in the polyiso taped?
You will certainly get air movement and/or drainage between the battens and the ribbed profile of the metal panels. And if they are installed well, there should be very little moisture getting behind the metal panels anyhow. Unless this is a very exposed, wet coastal environment, the horizontal battens will probably be fine. Just make sure to seal all of the penetrations in the panels and lap everything properly. You can also probably find or make open-cell foam or other fabric to fill the ribs at the bottom and top to allow some air and water flow while stopping the bugs.
Peter,
Sorry, I missed the WRB in the sketch; yes, it is between the polyiso and the battens. I did not tape the polyiso. I am foaming all the joints/gaps with Great Stuff Pro, but since that is done from the inside, that won't have the same effect as tape.
The climate is in my favor: central Kansas, 29" avg. annual rainfall. We do get windy rain, but the humidity isn't crazy here. We will definitely seal all penetrations, and lapping on this is going to be straightforward, so you're giving me some hope.
I'll check with my metal supplier to see if he thinks the foam closure strips (which I'm reasonably sure are open-cell) will allow some air/water flow. We'll have very little gap between the rat-guard and the bottom of the panels, so I might be OK without it, if there's a risk of not getting enough flow.
Thanks for your feedback,
Arlyn