Transitioning roof top foam insulation to side walls – Advice needed
I’ve been considering a chainsaw retrofit over-roof with 6in of polyiso foam on the 4:12 roof deck of a 1970s house. One of the details I haven’t been able to settle on a solution for is the transition of the rooftop foam to the side walls.
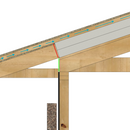
When the rafter tails are cut off (green line in attached image) the void needs to be sheeted and insulated. I could cut a foam plug out of the 3in foam and tediously foam them into each rafter bay and then cover it with a piece of Zip sheathing.
I could skip the foam there and opt for mineral wool in that area with the Zip over the top.
If I am being honest though, neither seems like a homerun choice. In the past when I’ve used a thermal camera on the interior, the top corner of the room glows like it is on fire in the summer.
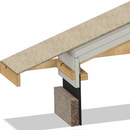
This makes me wonder if I would be better off opting for something like a short piece of 2in polyiso attached over the Zip and carried a couple of inches past the top plate framing and taping/sealing it to the existing exterior gypsum (as depicted in the 2nd image).
As you can tell I haven’t settled on any solution so if you have experience with this type of scenario or see something else I need to correct I welcome the input.
GBA Detail Library
A collection of one thousand construction details organized by climate and house part


Replies
You have 6" of rigid above that area after the retrofit, you won't get a hot spot. Important part is to get air barrier continuity from the wall to the roof deck. Go for the simplest option that gives you the solid air barrier.
You bring up another interesting point I have yet to determine how to properly address... the exterior of the house has 7ft of brick with an 8ft wall height. I can wrap the peel and stick over the roof and slightly down the top of the walls, but I don't plan on removing the existing brick and have yet to figure out how to successfully transition an exterior air barrier (roof/wall top) to an interior air barrier without have essentially one large crack around the whole house.
Given the exterior sheathing is gypsum I thought about removing the uppermost portion of it a couple of inches below the bottom of the top plate and extending the piece of zip that already needs to go over the existing rafter tail ends. That would in theory allow me to use foam board on the interior to caulked/foamed at the foam-> Zip connection to make the transition.
Thoughts?
A piece of 2x4 is a solid air barrier. I would tie into the top plate on the outside and then continue with the air barrier on the inside. Fill any wire holes through the top plate with canned foam.
You can use a bead of acoustic sealant on the back of the the Zip strip to connect to the top plate. Same on the inside.
Be careful not to fill the gap between the sheathing and the brick veneer.. This needs to be open to allow for drying.
Correct me if I am misunderstanding you, but essentially what you are saying is to sandwich a bead of sealant between the exterior added Zip section and the top plate and then utilize the face of the interior of the top plate as the new plane of connection for the an interior air barrier?
Are you thinking along the lines of an Intello-type product to create the interior barrier?
Yes exactly. You can use one of the fancy membranes, 6 mil poly or drywall as your interior air barrier.
I'm converting to an unvented roof assembly now with exterior foam. I entertained doing a full chainsaw retrofit but in the end, we're just adding the foam to the existing roof construction extending out over the eaves. It will be completely unvented. Our rafter blocking is to the exterior of the top plates, and we're filling the rafter bays with dense pack cellulose (installed from the exterior in cathedral areas) which will fully cover the top plate.
I'm air sealing around the blocking in each of the rafter bays, including to the top plate, with Tescon Visconn Fiber, applied by paint brush. It's tedious but easy work. The air barrier on the roof will be the sheathing below the foam which is fully taped plywood. Our walls do not yet have a continuous exterior air barrier or exterior insulation but we can tie that in to this construction pretty easily in the future. We are using 4" of GPS on the exterior so we have about R-20 exterior and R-20 interior which is plenty for our climate zone 4C. The path we're taking was significantly less expensive and easier logistically vs the chainsaw retrofit - something to consider if it would work for your requirements.
Do you know who will be doing the work for you? This was a big hangup for me initially and significantly influenced the methods we ended up using. I found that roofers who do residential work as well as commercial flat roofs (which regularly have exterior foam) are equipped to do the exterior foam portion. Other roofers did not seem capable (or willing) and I wasn't sure how to find someone to do just the foam (or do the eaves reconstruction in the chainsaw case) without involving a GC.
For the brick portion, some of the fluid applied WRBs are rated to coat brick. I think Prosoco and ProClima Visconn. Meaning you could coat the entire exterior of the brick and then transition that over the top and tie into the foundation at the bottom. That's assuming you're OK with painting the brick after.
One of the biggest issues I've run into with adding the foam to the existing roof construction without the chainsaw retrofit is the effect on the size of the fascia. With 2ft overhangs and a boxed soffit the fascia board becomes impractically large to hide the added foam.
I'd personally gladly opt for an alternative over the chainsaw retrofit, but I have yet to find a good solution to bypass that one particular issue.
If you anyone has any suggestion (aside from an open soffit) I am definitely interested.
We have angled eaves. I'm 'only' adding 4" of foam and in that case we'll have a 2x12 fascia, with the existing 2x6 rafters unmodified. I'm putting a 1x6 on the upper half to create a stepped look like below for the rake edge. The eaves will have 5.5" tall gutters which also visually break up the fascia about half way.
https://www.instagram.com/stevenbaczekarchitect/p/CqxsHxcrkHu/?img_index=5
One option to help hide the return for a boxed eave is moving it back to be in the same plane as the wall rather than at the rake edge. That gives you more flexibility on how to style the rake edge. The main picture in this article gives an example:
https://www.builderonline.com/products/building-construction-materials/continuous-insulation-meeting-the-needs-of-todays-builders
Or as shown here in the "simpler boxed rafter tail" image:
https://www.builderonline.com/design/alternatives-to-the-pork-chop-eave-return_o
Another document that may help:
https://cityofpleasantridge.org/wp-content/uploads/2019/05/Eave-Details.pdf
Wow, I really like the concept of the stepped look. It potentially solves the visual issue without creating a ton of additional work or a massive single fascia.