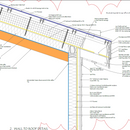
Roof Assembly Review
Curious to get input on the attached roof assembly.
West coast of Vancouver Island. The main focus is a highly durable roof to protect from the elements and also needs to achieve R-50 with no foam, all mineral wool. Hybrid timber frame below carries all loads, all details flushed out with engineer already, and signed off by jurisdiction for BCBC codes. Just after any general thoughts or concerns. Am I going over board with the second layer of plywood and a SBS Modified bitumen layer? I just love a good solid bitumen layer in our heavy rain environment.
Roof Assembly:
-Timber rafters
-Drywall between w Zip strip
-SIGA Majrex Vapour Barrier
-2×6 over framing for lights/electrical
-5.5″ rockwool comfort batt
-1/2″Plywwod
-Vapour permeable, air tight, weather resistant layer (show SIGA Majvest but likely go with Henry VP160, 28 perms, better water resistance)
-8″ of comfortboard 110
-2×4 cross strapping both ways, vented top and bottom.
-1/2″ ply
-Henry BlueSkin High temp roof underlay
-3d mesh
-Standing seam metal roof.
Second ply layer is for SBS blueskin layer and also love a good solid metal roof, we will be adding solar on top and I like not having to worry where to walk.
Am i over thinking it? Cost is an issue but not over a durable roof. This is a generational build that will stay in the family for many many years and I’d prefer to invest now then later.
Curious to hear feedback.
Thanks!
GBA Detail Library
A collection of one thousand construction details organized by climate and house part


Replies
Can you go with purlins for the 2x6? That would let you simplify your life without needing any comfort board. You can also end the purlins at the top of your wall for simple air barrier continuity.
You could then go with 2x10 rafters over the 2x6 and first deck. Insulated these with 2x8 batts and have a vent gap. These rafters can now extend past your walls to form your overhangs. The batts are way cheaper than the semi rigid panels and you don't have to deal with any long screws and semi squishy panels.
The only thermal bridging is where the purlins and rafters cross and it is a very small area of the whole roof. Close enough to continuous insulation without much of the hassle.
From there you can install your final roof deck straight onto the 2x10 rafters, no need for any cross strapping.
Seamed metal roofs are liquid tight, the layer of peel and stick buys you nothing especially at higher slope. I would skip it.
That 3d mesh doesn't do anything there, if anything it might void the warrantee on your metal roofing (most need to be installed onto a solid substrate, not squishy mesh).
P.S. Instead of purlin/rafters, you can also build with two layers of rafters. If you offset them, it will give similar thermal break.
P.S.S. You can skip the warm side vapor barrier if you use a vapor closed peel and stick over the the first deck.
I built a conditioned attic/vented roof using standing seam and polyiso insulation over the sheathing. I used 2x4 on a diagonal over the rigid insulation with long lag screws, but I did not install a second layer of sheathing. Instead, we attached the standing seam roof directly to the 2x4s. Something to consider, also allows the underside of the steel to be exposed to your ventilation channels.