Questions on re-siding entire house
One story 1977 Texas ranch style tract house, 3 sides brick veneer, southern facing rear 4 th side original delaminated T111.
The plan:
T111 – remove deteriorated southern facing T111, remove existing 3.5″ FG batts, spray foam to fill 3.5″ void (interior sheet rock remains). New sheets of OSB overlaid with a rain screen. Primed PT furring strips (ripped from 1/2″ PT plywood) placed over stud locations and tacked on top of rain screen. Then 4X8 sheets of fiber cement panels nail gunned through furring strips & OSB into original studs.
T111 replacement questions: What is a good material for the rain screen? Is 1/2″ furring thick enough? Is priming the furring overkill? With 24″ eave overhangs, should the spray foam be open or closed cell?
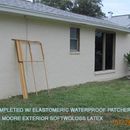
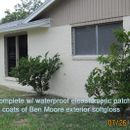
Brick veneer – East facing long wall (60′) has been completely re- patched with water proof, elastomeric patcher made for brick surfaces, primed with Benjamin Moore latex Fresh Start primer and then given 2 coats of Benjamin Moore Softgloss exterior water proof paint. It looks good. (picture attached).
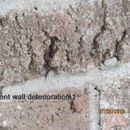
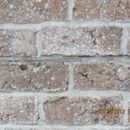
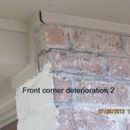
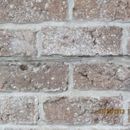
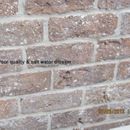
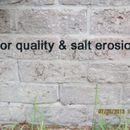
Benjamin Moore, however, discontinued the brick patcher product and I’m now left in the lurch for the front street face wall & the west side wall, with no patcher available. The original brick used was not high quality (to put it mildly) and living roughly 1 mile from the gulf, the original brick surface has serious deterioration problems (pictures attached).
Here’s where the real problems start:
As is the norm, the brick veneer stands 1″ proud of the wood studs via mortar clips. Because we had a hurricane hit 30 years ago we are under the “Texas Windstorm Insurance Agency” (TWIA) rules & regulations, copies of the Miami-Dade Regulations.
With patcher no longer available, I purchased a Bosch tuck point grinder and committed myself to tuck point the remaining 2 brick walls, which I am just about to start. Repairs will be made with mortar. Tuck pointing the mortar cracks will be time consuming but strait forward. That process should restore structural integrity to the wall if all that I have read is accurate.
It is the eroded & pitted surfaces that I am concerned about from an appearance standpoint, however. If I can’t get mortar to adhere reliably where pitting and erosion have occurred then I am wasting my time, money, & effort with priming & painting it only to be worked loose by temperature expansion and possible future settling because we have a sandy soil composition here.
This gets me to thinking about applying the same fiber cement panels over the brick veneer to unify the exterior appearance.
Brick veneer questions – Has anyone used fiber cement panels over brick? What would best practices to do so? Given that both brick & fiber cement are porous, should a rain screen be applied over the brick veneer to prevent moisture penetration through the brick even though it has been occurring in the past?
OR is it better to just stucco over the brick and be done with it?
Would sure like any help I can get on this one.
Ken
GBA Detail Library
A collection of one thousand construction details organized by climate and house part




Replies
On the south side where you're replacing the T111 with OSB, using open-cell foam in the cavities, and adding an inch of foil-faced polyiso on the exterior of the OSB has a long term financial benefit (and a nearer-term comfort benefit).
1x furring through-screwed 24" o.c. to the studs with pancake-head screws and nailing the fiber cement to the furring (rather than long-nailing to the studs) with ring-shank nails would retain more of the thermal performance of the rigid foam.
If adding fiber cement over the brick, adding a housewrap or some other spray-applied weather resistant barrier to the brick and leaving a rainscreen gap keep the bulk moisture penertraion on the exterior. Using a flash inch of closed cell foam over the brick may be the right approach, since that adds an air-tight R6 that isn't so vapor-tight as to trap moisture in the assembly.
Dana,
Thanks for the reply. I was beginning to feel lonely.
As far as adding 1" polyiso over the OSB, I assume you going after knocking down the thermal bridging at the studs correct?
Given that the T 111 is south facing and the run of the wall is a 100 lineal feet and is 8 ' high, how much reduction would that additional 1" of polyiso account for in terms of lower summertime A/C cost (percentage wise is OK)? This year we have been running constantly at 90 degree temps with heat index every day of 105. My A/C unit can't keep up.
I'm just getting ready to have the roof decking internally spray foamed to 6 " deep which will shift the thermal envelope to get the A/C handling inside the soon to be new foam thermal envelope. All I have to do is rip out the sheet rock ceiling & existing 3" FG so they can come in & spray.
Ken
Ken,
The only way that you can determine the effect of improved wall insulation on your energy bills is to model the house with energy modeling software. The answer to your question depends on many factors that you have not shared.
That said, adding additional R-value to the walls of a house in a hot climate can rarely be justified by savings in cooling energy use.
Furring strips do not have to be pressure-treated; after all, rainscreen gaps are well ventilated and protected from rain, so they stay dry. For more information on rainscreen gaps, see All About Rainscreens.
Martin has it right- the effects on cooling energy use will be very marginal at best. Adding wall-R to an already insulated wall does very little for reducing the cooling loads, but would have a significant impact on heating loads. To attack cooling loads there are three primary drivers:
1: Solar reflective index of the roofing (and it's thermal mass in the case of concrete/ceramic tiles) & attic R values.
2: The area of unshaded east & west facing glass
3:air infiltration
3a: Air handlers & ducts in attics above the insulation, driving air infiltration.
The heat gains through 2x4 walls w/ R13 batts is well under 20% of the total cooling load, so even if you cut that in half by doubling the R-value, you've only reduced it by less than 10%. Exterior shades on windows would have a much more dramatic effect. If you have uninsulated & leaky ducts & air in the attic that could account for literally HALF the cooling bill, and 6" of foam at the roof deck foam will likely result in percentage savings well into double digits (even though it's only ~R15-R16 after the thermal bridging of the rafters are factored in.) Between the reduction in air-handler driven infiltration and reducing in the direct gains on the ducts it'll be measurable.
If the pre-existing batt insulation is below the attic floor, it's really OK to just leave it in place- just peel it back at the soffits to ensure they can foam all the way down to the top plates of the studwalls and get a good seal. Having the extra R11or so between the joists at the attic floor will lower the overall cooling & heating loads, and will have zero risk of creating moisture issues in your climate. Fully gutting then replacing the ceiling probably isn't necessary to get the foam on the roof deck, fully sealing the attic (is it?)
Since you're in the process of re-siding, adding R5-R7 in continuous insulation (either sprayed or rigid foam) makes the house more air tight, reducing the latent AC load, and increasing wintertime comfort. An R13 +R5c.i. wall comes in at about R15 whole-wall (after the thermal bridging of the framing is factored in), which is pretty good for a house in climate zone 2, which is most of TX, but merely code-min in climate zone 5. Taking it up to R20 whole-wall isn't always going to have much of a payoff in either comfort or reduced energy use, but going from your ~R10 to ~R15 will be noticeable on heating season comfort & costs, if if it barely registers during the cooling season.
Martin,
Thanks for the reply. I read both your rain screens article & Joe' L's Mind the gap article, both which were very informative.
Based on Mind the gap, I think the approach I'll take on replacing the T111 on the south side is to use open cell foam to replace the FG batts in the wall cavity as originally planed and sheath with moisture resistant OSB. Then apply either 1/2" or 3/4" polyiso sheets over the OSB and tape the seams. If I read it correctly, Joe said that no additional WRB would be required like building paper, etc. but by the end of the article I began to wonder if another smaller gap, like 1/16 or 1/8, should also be installed between the OSB exterior surface and the POLYISO Interior surface. Then attach 3/8" furring strips over the stud locations and nail gun the Hardy CF panels in place through the furring strips & into the studs.
So was a little confused about whether or not to add that interior gap between the exterior face of the OSB and the interior face of the POLYISO.
How does that sound to you?
Dana,
I had the house re-roofed about a year ago and chose Owens Corning Shasta White energy star rated shingles that are reflective. Owens rates them at 25% reflective. In the top 2 pictures above you can see what it looks like to an extent. There are now 8 houses in the neighborhood with "white" roofs. I can recall a real estate agent telling me that a white roof on a house would be a white elephant and never sell. I disagreed with her then and still do today. People are beginning to understand the weather changes that are happening and the effect they have on their pocketbook are the new normal for the foreseeable future.
The current air handling ducts are in the attic and they do have some insulation, but not much IMO.
There are 4 rooms that have cathedral ceilings where the sheet rock & existing FG insulation will be removed and the roof deck sprayed from inside. The insulation contractor that I have had good dealings with in the past, indicates that other houses that have taken the same approach have seen electric bills decrease by 50% or close to it ! The other 3 rooms have flat ceilings but will get the 6" of open cell foam via the very cramped attic area. There was no other choice but to remove the sheet rock on the cathedral ceiling rooms.
The houses in this neighborhood were cheaply built with an eye towards making them affordable for the lower middle class, while maximizing profit for the builders in an unfortunate clash of priorities.
My problem is, I was taught to do it right, not fast or to cut corners in order to fill my pockets with OPM.
I guess that makes me old fashioned, but it's OK because I sleep well at night and have no regrets about it. Whoever the next owner is, will get a house where getting it right was the priority & not money.
Ken,
The way I read Lstiburek's advice, you are OK as long as you have a rainscreen gap between your siding and the rigid foam (which you do) and as long as the insulation between your studs is vapor-permeable (which, if you choose open-cell spray foam, it is). So an additional gap between the OSB and the rigid foam is not necessary.
Ken, your insulation contractor may be exaggerating some but basically he has it right. 3" of fiber ceiling insulation and air ducts above it - that's your cooling problem right there. Make sure the ducts are properly sealed too while you're at it and have the ceiling open. I see no foundation vents in the photograph so I assume you're on slab, if this is not the case sealing the crawl space would normally also be in order. WRT the brick: encasing masonry with siding seems an unnecessary complication of your wall system with potentially troublesome detailing issues at window openings etc. I see what appears to be salt on the surface of the brick and some minor settlement cracks but very little in the way of structural deterioration of the brick itself, maybe some minor pitting. The irregular deeper cavities would be original, from sloppy manufacture or may even have been considered a feature. Stucco might make the settlement cracks slightly more conspicuous if the foundation continues to move, though those cracks do seem pretty minor and applying over a s/s stucco mesh should fix that and the adhesion problem. I'd do that, or keep looking for a substitute elastomeric patch material and then finish it as you have the east wall.
James,
You are correct this is a slab on sandy soil about a mile from the gulf.
In the 3 rooms with a flat ceiling plus one (MBR with cathedral), the ducts do run wild in the attic above the thermal envelope Those attic spaces will be opened at the gable ends and the very skinny insulation crew will be spraying the bare underside of the roof deck to finally enclose all the air handling equipment AND all the air leaks. The roof decking will become the thermal envelope above ALL rooms.
In the cathedral ceiling in the (LR) they actually dropped the ceiling by 30" on the front side and ran the 6" duct through that humongous void with water lines and electric. Yes, Jack built this house, and jack didn't know "......." add your favorite cuss word there.
The ducts, water lines, & electric will be moved to a truncated ceiling underneath the peak of the newly insulated cathedral roof deck next to the ridge beam which is not enclosed now but will be to handle those lines. I loose next to nothing on a 13' ridge and gain 30" of headroom room on the front side of the LR. A good trade if I've ever seen one.
I stopped into another paint store this very day and discovered they handled the product from a company named Richards who made the elastomeric patcher for Benjamin Moore. I worked out a price break with them and ordered a single gallon to satisfy myself that it will apply like what I was getting from Moore. If that works out OK, I'll order 4 or 5 cases at a time to keep the product coming fresh.
Unfortunately, Mom nature needs to give us a cooling break to get going because we have been steadily above the 85 degree & humidity specs for the product.
In the mean time, I'm contacting slab foundation contractors to see about stabilizing the slab not only for the exterior but for repair of the cracked interior sheet to.
Thanks for the reply!