Picture Frame In Exterior Insulation – Flush with Insulation or Furring Strips
I’m trying to decide what style of Picture Frame to use on an upcoming external insulation project.
This will have vertical furring to hold the 2 layers of GPS foam in place. The Air Control layer will be at the sheathing under the foam. The Water Control will be the outer layer of foam (seams taped etc.)
I found several approaches.
-
Rip a 2×4 for the overall thickness of the insulation and fasten directly to the framing. The strongest approach but no thermal break.
-
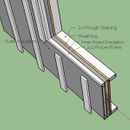
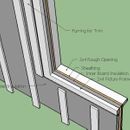
If 2 layers of insulation, rip a 2x the same thickness of the outer layer insulation and cut the outer layer opening 1-½” wider than the RO to accommodate the Picture Frame so the inner layer of insulation becomes a thermal break. The 1x face of the Picture Frame is flush with the outer insulation layer making flashing much simpler – only one 90 edge.
-
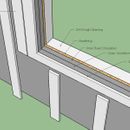
Use a 1×4 flat against the outer layer of insulation. Least strong but OK for smaller windows. Maximum thermal break. Window mounting is in the same plane as the furring strips. This is different from the other options.
So, should the Picture Frame be flush with the top layer of insulation so the flashing is simplified or should it be in-plane with the furring strips so the exterior trim details are the same as if installing a window in a sheathed wall? I didn’t find a discussion addressing this topic.
What is going to make the window trimming easiest or does it matter? If vinyl siding was to be used and the window had a J-channel, the window would have to mount in the same plane as the siding, correct?
For the 2 options with the Picture Frame inset into the outer layer, a 3/4″ furring could be added to make the Picture Frame in-plane with the other furring. This could possibly be applied after the window was flashed?
Attached are sketches showing:
2×4 Picture Frame flush with top of outer insulation
1×4 Picture Frame on top of outer insulation
Thanks for having a look.
Tim
GBA Detail Library
A collection of one thousand construction details organized by climate and house part


Replies
Have you looked into ThermalBuck? It’s an insulating window buck. I believe it’s designed for flanged windows, but according to the manufacturer can be used with flangeless (with the help of metal strapping).
Adam
I have. I'm pursuing Picture Frame approach to preserve the original RO size - so a standard size window could be used. Saves ~ $500 per window at one place I checked. With 6 bedroom windows to replace, it adds up. Still evaluating.
Tim,
From a trim and siding perspective it doesn't matter much - except, as you said if you go with integral J trim for the vinyl siding. I would continue your drawing up to show the head, and include the flashing there so you know how it integrates with the WRB and trim.
With all three options you need to modify the detail at the sill to take the weight of the window. That's either solid lumber back to the sheathing, or spaced blocks between the sheathing and the outer picture frame.
Based on what I’ve seen from similar projects, the key really depends on your priorities for ease of future window trimming and the amount of thermal break you need. I personally think making the Picture Frame flush with the outer insulation could simplify the flashing and trim work in the long run. It’s also similar to how I handled some recent home upgrades—I was trying to figure out the best way to display photos around the house.