Old house insulation
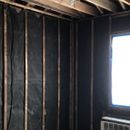
My husband and I are in the process of renovating our bungalow built in 1955. All the plaster has been removed from the walls, and there was no insulation. We see from the interior that there’s wood sheathing covered with slightly damaged tar paper, and 1” vertical wood straps at every 16”. We want to improve the house’s air tightness and to add insulation, but we can’t loose too much internal space. Removing the bricks and adding exterior insulation is not an option. We are planning to have all windows replaced.
We have watched the following video from Matt Risinger and we are wondering if a similar approach should be followed for house, and if so, to what extent. Link to the video: https://youtu.be/jhoQ_f9ZnzQ
We are in a colder climate (Quebec, Canada); The exterior of the house is brick.
My questions are:
2) Should we replace the old tar paper? If so, what material should we use?
3) What would be insulation strategy to maximize R-value without loosing too much interior space? We were considering closed cell spray foam or rigid foam boards to provide air and thermal barriers, and loosing 3-4” of space, depending if we keep the original wood straps for the air gap or if we remove then.
Thank you!
Cibele
GBA Detail Library
A collection of one thousand construction details organized by climate and house part





Replies
The house Matt Risinger is doing is in Texas which is a cooling-dominant climate. His big concern is condensation in the wall when the air conditioning is running. The heat flow is from out to in and it's going to drive the vapor in that direction. In Quebec your dominant heat flow is from in to out so as long as you have a vapor barrier on the inside you don't have to worry about condensation.
You don't say where you are in Quebec but most of Quebec is climate zone 6. You probably need about R24 in your walls, which would be four inches of polyiso. I would do a one-inch layer between the furring strips and a 3-inch continuous layer. In many places you can buy used sheets of 3" insulation very reasonably. Tape the inside layer and you have your air and vapor barrier. Attach a layer of drywall with 4" drywall screws to the vertical furring strips.
Thanks for your reply.
Yes, I’m in climate zone 6 (Montreal).
I’m going to look for places where I could buy used polyiso sheets.
I had not thought of attaching drywall to the existing furring strips.
I was thinking of removing them to install a continuous layer of insulation towards the exterior and I would add furring strips over the insulation sheets, to make room for electrical installation. I’m going to assess both approaches now.
Thanks!
Are you sure that tar paper has wood sheathing on the other side, or is it just between the studs and the back of your outermost brick veneer?
I wouldn’t use spray foam here. It’s really not an ideal product in terms of price/performance in a wall. A cut and cobble installation, putting rigid foam between the studs, is also not a good option: it’s a LOT of labor for little gain in whole-wall R value due to thermal bridging of the studs, just like in the case of spray foam.
Bill
Hi Bill, thanks for replying.
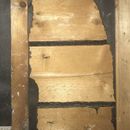
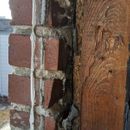
I’ve lifted a piece of the tar paper where it was damaged, there are long wood boards, each one being 6” wide. I stuck a ruler in a gap between the wood boards, and it measures about 3 “ in depth. My neighbour had recently repaired some bricks in his house, that looks like mine, and he told me that there’s a gap between the bricks and the wood.
If we go with spray foam, we were planning to frame the studs 1” or 1.5” off the wall, so when the closed cell foam is sprayed, it would form a continuous insulation layer behind the studs. If we choose to go with rigid foam boards, we were going to attach it to the siding, and then add furring strips over the boards, so the most exterior layer of insulation is continuous. Would that work? How would you insulate a house like mine?
I’m also not clear is if an air gap between the siding and the insulation is necessary to prevent my house of rotting if ever the siding gets wet. Any contractor I spoke with so far, has been surprised with my question, and some say I wouldn’t live long enough to see a damaged siding.
I want to improve our house air tightness and insulation, but not to the point of causing worse problems.
Thanks!
I'm struggling to see where the structural strength of the wall is. There are two basic approaches, either the brick wall is itself the structure, or there is a wooden frame and the brick is a cladding over it. Can you see where the joists for the floor and ceiling rest? If the brick wall is the structure they will go into pockets in the brick wall. If there is a wooden frame that will hold up the joists.
If the brick wall is structural everything else can come out without harm.
Yours seem to have an unusual wall.
It is hard to tell from the photos. Is the wood we can see furring strips on top of tar paper?
I would be tempted to cut out a spot in the tar paper make a hole in the sheeting and see what is in the cavity. Is the sheeting plywood or boards?
Understand insulating old walls is risky. The old windows and door may not be flashed to today's standards and have lots of small leaks. You will not notice because without insulation to soak up water and lots of gaps allowing lots of air to flow thru the water dries to before anything rots. If you stop the air flow your 70 year old wall could rot away quickly.
This video of Joe Lstiburek is great and explains the problem better than I.
https://www.youtube.com/watch?v=IaozbiujnWM&list=WL&index=6&t=8s
Walta
Hi Walta,
Yes, the wood furring strips are over the tar paper.
Behind the tar paper there are long wood boards, installed horizontally, that look exactly like the ones we see in Matt Risinger’s video.
We are planning to replace windows and doors.
Thanks for the video you shared, very interesting and informative.
What would you do reduce air leakage and add thermal insulation, without risking compromising the house’s longevity?
Thank you!
First you need to understand that brick and stone are not waterproof. If the front of the brick/ stone gets wet before long the back will be wet.
Assuming your brick and stone is not structural I would expect to see the masonry then a one inch gap then a water barrier then the sheathing then a 2x4 wall then drywall.
Your wall is very strange from what we can see. I do not know if your wall has two sets of sheathing and water barriers or just layer of sheathing and water barrier in the wrong place.
I can't offer any advice until we understand how your wall was built. I will say it would be very bad idea to allow any new insulation to come in contact with the back of masonry.
Walta
As Walter said, it’s very important that you have an air gap behind the brick so that things can dry. If you have stuff in direct contact with the brick you risk rotting the wood structure, and also damaging the brick in freeze/thaw cycles.
It sounds like you can create a gap between the wood sheathing and the studs? That sounds odd, usually you can’t do that from the inside of the structure, at least not without a LOT of work. You need to determine what is carrying the load — what is structural in that wall — before you cut any studs. Remember that sheathing can be part of the structure too providing racking resistance.
Can you get us some more pictures? Maybe make a “plan view” (overhead) drawing of how the layers of the wall are assembled?
Bill
I'm a little puzzled with what I see. I live in a 1950's bungalow in Ontario.
I would expect a house like yours to be a brick veneer (1 brick thick) with probably 2x4 wall construction.
But you're saying there are wooden boards for cladding with a 1" furring strip on the inside. Are the boards attached to the bricks? Is it a full brick wall (not just a one layer thick veneer).
“Behind the tar paper there are long wood boards, installed horizontally, that look exactly like the ones we see in Matt Risinger’s video.”
To my eye your wall is nothing like the walls in Matt’s video. You have many of the same layers but they are installed in a very different order. It look to me like your sheathing is install on the indoor side of the studs with a tar paper water barrier inside of the sheathing totally backward from the way most walls today are built. It is possible your walls are sheathed on both the inside and outside with another water barrier on the outside we cannot see, that would be a very expensive and wasteful way to have built a wall and seem likely.
The only way to know is to remove a board so you can see what is really inside the wall.
Walta
The climate is also nothing like in the video.
Yes, I understand that my climate is very different.
>"1) Do we need to keep an air gap between the sheathing and the interior insulation to allow the wood to dry properly if it ever gets wet?"
No. The critical air gap is on the EXTERIOR of the sheathing, between the sheathing & brick.
In Risinger's video there is no sheathing, no exterior brick. Since the siding is exposed directly to the weather (unlike your sheathing), it needed the interior-side vent space to provide drying.
>"2) Should we replace the old tar paper? If so, what material should we use?"
Strip the old tar paper- it's not providing much function, and it's obscuring the view of the sheathing. A suspended tarpaper between the sheathing and interior side finish wall adds a couple of air-films good for an additional R1 of performance, but the overall stackup is still only good for about R5 "whole-wall" after factoring in R-value of the brick, exterior & interior air films, sheathing, and interior finish wall.
If it's plank sheathing in pretty good shape, with at least 3/8" (10mm) between the sheathing and brick it should be relatively safe to insulate the 2x4 bays with a full fill of open cell spray polyurethane foam. That yields about R13 at center cavity, or about R10 "whole-wall" after installing the gyprock. Code inspectors will want to see a layer of polyethylene sheeting behind the gyprock, but that can be a summertime moisture disaster inside a brick veneer wall if the house is air conditioned. It's safer to use 2-mil nylon (Certainteed MemBrain) instead, which meets the NBC definition of vapour barrier when it's cold outside, but opens up the moisture content is high enough to support mold growth.
https://www.certainteed.com/resources/30-26-074_MemBrainSpecSheet_English-CA_July_2019.pdf
Dana I find your normally clear advice confusing this time. When I look at the photos I see the plank sheathing install on the indoor face of the 2x4 stud wall covered with tar paper and furring strips on top, do you agree?
Do you have any reason to believe there is something in the wall cavity to separate the new insulation from the masonry?
Walta
To both Walter and Dana --
OP says there are no 2x4's, just 1x furring strips on the inside of the sheathing. If that's the case I'm really struggling to understand how this wall is built.
>"When I look at the photos I see the plank sheathing install on the indoor face of the 2x4 stud wall covered with tar paper and furring strips on top, do you agree?"
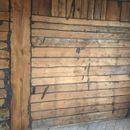
I see tarpaper tacked to the exterior sheathing in (apparently new?) image #3. I had previously assumed it to be tacked to furring creating a gap between the plank & tarpaper.
If there is no structural studs, the brick is probably structural, but maybe not. Cibele wrote:
>"My wall structure, from the outside to the inside, is: brick, air gap, 4x8 planks stacked horizontally, the tar paper on the interior we see in the picture, the 1” furring strips, and finally, the plaster that used to cover the wall."
----------
>"You wrote 1x8”. There are 4x8”."
So the air gap between the between the brick and planks is 3", but the "planks" are really stacked FOUR inch by 8 inch BEAMS? Stacked beams are likely to be structural.
There needs to be a bit more investigation on how this house is put together before an insulation plan can be devised.
Is it a single wythe of brick?
Is there any tarpaper on the exterior side of the 4x8s?
Is the cavity between the brick & 4x8s vented at the top, with weeps or vent holes to the exterior near the bottom?
Hi Dana,
“I see tarpaper tacked to the exterior sheathing in (apparently new?) image #3.”
- No, they’re in the inside, as you had originally understood. I was standing on my living room as I took this closer picture of the tar paper (image #3).
“Is it a single wythe of brick?” - I haven’t removed bricks yet to check it myself, but I was told by a contractor that there’s only one layer of brick.
“Is there any tarpaper on the exterior side of the 4x8s?” - I haven’t seen it myself, but apparently yes, there’s.
“Is the cavity between the brick & 4x8s vented at the top, with weeps or vent holes to the exterior near the bottom?” - they used to be. The previous home owner patched the venting and weeping holes on the top and bottom of brick walls. I’m planning to remove these patches so it’s properly vented/drained.
I’m planning to remove the tar paper and furring strips in the interior and have 1” of closed cell spray foam, then frame a 2x4 in front of it, and then add batt insulation (rockwool) into the cavities.
Do you think this is a good approach?
Thank you,
Cibele
>"I’m planning to remove the tar paper and furring strips in the interior and have 1” of closed cell spray foam, then frame a 2x4 in front of it, and then add batt insulation (rockwool) into the cavities.
Do you think this is a good approach?"
No- not a good approach.
An inch of closed cell foam is close to meeting the NBC's definition of "vapour barrier", which will restrict the drying capacity of the 4x8s toward the interior, and it does not have sufficient R value to keep the rock wool dry over a Quebec winter.
Installing a 2x4 studwall 2" away from the 4x8s and installing 5.5" of OPEN CELL foam would provide better air tightness, delivers a comparable or better thermal break on the framing and uses only ~35-40% more polymer than an inch of closed cell foam, and uses water instead of HFC245fa (a powerful greenhouse gas with a warming potential of roughly 1000x CO2e @ 100 years) as the blowing agent.
Open cell foam on it's own is too vapor open to protect the 4x8s. Rather than using 6-mil polyethylene on the interior, a layer of 2 mil nylon (Certainteed MemBrain) allows the assembly to dry toward the interior when it needs to (when the moisture in the foam & studs & foam might otherwise rise high enough to have a mold problem), but behaves as a vapor barrier when dry, restricting the rate at which moisture moves from the indoor air to the 4x8s when the wood is cold.
https://www.certainteed.com/resources/30-26-074_MemBrainSpecSheet_English-CA_July_2019.pdf
A 3" cavity with weeps & vents would be fairly protective of the wood from exterior moisture. WITHOUT weeps & vents the humidity in the cavity remains high, and soars to extreme levels when the sun warms the brick, driving moisture out of the brick into the cavity
Hi Dana,
Thanks for your reply.
Based on your first response, I understood that leaving gap/permeability for drying to the inside wasn’t necessary.
I see your point of a thicker open cell foam instead of the closed cell, however this wouldn’t be possible in my case, given the limited interior space. I can add a maximum of 5” overall to the thickness of my walls towards the interior, although I’d rather have it a thinner as possible.
I’m now considering to have a 2x3 framed 1” away the wall, and spray 3” of closed cell. So I have a higher R-value overall to handle Quebec winter.
Makes sense?
Thanks!
This quote from the OP leads me to believe there is a 2x4 stud wall behind the sheathing.
I’ve lifted a piece of the tar paper where it was damaged, there are long wood boards, each one being 6” wide. I stuck a ruler in a gap between the wood boards, and it measures about 3 “ in depth.
Walta
Hi all,
Thanks for all the questions and comments.
I did gathered more information today and I took a picture of the sheathing, after having removed a strip of the tar paper, and attached it to my original post.
My wall structure, from the outside to the inside, is: brick, air gap, 4x8 planks stacked horizontally, the tar paper on the interior we see in the picture, the 1” furring strips, and finally, the plaster that used to cover the wall.
The floor joists are resting on the concrete foundation walls. The ceiling joists are resting on a wood structure, that is topping the horizontal wood planks visible in the picture. So the brick is not structural.
It's obvious that the rafters are sitting on something behind the 1x8s. Either on the brick or a 2x4" or 2x3" framed wall. Cibele, you will have to run a blade diagonally following the planks until you hit something. It should hit a stud every 16" horizontally. That's your real framing as a stacked wall of 1x8"s and furring strips would not hold up a roof unless the rafters are sitting on a supportive brick wall. My thoughts from the photos. PK
Hi PK,
You wrote 1x8”. There are 4x8”. I was told they are supported by columns every few feet. I guess I’ll only know for sure, if I remove all the furring strips and the tar paper.
So there is a 4x8 header supporting the ceiling, and the 4x8 is supported by columns spaced periodically along the wall? That would be a reasonable structure.
If you have stacked 4x8s from the foundation all the way to the ceiling, you essentially have a solid wood wall. There is no reason the wall couldn’t be built that way, but it’s a very inefficient use of wood.
Bill
I guess that’s how they built 70 years ago. I’ll share more details as I find out.
Regarding my question about how to best insulate this wall, I’m understanding from all the comments that an interior air gap, just behind my insulation isn’t necessary. I’m also understanding that the tar paper isn’t doing anything and I’m better off removing it, along with the furring strips that are holding it to the wall.
Therefore, once they’re removed, I could insulate my walls with one of the following options:
1) installing contiguous foam boards and taping the seams.
2) framing a 2x4” in front of the existing wall and spray foam it or even a combination of spray foam and batt insulation.
Is my understanding correct?
Thanks!
Cibele,
Why focus on the exterior walls?
My partner and I renovated a 1950s brick veneer house several years back in Illinois (also Climate Zone 6). Our old crawlspace and attic were the biggest problems -- NOT the exterior walls.
I did infrared image scanning to find air leaks and poorly insulated areas, and if I can find those pics I'll attach a few, but here's what I remember:
1) chimney gaps - major air leaking "funnel" that I sealed up with sheet metal & caulk
2) condensing rafters - from humid air leaking into attic. In winter, the rafters sparkled from frozen crystals ... it was pretty to look at, and pretty destructive to everything in the attic
3) attic hatch - might as well have been a "hole" to the cold attic. I weatherstripped the hatch and built an insulated box over the attic step ladder
4) condensing ceiling corners - we had a hip style roof and the batt insulation & air sealing was hard to do in corners. In winter, the 4 cardinal corners of the ceiling would condense water -- literally dripping from the ceiling. You have a gable roof so hopefully this won't be an issue.
5) vented crawlspace - the vents to the crawlspace might as well have been OPEN windows all year round, and made our hardwood floors very cold in winter. Do you have a basement instead of crawlspace? Even basement windows deteriorate over time and start to leak. (I'm replacing basement windows in our current 1930s house ...)
6) non-sealed, non-insulated ducts - this one was pretty bad: a previous owner had literally cut open HOLES in the ducts! I assume their holes were to heat the cold floors because of the vented crawlspace?? Had to patch up and insulate all ducts, but even without that problem most ductwork of this vintage is in an unconditioned space so its spending more time heating the outside than heating your house :)
So the above list was mostly attic, and crawlspace. I really don't recall doing much to the exterior walls, and if you poke around this site and other sources, there's a common theme: prioritize fixes in order: A, B, then C.
A - Attic 1st
B - Basement / crawlspace 2nd
C - everything else, like exterior walls
So are attic and basement/crawlspace already done?
Justin
Cibele, if I'm reading you correctly this is really more like a log cabin than a framed house. In the picture it looks like there is tar or something between the beams, probably an attempt at air sealing.
I think you are correct in your assessment.
Hi Justin,
Thanks for sharing your experience. We also did this assessment and we are tackling as much as we can: we just removed the old chimney, we will replace windows, and we will seal joists, walls and ceiling, and then insulate all: basement, main floor and attic.
Cibele,
Ah, OK. Sounds like you're doing a full reno. Good time to do it with all the virus stuff keeping us all home :)
I was thinking about this a few days ago as I have some similar plans myself.
I’d recommend AVOIDING any high-risk work right now that isn’t an emergency. Don’t do roof work right now or other work that has a high chance of getting you hurt. Best to postpone any risky work right now due to the potential for the healthcare facilities to become overloaded.
You don’t want to need medical care right now, and you don’t want to displace someone else that might, either.
Bill
That’s a very good point. I’m glad that the chimney has already being removed. Everything else should be low risk, but I’ll keep that in mind. Thanks!
I've been avoiding any work that creates dust. Inhaling dust weakens the lungs and increases susceptibility to infection. Dust masks are almost impossible to buy right now.