Insulating Rim Joist Bays With Brick Veneer Gap
I have a ’72 wood sided/brick veneer house with 2 stories + walkout basement in southeast VA (4A). The first floor is well above grade in most locations. 3ft at the minimum. A section of the house is over a crawlspace but the joist bays do not have this direct path to the veneer air gap, there’s a typical mudsill to rim joist intersection.
Looking to seal air gaps and up my R values as best I can without destroying my house in the process.
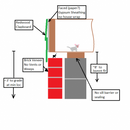
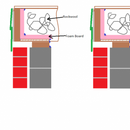
I’ve managed to find a few examples and similar posts to my particular issue, however, I want to be 100% before attempting this on my own house. I’ve made up a few sketches showing my situation and my proposed resolution. Would it be better to just cover the gap with wood, seal, fill the cavity with rockwool, and then add my foam board above the stud wall rather than foam boarding the bottom of joist bay and rim joist? Idea being it may allow some amount of inward drying into the joist/subfloor assembly?
Do I need to drill vent holes and weeps into my brick?
Do I need to try to slide metal flashing under my sill plate between anchors?
Thanks for the help!
GBA Detail Library
A collection of one thousand construction details organized by climate and house part


Replies
I love your details with the mouse and bug included… I have to borrow your idea! Kidding-aside, I like your approach, and yes, since brick is porous material and a moisture reservoir, having vent and weep holes is always a good idea, and code. The metal flashing wouldn’t hurt either.
Thanks! I was trying to be as realistic as possible. I should have also included a snake, though.
I'm worried I will in some ways be limiting the drying capacity of the wall system and sill being that the brick veneer probably loads it with more moisture than a typical sided house would be exposed to. I do have a basement interior perimeter drain installed in the slab with a wall liner thing to deflect water down into the drain. Not sure if having that plus the height of my block wall above grade, plus the brick taking the brunt, would in some ways limit the amount of moisture making it to the sill from capillary effect at least.
You don't need to use metal for a capillary break, and in some ways metal isn't even ideal here (since it can corrode). Typical aluminum flashing is probably especially prone to corrosion issues. I like to use thin (1/32") HDPE (high density polyethylene) sheet as a retrofit capillary break. The reasons I like HDPE is that it's very tough and durable, it's very cheap, and it's fairly stiff and slippery which makes it easy (ish) to slide into small gaps. I prefer to use black HDPE for UV resistance. You can get this material from plastics supply houses.
If you have a critter problem (I also love your mouse and bug details!), I would include hardware cloth when you cover that cap. Hardware cloth is like heavy duty window screen, and it makes a good chew-proof critter barrier. 1/2" mesh is usually enough to keep out things like mice. If you have a problem with small snakes, 1/4" might be better, but if you'll also have a layer of wood I think you'll be OK with 1/2" since snakes don't chew things -- snakes don't have teeth!
Once you've put in that critter barrier and capillary break, you want to use your last detail with the full layer of rigid foam for best insulation. If you are careful with your exterior, you'll have drying to the exterior for the sill plate.
I see you show the rigid foam in pink, so I think you're thinking of Owens Corning's Foamular XPS product. My preference for this area is polyiso on the walls, and EPS on the rim joist. The reason I prefer EPS on the rim joist is that it's a little more vapor open than XPS, so it's a little safer in retrofit applications where you're worried you might have a bit more moisture than you'd like. I used 2" EPS panels when I insulated the rim joist in my own home for this reason.
Bill
Thanks for the reply! Do you typically need to Jack a joist or two at a time to get pressure off of the sill and just work your way around?
I use a pair of sistered 2x6s as a sort of mobile header, and a pair of bottle jacks to lift it up. I use a header about 6 feet long. The goal is to lift enough joists to slide in 4 foot long strips of HDPE. The reason for 4 foot strips is that the standard sheets are 4 x 8 feet, so I have the plastics supply house cut me strips 4 feet long and whatever width the top of the block wall is plus about half an inch. I form the half inch at a right angle with a strip heater (I have one of these, but many plastics suppliers can also do light fabrication like this for you).
What I do is put the header up, then jack it up to open up a gap of about 1/8 to 3/16" or so between the sill and the top of the masonry wall. I think slid in a strip of HDPE until the lip is against the inside of the block wall. In this way I know immediately when the strip is all the way in -- this is important since it's often difficult to work in these areas, so anything you can do ahead of time to make the job easier is worth it. I then lower the header, move it over leaving maybe a foot of overlap with where I started, then jack it up to open a gap again. I insert another strip of HDPE overlapping the first by an inch or two. I then lower the header and keep on going in the same process until I get to the far end of the wall.
It's tedious work, but not that hard.
Bill