Insulated Slab w/ Brick and Block Stem Wall
Hey guys. I really need some help and advice on this.
2000 sqft new construction in southeastern NC (CZ3a).
Raised slab foundation. Stem walls backfilled and slab insulated as discussed here…
https://www.greenbuildingadvisor.com/question/new-build-raised-slab
I want the front face of the stem wall to be brick. Locally, stem walls are almost always CMUs and not poured. Doing the CMU stem walls with brick is not uncommon here and several local builders refer to it as “brick and block.” Here’s a good explanation of “brick and block” by a NC builder not very far from my area…
https://www.finehomebuilding.com/1998/05/01/brick-faced-foundations
What I need help figuring out is how to incorporate the insulated slab (discussed in the link above) into a “brick and block” stem wall design? Can anyone point me to a detail on how this could be done?
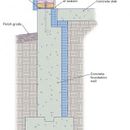
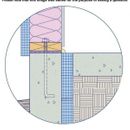
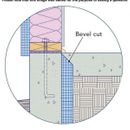
Would the bottom plate still sit over the edge of the insulation or should the full width of the bottom plate rest on the brick/block stem wall with the insulation completely inside the interior (see attached images)?
If completely inside the interior is the bevel cut a good idea or no? Is it even necessary if LVP flooring is being installed (floated)?
Perhaps I’m overthinking this and there is an obvious and easy answer. Any advice would be much appreciated.
GBA Detail Library
A collection of one thousand construction details organized by climate and house part


Replies
Jason,
You are facing the same questions whether you include a brick veneer or not. The only thing that changes is the width of your stem-wall.
The more of the interior insulation you can cover with the bottom plate the better. What determines how much you can overhang is your local code. Ours allows a 1/3 cantilever.
Depending on how much you are allowed, you will have to compensate by tapering the slab edge to cover the rest. Remember, you have some leeway as the drywall and baseboard trim protrude beyond the plate.
Malcolm,
Thank you for the reply. My understanding is that in doing this the brick would not be just a “veneer” or “façade” but would actually be structural and would take the bearing of the exterior wall. Correct?
As I mentioned, locally, stem walls are almost always built with CMU and not poured. The top course usually gets what is referred to as a shoe block, which creates the ledge or “shelf” like the one in the first attached image.
There is what I think may be a misunderstanding by some local builders and contractors that this ledge or shelf creates a bearing for the slab but if I understand correctly this is not the case. The slab only bears on the compacted soil and SHOULD be independent of the stem wall, correct? In a foundation such as this, the slab is not structural, correct?
Again, thank you for your input. It is very much appreciated.
Jason,
My mistake - I should have looked at the link you provided - I assumed the brick extended up as cladding for the walls above. My rely was of next to no use.
I see the problem now. Any combination of brick and CMU is going to far too wide to be hidden by the framing above, and full width bricks mean there is not enough space to include a ledge made from even narrow CMUs.
Probably the easiest solution is to forgo using regular bricks and instead apply thin veneer bricks to the outside of the CMUs. That would allow you to use any of the variations on the typical slab/wall detail you posted.
And yes, there should be a gap between the slab and the ledge below to deal with the differential settlement between the slab and foundation walls. If I were building the first detail you posted I would make the ledge several inches deeper than was necessary to hold the rigid insulation.
Malcolm,
Yes, exactly. Thank you. My brain feels somewhat vindicated. I couldn't think of how to say it, but you covered the issue well.
The composite stemwall (combo of brick and CMU) will be too thick to be covered by the 5.5" wide bottom plate...too thick to even place the insulation completely inside but flush with the stud wall. Was hoping that you or another member might have some insight into how this composite wall could be used (since it's the norm around here) while still incorporating the slab insulation.
I had thought about the thin brick veneer as an option. There are 1/2" thick options that would run almost flush with the exterior sheathing and would still not be proud of of the siding. I believe the brick veneer is more expensive than the same full size bricks, so there's probably some additional cost involved, but not sure how much more vs building the composite wall. Also, there's a wrap around porch on two sides that would complicate using thin brick on the other two sides since full brick will be used around the top edge of the concrete porch slab. Not sure how the intersection would work, and that's assuming I can get full and thin of the same brick, which I imagine I can.
On a slightly different note, it seems that most builders here, when building a raised slab with a stemwall, not only do not leave a gap between the slab and the ledge, but also tie the slab into the stem wall with rebar when the slab is poured. It's almost like they're trying to turn it into a monolithic, and I don't understand why, other than... "that's the way it's done."
Dennis,
I think tying the walls to the slab is an either/or thing. They need to be structurally well connected, or left to move independently. The worst case is the middle ground where they sit on the ledge unattached. That's what makes them susceptible to cracking.
Malcolm,
Thank you for the explanation on attaching the slab to the stem walls vs not attaching. That makes more sense now.
Would a possible solution be to fur out the 2x6 wall to the inside with rigid foam and strapping, ala Bonfiglioli, making the wall 7.25"? Using a standard brick with a 3/8" mortar joint and 4" nominal CMU would make the stem wall roughly 7.625"...only 3/8" thicker than the 7.25" wall. Add drywall and base to this and a portion of the slab insulation is covered. The insulation is completely inside the interior though, but only by 3/8". Also, there's no ledge or shelf at all (see second attached pic in the initial post). I did a quick drawing to show the detail of what I'm talking about.
This would require a lot more effort to frame a Bonfiglioli wall, but would have the added benefit of additional wall R value as well. Maybe a not-so-great idea, but I'm just curious as to your thoughts. If it's a dumb idea or just doesn't work for some reason feel free to let me know. :)
Thank you again for the input.
Jason,
That would work fine. However I'm not sure I would let the difficulties of separating the slab from the stem walls drive the composition of all my exterior walls. Decide how you want to build your walls, and keep the slab edge problem separate.
Is the slab going to be your finished floor?
Malcolm,
Flooring will be Shaw LVP. Floated over slab.
I understand your point about not letting it determine the composition of the exterior walls. I certainly wouldn’t do anything other than standard 2x6 walls otherwise but I really wanted to find a good solution to use slab edge insulation.
Honestly, at this point, I’m considering how important the slab insulation really truly is. It lowers the block load Manual J heat loss by about 6kBTUs/hr. That’s obviously significant, but how much is it really worth to me? It’s certainly not worth changing a major exterior aesthetic to make it happen.
Either way, I like thinking through it and I really appreciate the input.
Jason,
If you aren't exposing the slab, another option is a pt 2"x10" sill plate to cover the foam. I used that detail about 25 years ago on a spec. house. It worked well. I ran the sub-slab poly up the edge as extra protection against moisture.
Another advantage is that if you are using pre-cut studs it leaves your framed walls at 8'-1" or 9'-1" - which you want for drywall and other sheet goods.
Malcolm,
Very nice and elegant solution. Only issue I might run into is that along with double bottom plates, hurricane ties are typically used here around both bottom plates. I'm a few miles inland, but still on the east coast of NC (130 wind zone). Not sure if the 2x10 would create an issue with this or not. Now that I think about it, I suppose it wouldn't. I'm attaching a pic of my previous house that was built here in 2010. It's a monolithic slab on grade, but you can see the double plates and ties. This is typical wall construction for this area.
Also, I have to make sure that it’s not a “termite friendly” design. We have those buggers to think about here also.
Another thing that I thought about but but forgot to mention is the heat loss calc for the slab. The normal manual J heat loss calc for slab on grade is based on soil type. A raised or elevated slab is going to be on compacted material that is likely a different soil type than what is on grade. A raised slab is not technically “on grade.”
I’ve wondered about the proper way to calculate the heat loss through an elevated slab of this type. It would seem that the normal manual J calc and F-factor wouldn’t be very accurate for this situation.
You can also look at some of the concrete/wood composite ICF forms (ie Faswall). Even without insulation insert, fully filled with concrete these give a fair bit of R value.
This gives your footings R value without having to use any foam.
Malcolm and Akos,
Thank you guys for the replies. All of your advice and input regarding the raised slab is greatly appreciated. I would like to get your thoughts on the detail that I'm attaching. It uses a 6" CMU at the top of the stem wall, which is of course actually 5.625", to support the 2x6 bottom plate. This puts the "cold" six-inch CMU slightly in the interior but only by an 1/8". Does it matter that it protrudes into the interior, even by such a small amount, or is the slab edge insulation still effective here?
The 2" insulation at the slab edge is flush with the interior edge of the 8" CMUs. This keeps the edges of the slab off of the "shelf" or ledge of the stemwall.
Does this detail work? Any issues?
That'll work fine. In a super cold region, the small exposed edge of block might have some potential for condensation, but this shouldn't be an issue in your region. Thermally, there's little or no difference. Proper air sealing of this area is far more important than 1/8" of exposed block more or less. I see you've lost your brick veneer, though. Design decision, or cost?
Peter,
Thank you for the reply. Much appreciated. Glad to hear there's no real difference thermally regarding the tiny intrusion of the block edge into the interior. I assumed that was the case, but wasn't certain. Point taken on the air sealing importance at this area.
Regarding the brick, I still intend to have a brick face on all four sides (house is simple rectangle). However, two sides are covered by a wrap around porch, and a good portion of the back will also have a large rear porch. The brick face will go on front edge and sides of the porches, which means I don't have to worry about working the brick into the design of the foundation stem walls on those two sides. I essentially realized that I was stressing over a detail that would only be needed on really one side of the house. I think the porches will be designed using full brick and then I can just use thin brick veneer (1/2") on the one side without a porch and on the small areas of the foundation at the back on each side of the rear porch.
The thin brick is definitely more expensive but not super costly considering the small amount needed.
Please feel free to let me know your thoughts on the issue. Again, thank you for the input. Good to have confirmation regarding that detail.
Jason,
You plan sounds like a good one.
Deleted
Malcolm,
Thank you again for the help and input. I'm checking with a local termite expert regarding how to, if possible, ensure that termites will not be an issue with the proposed foundation detail. Structural engineer is also checking out the detail. Engineer will probably be needed to convince builder that it's ok to not tie the slab to the stem wall. What you hear is "that's how its always been done around here." :)
Here's the latest draft of the foundation detail showing the front and back exterior walls. In the front wall detail, you can see the front porch slab. Any other thoughts or suggestions are welcome.
Jason,
Those look like good, easy to build details.
One very minor thing: If I'm framing walls directly onto stem-walls (without a wood floor), I like to keep the anchor bolts low and use them to only secure the bottom of the two plates. That way you can use them to precisely locate and lock down the first PT layer. Then when you stand your walls you don't have to spend any time knocking them straight, or square the building. You do have to hog out a bit of lumber on the second plate where the nuts are, but then you can just nail the two together.
Malcolm,
That's a nice solution sounds like, but I'm in a wind zone. I'm in a 130mph design zone. Code here requires the anchor through both bottom plates. The required anchor is 1/2" diameter minimum @ 4' OC. The minimum embed is 7" in concrete or 15" in grouted masonry. The 140mph and 150mph zones just east of me require the anchor bolt to run continuous from the plates to the footing.
On a different note, in regards to air sealing, what do you typically use under the bottom plate? Sealer, adhesive, gasket? Also, what's the best adhesive and/or sealer between drywall and framing?
My intention is for the exterior sheathing and the ceiling drywall to be the air barrier. Would an adhesive strip that runs from the face of the exterior sheathing up and over the top plate and then adheres to the back of the ceiling drywall be a good way to do this?
Jason
Jason,
We still use a poly interior air-barrier here, so the sill-seal is just a capillary break. We run a bead of acoustical sealant on the interior junction of the bottom-plate and slab, and embed the poly in it.
From the details I've seen here in GBA, the two most common ways to transition the air-barrier are strips of membrane as you describe, or if you are strapping the ceiling strips of plywood.
However I'm probably better deferring to those posters who use exterior air-barriers on how to best handle these transitions.
Thank you sir. You've been extremely helpful. Perhaps a new question with the proper title is the way to go on that.