Insulating and Air-Sealing Rim Joists in Balloon Framing
Hello Everyone. I recently purchased my first home which is a 1930-built balloon frame. I’m looking for advice and guidance on sealing the perimeter at the foundation walls.
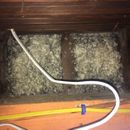
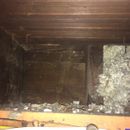
I do not have a “built-up sill” as shown in this image: https://upload.wikimedia.org/wikipedia/commons/thumb/8/89/Balloon_frame.jpg/300px-Balloon_frame.jpg What I have instead is simply horizontal exterior sheathing boards so from the basement side you can reach your hand up into the stud bays. Previous owners of the house blew in insulation into these bays and let it fall down to the sill plate, simply blocking it off with cardboard stapled to the face of the studs and floor joists. The photo with the white wiring shows what this looks like after the cardboard is removed. The photo without the white wiring shows what it looks like with the insulation removed – you can see the external sheathing to the left of the stud (for whatever reason, there is original blocking at floor level here so the insulation doesn’t extend down to the sill in this bay but this is an exception). One challenge is that the studs and the joists seem to be at irregular distances so there is no consistency in stud/joist placement.
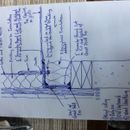
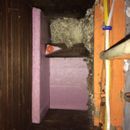
I had a blower test done and as expected this was a big problem area so it needs to be sealed and insulated. I’ve been trying to figure out a good way to do this and came up with the attached detail. It’s labor intensive but I think it will get the job done properly. But before I start, I wanted to run it by this forum and get some feedback. The idea is to work joist-bay-by-joist-bay, remove the blown-in, clean it out with a shopvac, and cut 1″ vertical facing foamboards to fit between the stud and adjacent joists. I would then add Great Stuff Pro to the joint between the wood sheathing and the sill plate and the horizontal seam between the runs of sheathing (there’s a seam about 4″ above the sill that you can make out in photo where you can see the sheathing). I’d then insert the facing foamboard so it seals in place as the Great Stuff cures. Next I’d have another piece of foamboard cut and notched around the stud that will serve as horizontal blocking for the stud cavity insulation. This piece will be supported by the facing foamboard on the exterior side and by a support that I can nail to the stud face on the interior side. This piece would be installed and sealed all around with Great Stuff Pro. After it cures, I’d beef up the insulation with 6″ of fiberglass which would bring it to the edge of the sill plate. All done. Sealed and insulated. I’m attaching a photo for a trial run so you can see what I’m proposing. Sorry about the photo orientation – they’re automatically rotating when I upload and I can’t straighten it out.
So how’s that sound? Any thoughts/comments/feedback?
GBA Detail Library
A collection of one thousand construction details organized by climate and house part


Replies
I see how you need the upper piece of foam board to keep the insulation in the stud bay from falling in on the cavity you’re working on around the rim joist area. I think once you’ve installed that piece, you’d be better off hitting the rim joist and edges of the upper foam board piece with spray foam from one of the two-part spray foam kits. Doing it this way will save a lot of labor and probably also get you a better air seal.
Having done a lot of this “cut bits of rigid foam and glue them between studs” to insulate some oddball top plate / rafter areas in my own attic, I can tell you it is very labor intensive. Using great stuff like glue does work, but it tends to push the piece out as it cures and expands so things don’t always stay where you want them, even if you hold them in place for what seems like enough time.
In your application, you might find it easier to cut pieces of mineral wool batts and stuff them up into the stud cavities from below to serve as both a stop for the blown in insulation and as a backer for spray foam. Once you have the mineral wool in place, hit the rim joist and the mineral wool with the spray foam kit and put a few inches in there. This should get you a good air seal, and good insulation, with a lot less work.
Bill
Thank you Bill, Brian, and Tim for your replies. I looked at the spray foam kits but they seem rather expensive and reviewers note inconsistent results and longevity. I did get in touch with a local spray foam contractor who will be visiting the house in two days and will give me an estimate. I'll continue to update on my progress as this goes along, but in the meantime if anyone else has comments please leave them.
What you are proposing looks like it will work. Definitely heed Bill's advice when it comes to using the stray foam as adhesive. It works, but it is pretty powerful when it expands and will blow out the foam if you are not careful. Maybe use the low expanding stuff for windows in doors. Like Bill, I've done a bunch of this work and it is time consuming. I haven't used a 2-part spray foam kit, but know people who have with good results. I'd consider that option if I were you. Also, keep in mind that temperature is critical to spray foam curing properly. If you are doing this work in the winter, make sure the air temp and the surfaces are warm enough.
Since it is balloon framed you should consider adding wood fire blocking to the stud bays. This would keep a basement fire from destroying the entire house
I have a similar rim joist situation but there are vertical studs framed directly into concrete (see attached photo). Will I have any issues with a similar insulation plan of attack? Is the concrete an original form of fire blocking (house is stone foundation from 1923)? My concern after copious amounts of research has to do with trapping moisture along those vertical studs and maybe even along the joists? I doubt this was ever insulated and there is evidence of past moisture, but I’ve been in the house for just over a year and have not noticed any moisture along the rim joist. I haven’t looked at every single bay as there are framed walls throughout the basement (also without insulation in the framing and with a sizeable gap to the foundation wall).
Piggybacking on this old post since it seems pretty relevant to my situation and was one of the first search results that popped up while performing a google search. And for clarification, my insulation would look like the following — 2”xps cut to fit within each joist bay and in direct contact with the concrete/vertical stud assembly, followed by rockwool.
Thanks,
Dave
Attempting to bump this one last time. I was able to open up some more bays to have a look and found spots where the presumed concrete fire blocking was sort of crumbling. Also found areas with wafting drafts and decades old mice runs.
Based on the photo above, I’m not even actually looking at the rim joist. The concrete/stud face is likely a few inches thick and if it isn’t continuous to the exterior rim joist/sheathing then how the hell can it be air sealed and/or insulated?
Anyone have an insulation contractor they recommend in the Baltimore, MD area?
BF_10, I see that a lot up here in the north but we have good drying potential to the outside on older homes. For you in a warmer humid zone, you have to be careful using hardboard insulation as if the basement/foundation is cool enough for high dew point, you could cause wetting where those studs and joist meet the board insulation. What is on the exterior? Old siding with felt? Insulating from the exterior is always a safer option.
Thanks, Paul. Here is a picture of the exterior, which appears to be wooden clapboard, thin foam insulation, and then vinyl siding. The basement is extremely leaky so I think any water issues in the past have been allowed to dry quickly. I’ve looked at quite a few sections of the rim joist and framing studs and they are all in fine shape.
A few questions if you don’t mind. Would you air seal + eps foam board or just air seal? Would spray foam be a viable solution?
Thanks,
Dave
Hey Dave! Looks like the second photo is the foam correct? Your finger is on what looks like the very old felt they used to cover ship lap sheathing just under the siding or is it just backing for the foam? I would use EPS cut outs with foam injected at sides as that won't shrink and pull away in 10-15 years and certainly won't off gas for 30 years like spray foam does. EPS also has some permeability to relieve moisture. Always leave 1/8-1/4" space around the EPS so foam can truly attach well.
+1 for EPS foamed in place with canned foam. I would recommend a larger gap though, in the 1/4-1/2" range, around the perimeter of the EPS panels. It's actually easier to get a good foam in place job with the bigger gaps, since you can get the straw from the foam can in more easily. It also helps to cut a beveled edge on the EPS panels so that the force of the canned foam expanding while it cures will want to push the panel in towards the rim joist instead of away from it. You want to avoid air gaps between the rim joist and the EPS panels as much as possible.
BTW, I like to cut old scraps of copper wire a bit longer than the distance between joists and use them to hold the EPS panels in place while the canned foam cures. All you need to do is place the EPS panel, then put the wire between the joists and push the center of the wire into the foam a bit. The ends of the wire tend to bite into the joists a little, and the force is enough to hold the EPS panel in tightly while the foam cures. Once the foam cures, remove all the wires. Easy and cheap :-)
Bill
Paul/Bill,
Thanks for the help! I wish I had more pics and even kept some of the scrap material, but these photos are from a 3’ x 3’ whole in the side of a wall which contained an ancient ac unit. Realized during my first winter in the house that it was essentially wide open to the exterior!!
I don’t believe I saw any felt layer and that my finger is resting on an ~1/4” foam board which lays between the clapboard and vinyl siding.
Bill, that is a great tip on the copper wire and I can envision exactly what you are describing with that + bevel-edged eps and foam.
If you don’t mind a few additional questions — what is the best way to airseal/insulate any areas which have a joist running parallel atop a foundation wall? I’m currently ripping everything out of a basement workshop which was dug out by hand in the 60’s that unfortunately had furring strips secured directly to the cinder block foundation. There is an area as described above which causes a section of the kitchen above to have ice cold floors in the winter. I’ve tinkered with the idea of cutting an access panel in the floor above but not sure the wife would be too happy with that :)
Also, for the rest of the basement, there are some rim joist sections which don’t have much depth to them due to a combo of the mortar fireblocking and actual width of the stone foundation. Can I still go with the eps + foam method even though it may extend past the foundation? How would I go about covering the eps with a fireblock (I.e drywall or rockwool) in this scenario?
Thanks again!
-Dave
The parallel joists are usually on the gable ends of the house. Most of the time I find there are two with a gap between. Those I just box in with foam within the interior. For fire code, drywall is fine or you can get Thermax insulation which is fire rated but pricey.