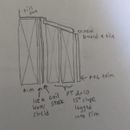
Innie patio door extension sill and flashing detail
Hi. I’m adding 4” of foam to my house during my re-siding project in Minnesota. I’m trying to figure out the flashing and extension sill details around the patio door. I’ve made a sketch but I don’t really know how to properly flash the extension sill for drainage.
As you can see, I’m thinking about using sandwiched PT 2x10s as the main load-bearing base of the extension sill, which is lag screwed into the house rim. Then I cap that off with some cement board and tile to bring the whole sill out to meet the thickness of the walls. Is the whole thing as simple as making sure that the til is underneath the lip of the sill pan? (Note that the gaps in between materials in the drawing is so that all of the lines don’t blend together.)
My drainage plane is behind the foam, using #30 felt as the WRB.
I’d appreciate any advice.
Thanks.
GBA Detail Library
A collection of one thousand construction details organized by climate and house part


Replies
Hi Jay,
I don't have a good answer for you. Most builders install outie doors in thick walls. I understand that your situation is a retrofit. Since your proposed solution doesn't have insulation beneath the door anyway, can you trim the door in a way that keeps it recessed from the wall plane and eliminates the need for an extension? Can you insulate the rim joist from the inside? Check out the photo below.
The other thing that I'm skeptical of is the tile detail. Even with the cement board, I can't image those two PT boards not moving a lot seasonally and cracking your tile install. Seems like a good place for a durable wood species.
Hi Brian.
Thanks for your reply. I actually do have the option of replacing the door at this point, so it doesn't entirely have to be a retrofit. But even if it were a new install, I think that I would keep it an innie because of the ease of integrating the WRB. Since my drainage plane is behind the foam, I'm not quite sure how easy it would be to do that properly.
Trying to trim it out like the door in the photo will be hard because right now there are concrete paver steps that lead up to the door. (See pic.) I am planning on removing some of the pavers to move the steps ~5 inches further away from the house to allow for the increased wall thickness. I do like your idea of a durable wood species. That will be much simpler than tile.
Thanks again!
I just installed a similar detail on my project except that I substituted xps for the interior 2x8 to give more insulation value. It's still very solid. I'm covering with wood. I agree that tile won't survive in this situation.
Hey Joel,
What did you use to fasten the 2x8 to the rim?
I used deck screws, I don't recall what length. They countersink themselves into the 2x to give a little more penetration into the rim.
We dealt with a similar issue when detailing our innie doors with a plywood door buck. We used 4" of Rockwool on the exterior of our Zip sheathing. You can check out the details here:
https://kimchiandkraut.net/2018/11/12/windows-and-doors-air-sealing-8/
To support the plywood buck I used 2 2x8's with a layer of Rockwool, very similar to your diagram.
Instead of using layers of 2x lumber, in Maclay's book The New Net Zero he shows a detail for this area using fiberglass angle to get the rigidity that you're looking for without taking up much physical space (more space available for high R-value insulation). You would want to confirm that this is structurally sound with an architect or engineer, but it's what I would pursue if I could do it over.
There is fiberglass angle available on the websites for:
Grainger
and
Strongwell
Instead of wood for the threshold you could also use PVC trim or decking for its durability, or like us, you could just continue your sill pan out beyond the outside edge of your siding. It was the best option for us at the time, and the metal sill pans have held up well so far.
Eric,
You all are doing really nice work. Thanks for sharing.