How to manage moisture in very shallow ‘crawl space’, as well as in finished concrete block interior stem walls.
Longtime lurker. Just as a show of respect for the community, permit me to state that I have read tons of great threads, and countless articles by Mr. Holiday too, all in an effort to educate myself prior to doing the building I have dine, or posting here. I am doing so because I have to admit I’m feeling a bit beaten, as I cannot figure or find a way to address my situation.
Is it possible to ‘manage’ moisture under a finished floor, behind a wall, with only five inches of clearance above a slab that gets wet, and a block wall with capillary action promoting moisture too?
Water is able to enter the space, in spite of my best efforts to mitigate same, because of several factors: 1) the site is steeply sloped toward the subject space; 2) the site is solid rock ledge and I was unable to afford to break rock to reverse or divert flow without going broke; 3) an acute angle exists at the vertex of the footing, and the stone ledge’s slope, and that is the entry point for water (the gap between the rock and the footing); 4) the footing, because of the site’s characteristics, is stepped and at the base is higher than the finished floor, and slab.
A few other tidbits:
1. Exterior and interior perimeter drainage was put in by me around the new house, and st the wall where the moisture is infiltrating. However, and interior drain was not installed on that same bottom wall because where was no place to do so given the rock ledge was in a few places almost at the height of the slap.
2. The exterior block wall, and the footing, where the water is able to penetrate, was rolled with Karnack, then covered in 2″ os XPS, and then covered with dimple mat. I put the dimple mat on last to protect the XPS. The dimple mat extends several feet up the slope of the grade in order to function as a sort of trough for an exterior drain that pitches around and way from this area to daylight.
3. I was unable to put a capillary break between the footing and the block. I did use a sill gasket under the ludsill, as well as aluminum flashing, and then I draped Tyvek inward under the plate over the interior of the block wall. I then taped this to 20 mil plastic sheeting and used this is my vapor barrier. In spite of the advice given by Mr. Holiday, I did not use rigid foam on the block. I had intended to put this foam over and not under the Tyvek. What has bothered me was there was nowhere for the bock to ‘dry to’ if I covered this with XPS.
4. The slab is on gravel where gravel was able to be leveled and used. Most of this slab has gravel. Then 2″ of horizontal XPS, and then 20 mil plastic sheathing, then the concrete slab.
There are two ‘rooms’ where the footing and the old and new houses meet. The footings sit on top of the stone ledge at the walls of these rooms, and the water seems through unintended weeping holes in the footing, as well as in the gap between the blocks and the footings. Rebar is epoxied into the ledge to anchor the footings, and again from footings into the mortar filled blocks. I tried off this rear and drilled/pinned the footings myself.
I do not know how to insert photos and write cations, so am describing the photos in order of uploads.
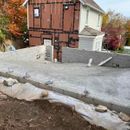
The first photo shows the slope of the site, and the main ‘crawlspace’. Despite there being both interior and exterior permitter drainage, which does divert a ton of water, there is still water sneaking below this slab. It then accumulates at the bottom fattest away, and seeps into the two rooms I am writing about.
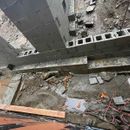
The second shot is prior to the slabs being poured. I took this during a rain to study how the rain moved. I was dreading what I saw. May many times I considered writing a post here about what I was seeing, but when you are doing the work yourself, at night is the only time, and I am often very tired.
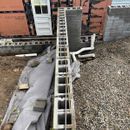
The third shot shows the drainage I installed. In the far side, you can see how I tried to get the pipe to follow the contour of the ledge but it was impossible. I know water pools in there. I slathered several gallons of Karnack in this area hoping to stop the water from entering, but the hydrostatic pressure is surely too strong….
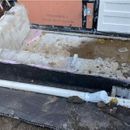
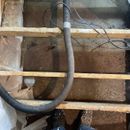
The 4th shot is the side of the build where there is no roof or crawlspace before the connection of the two houses happens. This is the ‘pantry’ before it was framed. This is the room I need help with, as I have a finished floor I want to install. I framed this out, put in the subfloor, and sheet rocked all but the concrete wall. I suspected water infiltration, despite the plastic and the Tyvek, and left and across port. My plan was to ‘condition’ this space with fresh air via a floor register, and a 4″ 100 CFM fan to the out side. I had not gotten that far when I inspected. I saw standing water under and on top of my plastic barrier.
I then tore out the subfloor, as I suspect if was ‘compromised’.
Picture 5: I’m super bummed. I’ve removed the plastic as it was only serving to keep the water beneath from having anywhere to go to dry. I always remember reading what struck me as a confusing set of guidances: 1) encapsulate; 2) allow a play for the concrete to ‘dry to’. Seems contradictory.
So, I have removed the Tyvek, and the plastic. My feeling is airflow, and a channel I have broken into the slab to run the water to a drain is my only hope.
I plan to treat the PT joists with Batra-Care, paint them, then pump a lot of air though this cavity with a moisture sensor as a switch. I will make regular visual inspections with a camera. The block wall is abate matter. How do I leave a gap, not lose the little space I have with heavy framing and air space, e.g., a soffit, and still ‘finish’ the ‘wall’, which is only two-three-four courses of block” I plan to use Azek for furring steps, and Azek 1/4″ panels. I’ll put a top board above with a hinge so it can be opened and inspected. Again, I will push air though this whole apace with an 8″ fan, and assist with exhaust to the exterior with a 100 com inline fan. I realize there will be equilibrium issues. There is no combustion appliance in the area. The space opens to a kitchen of a 150 year old drafty house, so make-up air is not a concern.
Pictures 6 (boiler room) and 7 (pantry) show the channels I dug out in the rooms. Both are sloped to a drain. Worked instantly. I do need to dig deeper on the pantry side. I will use a dehumidifier in the boiler room. Fans are all I can think of for the pantry, under the subfloor.
Does anyone thing pushing air through this pantry’s subfloor and plastic wall will work? I am also contemplating framing inward, say 8″, and putting 2″ XPS on the block wall side of the framing, so there is an air gap. I could also insulate between the joists. Not sure.
Any ideas? Thank you all for reading this long post.
GBA Detail Library
A collection of one thousand construction details organized by climate and house part




Replies
I've tried to diagram what I mean on #7.
Here is before and after in the boiler room. It really is an eyesore, and I still have water entering under the plate to the right od the door. I may have to rip it all out which Is verynupsetting.. I'm trying to find a grate or something for this...
The water shown by the door is how it used to be. The channel I dug has stopped 95% of the water. Just residual water by the door now.
This looks like you have bulk water problems, which you ideally want to deal with on the exterior of the home. Note that block doesn't need to dry to anywhere -- it is happy to be wet forever. Drying is an issue for the wood portions of the structure, not so much for the masonry.
I see you mention dimple mat. Normally dimple mat is placed against the last or first surface in an assembly, depending on how you look at it. On the interior side, you would normally put the dimple mat directly against the block wall, then put any insulation over the dimple mat. On the exterior, you could potentially put the dimple mat over rigid foam that was over the block, although it's probably more common to still put the dimple mat directly against the block. In any case, the dimple mat needs somewhere to drain to if you expect any significant amount of water. Normally the dimple mat would drain to a perimeter drain that should be at or below the level of the BOTTOM of the footing (the perimeter drain should not be placed at the bottom of the wall on top of the footing). The idea is that the dimple mat relieves hydrostative pressure by providing a drainage plane, then the perimeter drain carries that water away.
I'm not clear what you used the Tyvek for. Tyvek is not a vapor barrier, and should not be used for things like crawlspace liners. You need polyethylene sheet for a crawlspace liner, and there are reinforced products made for this purpose (although in a non-accessible crawlspace too small for someone to actually fit in, you could easily get by with a thinner, cheaper, membrane, even the code minimum 6 mil thickness, although I'd use a little thicker for that to make installation easier).
If you can't put in a full perimeter drain at or below the bottom of the footing, and you have a lot of surface water, you might try a french drain. French drains don't need to be escavated as deeply, but they can still help to intercept and divert large amounts of water, as long as that water is on or near the surface. That might be an option for you. You'd put the french drain along the uphill side of your property, then drain it to daylight on the downhill side to divert runoff coming down the hill around your house.
Bill
Hi Bill, thanks a lot. The photo in my post of the French drain pipe at the base of the J-Drain dimple mat, is as low as I was able to go. I actually broke the standard practice and used the dimple mat as a kind of funnel or gutter. Do you see that? Is this no good? I have more dimple mat, and can run that on the interior wall, and rigid foam over that. I am gun-shy about the plastic, as I had tried that wasn't great. If I tack the plastic to the underside of the joists to have that 5" gap would that work? I worry about that moisture being trapped under the joists, and perilously rotting my old house mud sill, which is level with the slab.