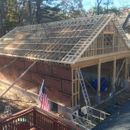
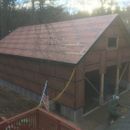
How to avoid thick-looking building with exterior insulation?
I’m building a big 40×64 detached garage in MA. Standard 2×6 stick frame construction with attic trusses dropped on top. See attached pics (one before and one after sheathing) to see what I’m dealing with. General build thread here: https://www.garagejournal.com/forum/threads/how-would-you-build-a-40x64x16-garage-in-new-england.492458/
I want to add exterior insulation (along with interior batt insulation down the road) because I’m planning to spend a LOT of time in here.
I want to do 4″ of XPS and/or polyiso insulation on top of the roof in order to achieve the recommended R20 above the roof deck for climate zone 5. The problem is, I’m going to end up with a super thick-looking rake and fascia edge. The rake edge is already framed with 2×8 rafters. With another 4″ insulation on top, along with 1.5″ furring strips (2x4s on flat) for roof ventilation, along with two layers of sheathing, we’re looking at over 13″ thick edge.
Any ideas on how to detail this? Or make it look not awful?
Fortunately the size of the building helps mask the fascia/rake thickness, but I’m still concerned it’s going to look a bit goofy.
GBA Detail Library
A collection of one thousand construction details organized by climate and house part


Replies
You've got 5" above the rafter. You can cut the rafter tail to show as much as you want and then box in the soffit. I'd show 5-1/2" and use a 1x6 fascia board.
One option is to do a stepped fascia
From Steve Baczek:
"STEPPED FASCIA w/ 1x shadow board. To break the scale of the fascia, I stepped it into two pieces. A 1x12 bottom tucks up underneath a 1x3 shadow board. The shadowbox is tucked 1/2" to provide "real shadow". The upper 1x8 fascia will recieve the gutter"
https://www.instagram.com/stevenbaczekarchitect/p/CqxsHxcrkHu/?img_index=1
https://www.google.com/search?q=steve+baczek+%22stepped+fascia%22
Matt,
You can thin the overhang from above or below.
If you stop the insulation at the exterior walls, you can thin the overhang from above as they did in the first photo.
Easier is to thin it from below by fastening new overhangs the same thickness as the foam through into the rafters and extending them out further - as in the second photo.
Lets step back a bit. This is not a house, so unless required by code you don't need that much insulation on a roof. Even if required by code, look at U factor based compliance which will let you go with less than R49 assembly.
When it comes to heat loss, a roof is another wall, so there is no reason to go overboard when doing expensive insulation. Assuming 2x6 walls with some exterior rigid, an R30 roof assembly will get you most of your energy savings which needs about 2" of exterior polyiso.
Mass zone 5 also doesn't sound like heavy snow country, so not sure if top venting buys you anything. Eliminating the venting saves you another 1.5". The combination of less rigid plus no venting would leave your rake ends a reasonable thickness or at least a size easily hideable with some trim.
Since you have a simple roof, another option is to keep it a vented assembly. 2x8 rafter with 2x6 batts is not the greatest, but you can either fur it out for more depth or add say a 2" layer of rigid on the inside. In either case, you will end up with a pretty decent roof for less work than dealing with exterior rigid plus another roof deck.
Where a thick layer of exterior rigid makes sense is if you want to leave the inside exposed without any insulation. In that case, I would go for a combination of above suggestions. Taper at the soffit ends and step the overhang as Malcom show in the 2nd picture.
Thanks all. I appreciate the feedback and ideas.
I quite like the stepped fascia board idea. I think I will do that.
I went ahead with a version of the stepped fascia idea. 2x10s screwed to the original 2x8 rake edge. Will probably just cover it with bent aluminum.
Along the fascia edge I installed strips of insulation (mostly to extend my overhang) along with blocks which will align with the 2x4 furring strips that'll go up and over the roof.
Now I have a 'tray' around the perimeter of the roof to lay in the rigid foam.
Next step is to actually install the insulation. I started experimenting with laying out the polyiso and XPS in a staggered and offset pattern. I guess I will tape the top layer (XPS). I don't love the fiber paper facing on the polyiso as it seems moisture prone, but I got it at a great price. It seems somewhat risky to have it sandwiched between the ZIP sheathing and XPS. But I think if I can get it all installed in the dry and the XPS layer taped, the polyiso shouldn't see much if any water...
Of course, there will be a roof installed over all this as well, further limiting the potential for water to get trapped in the polyiso layer.
Anyone see any issues here?
One side is done. I was super diligent taping the XPS, in hopes of keeping the paper faced polyiso underneath dry until I get it sheathed and shingled.
Really hope I'm not making a mistake sandwiching the paper faced polyiso in there.