Insulating Detached Garage Hip Roof
Hi all-
I’ve been pouring through threads here and elsewhere to determine some insulation options for my project. I’m hoping you can comment on my plans.
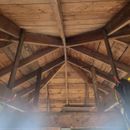
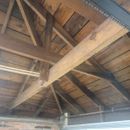
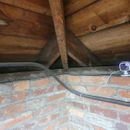
I have a detached 1937 brick garage (double course–I think it’s called, 8 inches thick). It has a slate roof (original); there are regular gaps in the wood sheathing planks. It is a hip roof at a 31 degree angle, which I believe translates into a little more than 7/12. Inside is completely unfinished. Interior dimensions are about 17 x 19. There are no joists, but rather rafter ties about 1/4 of the way up the rafters 48″ oc. This means there are three rafter ties width-wise and two ties length-wise. They are rough sawn 2x6s. Rafters are 24″oc 2×6, with the hip rafter(?) at each corner measuring 2×8. There is no ventilation but from my research the slates themselves breath/vent. House/garage is in a historic district. Climate zone 4 in Baltimore, MD.
I’d like to turn the space into a shop for hobbies. One decision point is whether to insulate and then heat/cool with a mini-split. If I go that route I have ideas for the door and walls, but the roof is trickier.
Note that I don’t want to install a ceiling and insulate on top as I’d need to add joists and it’d make the space feel too cramped. So that leaves the question of how best (performance, effort, price) to insulate the roof from the inside (replacing a slate roof is not in the cards).
Option 1: Install 2″ polyiso strips next to the sheathing in each rafter bay to create a vent space. Furr out the rafters with 2″ polyiso followed by 2×2, resulting in 3.5″ on top of the 3.5″ remaining in the rafter for a total of 7″. I’d then use either R21 unfaced fiberglass or rockwool (R23) in the rafter bays. On top of that I’d do 2″ of rmax polyiso (R13) followed by another 2″ of Thermax sheathing (R14). I’d offset rigid foam seams and screw into the 2×2 on the rafters. Not sure if I need perpendicular strapping for support.
Thoughts: I’d use the Thermax as I don’t want to install drywall as I’d likely have to reinforce the roof due to the additional weight. As it is, I assume I would need to add additional 2×6 rafter ties in both directions but I’m not sure about that. The Thermax can be exposed to the interior and this assembly should be relatively lightweight based on the PSF values I found online. Fiberglass is lighter and cheaper than rockwool.
OPTION 2: Install 2″ polyiso strips next to the sheathing in each rafter bay to create a vent space–same as OPTION 1, but I’d then cut a 1 inch section of rigid foam on top fo the strips in each bay to create a channel/baffle. Alternatively I could use a pre-cut baffle. I’d also furr out the rafters with 2″ polyiso followed by 2×2, resulting in 3.5″ on top of the 2.5″-3″ remaining in the rafter for a total of 6″ or so. I’d then use open cell foam on top of the rigid baffle until I’m flush with the furred rafters. Then I’d finish with 1 or 2″ of thermax sheathing–whatever gets me to my target R value.
Thoughts: This is a newer option based on some reading on GBA. I wouldn’t be able to DIY the foam part and foam makes me nervous (the historic folks don’t like spray foam). I also assume this would be more expensive though I haven’t done as much research on oc foam.
I’d appreciate any thoughts you have. I’ve added some pics of the interior of the roof.
GBA Detail Library
A collection of one thousand construction details organized by climate and house part


Replies
A few other ramblings:
Not sure if/how much I need to furr out rafters with option 2. This is all new to me so the most DIY friendly option is preferable.
Those hip corners look tricky. I figured I could stuff batt insulation in there.
The floor to top of brick is 88 inches.
I think the most DIY friendly option is to do nothing. You could put rigid insulation on the outside, but then you would have to remove the slate roof. You could install closed cell foam plus cellulose on the interior, but that's not DIY friendly and you have to be careful about keeping the foam away from the slate. You could build an attic floor and install cellulose, but there's not a lot of room for that and hip roofs are hard to ventilate.
If I was using this space for occasional hobbies and wanted more comfort, I would install a minisplit with enough capacity to keep things warm or cool despite the lack of insulation and numerous air leaks. A Mr. Cool unit would be worth considering.
Doing nothing with the roof is definitely an option. I should have phrased my question as IF I decide to insulate, what do you think about these options? Once I go down the road of insulating there are a bunch of dominos that are time consuming and expensive.
I'm trying to do this in phases, so what I might do is bring out 100a subpanel, frame walls, install a DIY Mr. Cool system, maybe get a DIY garage insulation kit and see how it works, how much I use it, what my electric bills are like, etc.
As an aside, for the walls I'm considering insofast rather than rigid foam CI, 2x4 studs, and sheathing. The reason is theres only 5 inches between the side walls and the garage door rails. I put a peice of 1 inch xps and a 2x4 next to the rail and there was MAYBE 3/8 left for drywall, which won't cut it. The door track is sort of L shaped and theres a metal peice (maybe for support?) that extends towards the wall 1 inch or more. Part of me wondered if there were replacement rails that were slimmer/low profile...but I digress.
I suppose if I DO insulate the roof, I'd be curious on thoughts from the experts.
I have gone back and forth with the idea of insulating my detached garage. The ceiling would also be a challenge for me. A infrared heater, a descent one could work for intermittent heating. You might get some benefit from only worrying about insulating the walls. I’m not the expert like the other guys on this forum. Not sure if it is worth it. A mini split is good but a infrared heater is going to heat objects in just a specific area or I believe that’s how infrared heaters work.
You have a complex shape for the interior of your roof, making insulating it complex unfortunately. If you want to avoid installing a flat ceiling that's too constraining, here's another solution that allows more headroom, no ceiling joists, and a lot less labor: Attach polyiso to the bottoms of rafters only.
The initial insulation you install is the most cost-effective. So rather than doing nothing with the roof, the easiest job minimizing the labor might be to span polyiso board across the bottoms of the rafters. That also avoids the rafters being a thermal bridge in most spots. You likely need some 1x support to hold those cut & cobbled polyiso in place here and there. Also tape the joints, especially since it would be tough to fit the polyiso pieces together tightly (being at odd angles to one another in so many places).
If you need to inspect the sheathing in the future, you could cut a section of polyiso out of an installed sheet, inspect, then tape it back in place. Or cut the tape and remove any 1x support (use screws not nails) to remove a whole section piece of polyiso.
This isn't the best solution if you want to install a much higher level of roof insulation, though.
I had considered just polyiso over the rafters as you suggested. The issue was I thought I needed to hit like R49 in zone 4. So I thought throwing in some batts in the rafter bays could buy me +r20-something for about $1k. However if that's not needed and layer and two of polyiso on top and sealed with some 1x strapping is WAY more DIY friendly. With 2 2-inch layers I could hit r27 or so.
You are probably not required to hit R-49 for a building that only gets used occasionally, but you should still aim for as close as possible. My first reaction was similar to Robert's above, but with filled rafters as well. You have several things working in your favor so far as moisture is concerned: slate roofs self-ventilate very well (though no codes really acknowledge this), the solid lumber sheathing is more tolerant of occasional moisture, and the garage should have very little moisture produced inside. While it technically won't meet code, your roof is probably entirely safe if you fill the rafter cavities with FG batts, then apply a single 2" layer of Thermax on the interior. Tape the Thermax seams with foil tape. Seal around the rafters and other penetrations with spray foam. Making the space airtight is more important than the insulation. Much more insulation probably won't help because the overhead door will be losing 90% of the heat at this point.
One clarification: when you say fill the rafter cavaties to you mean the whole 5.5" or should I leave a ~1.5" vent space?
Would it be completely stupid to install additional 2x6 rafter ties every 24" oc and then screw the foam sheathing to the bottom of them (or lay the foam boards on top of the rafter ties) and put batts horizontally above the rigid foam? In other words, create a ceiling but further up the roof. If I could eek out 2 feet of additional headroom I'd be good with it. There are no joists to contend with at the moment...
I like this "new rafter ties" idea best of the alternatives.
- Easier to install Thermax polyiso boards over the new rafter ties, and they would have support.
- Less cutting odd angles of polyiso to cobble together a completed ceiling plane of polyiso.
- Somewhat less polyiso needed, but you have to add those ceiling joist/rafter ties.
- Easy to install any fiberglass you might want above the flat ceiling of polyiso.
- Suggest adding a 2'x3' or larger 3/4" plywood framed vertical opening in case you want to get up into the new attic for inspection or other work. I'd make a horizontal 3/4" plywood hatch "door" to fit into the opening, attach polyiso to the upper side of the door, and weatherstrip the bottom edges. Add some trim on the inside of the framed opening for the hatch door to rest upon when closed.
- Should be easy to add polyiso board from the bottoms of the existing rafters (at the top of the brick walls) to meet the new polyiso/"ceiling" plane. Could stuff some fiberglass inside those spaces too.
The negative is I'd loose storage space but honestly this roof wasn't made to house 100s of lbs of crap. The positive is higher r value FG isn't really more expensive than lower r value so I could go with r30 on the flats. Also keeps my heat from traveling 18 feet into the ridge.