Vapor Control for Newly Insulated Exterior Walls
Hi all – As part of a DIY remodel I am retrofitting some of the exterior walls of my 1955 house in Zone 4C (Seattle) that have never had insulation before. From the inside working outward:
– The framing is 2x4s, 16″ on center
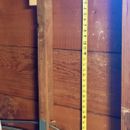
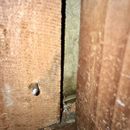
– The sheathing is horizontal 1×12 boards with gaps between them from 1/8″ to 1/4″. Not shiplap, not t&g. Photo attached.
– The housewwrap appears to be some kind of beige paper. Is this “kraft” paper? Photo attached.
– The siding is vertical cedar channel lap, about 1×12
I am working from the interior. When I am done with the insulation (and whatever else GBA advises for vapor control!) I am going to finish the walls with 5/8″ drywall, painted with latex paint.
The simplest thing for me to do – and all I’m hoping to do – is to add some Rockwool ComfortBatts and call it a day. R15 batts with a 25% framing factor equals R9 for the cavity and framing, which isn’t great, but I don’t have the square footage to lose to do bonifiglio strips, nor do I have the money for CCSF or anything with a much higher R per inch. Plus, R9 is a heck of a lot better than no insulation.
Will that work from a vapor perspective?
Do I need to address the gaps between the sheathing boards, with tape, caulk, or canned spray foam? Do I need a smart vapor retarder?
I’m not that all that interested in making the house a blower-door test all-star, as I already spend <$500/year to heat the place, and I don’t have the means to get any balanced mechanical ventilation, so if I tighten the walls up I will just need to run the bathroom exhaust fans more to keep CO2 down for my family of 6. But I am willing to do a bit more work than just packing some batts in – and potentially spend a few more dollars – IF that work is necessary to keep the sheathing from getting too wet!
Advice?
Many thanks,
Max
GBA Detail Library
A collection of one thousand construction details organized by climate and house part


Replies
> Will that work from a vapor perspective?
Here is a calculator for wall health/performance. Type in your values and it will provide pass/fail ratings. Some of them are quite conservative, far more than say Lstiburek's vapor retarder recommendations.
https://www.appliedbuildingtech.com/fsc/calculator
Note that you always need good air sealing.
Thanks Jon, that is helpful. I used these assumptions:
- R0.5 from the cedar siding (aka cladding)
- R0.5 from the 1x12 sheathing
- 10 perms for my 1x12 softwood sheathing
- 10 perms for my housewrap (whatever it is!)
- 10 perms for latex-painted cedar siding
The tool tells me that:
- Effective R Value for the whole opaque assembly is 12.5. Below code, but we knew that already, and better than the 2.9 I have without the batts.
- I have 3.3 Net Exterior perms (screenshot of the outputs attached). That is above the 3 Perm minimum I would need if I have latex-painted drywall on the interior side. I infer that what those results are saying is that my wall has sufficient outward drying ability that I will not have moisture accumulate in the assembly; and I DON'T need any sort of Class II or Class I vapor retarder on the interior.
What it doesn't tell me is what - if anything - I should do to the gaps between the 1x12 horizontal sheathing boards while I have access to them from the inside. After seeing what goes into the appliedbuildingtech.com calculations, is that question pretty much an air-sealing game at this point, i.e. not relevant to the vapor question?
What would you do; caulk them? Tape them with a flashing tape like 3M 8067? Just leave them alone and get on with my life??
M
You could detail the interior side drywall as an air barrier. A search should provide good information on this option.
And forget about the gaps in the sheathing?
>"...what - if anything - I should do to the gaps between the 1x12 horizontal sheathing boards while I have access to them from the inside..."
------
>"What would you do; caulk them? Tape them with a flashing tape like 3M 8067? Just leave them alone and get on with my life??"
It would be better if there were some sort of air-barrier between the cavity fill & plank sheathing.
Seasonal expansion/contraction of the planks from temperature and humidity cycling makes sealing the gaps in the planks something of a fools errand- not reliable over the long term. Cutting 16-18" wide strips of housewrap (or even rosin-paper, for the "no-plastics" purist) to fit up against the planks with enough at the edges to staple & tape to the studs with housewrap tape would work. It would be tedious to do a whole house that way, but I'm assuming the remodel involves only a few rooms(?).
While it's opened up be sure to put a bead of polyurethane caulk on every doubled-up framing seam such as doubled top plates, jack studs, etc. as well as along the bottom plate & subfloor.
R15 fiberglass is often quite a bit cheaper than R15 rock wool, if budget is a concern. If the drywall is air-tight, with air-tight electrical boxes & other detailing and the the sheathing air tightness has been much-improved with a flexible vapor permeable housewrap in each stud bay there isn't going to be any air currents to drag fiberglass shards into the indoor air.
Hi Dana,
Is this air sealing approach generally recommended for homes with plank sheathing?
I have the 2nd floors walls open on a 1950's Cape with similar construction, and was just planning on furring out to 2x6 walls, filling with Rockwool R23 batts, and facing with a continuous layer of 1" polyiso (seam taped for air sealing).
Should I take the housewrap approach above in addition? Perhaps it wont matter much if the entire 1st floor wouldn't be addressed. For what it's worth, my particular project is a brick facade.
Roger. Housewrap inside the stud bays sounds a fair bit easier than caulking or taping the individual gaps.
Would an even easier option be fully-encapsulated batts like Johns Manville ComfortTherm? Seems like it would solve the issue of airborne fiberglass shards, and make some modest improvements in my airtightness, especially in the belly of each bay?
>> Cutting 16-18" wide strips of housewrap (or even rosin-paper, for the "no-plastics" purist) to fit up against the planks with enough at the edges to staple & tape to the studs with housewrap tape would work. It would be tedious to do a whole house that way, but I'm assuming the remodel involves only a few rooms(?).
Well Dana, we did this. Took 2 weekends, 2 people, and about 17 splinters :). Hope it works!
Maximillian,
"Took 2 weekends, 2 people, and about 17 splinters :)"
Looks good! As to the splinters: A few years ago my wife became increasingly mad at me returning from work with injuries. I tried to brazen it out, and told her "If you aren't bleeding, you weren't working hard enough". The look she gave me said quite clearly "Idiot".
Is the exterior air-sealing simply a wind-washing and over-all airtightness concern, or in Seattle is there some concern with inward moisture migration (riding the air)?
Not sure, this was mostly an in-Dana-we-trust investment on my part!
Our outside air is really dry here though year-round... Wouldn’t outward moisture migration (warm, somewhat moist inside air hitting the cold sheathing) be a bigger concern?
Yeah, unless AC season with humid weather. Really I was just curious of the specific reason for Dana's recommendation. I suspect it was an over-all air tightness / wind-washing thing, but I wasn't sure if there might be something more to it.
Looks good, btw.
Trust in Dana's advice is generally well placed, he knows his stuff.
I suspect his reasoning for the exterior side air barrier was for some redundancy, since the wall will perform best if it's not leaky. Sometimes you place an air barrier somewhere more for convienience and ease of installation than anything else, and that usually means large, flat, open surfaces.
Bill
@entomodonata I really don’t have much in the way of data to answer your question... if I were handy with - and owned - a blower door maybe I could try to quantify how much of a difference the house wrap in the cavities made.
I can say that it was a pretty involved effort, and ‘pleating’ the corners of each bay so that the housewrap lay flat and square and the batts could fill the cavity was more time-consuming than I would have liked.
Depending on what you can live with, it might be better to put your faith in the taped polyiso!