Cost-effective option for improving cathedral roof insulation?
Hello all, Hello Martin.
I’ve read a number of GBA articles and posts regarding how to insulate cathedral ceilings, but I’m hoping for suggestions on the best way to improve our specific existing condition.
I’m in coastal Maine, zone 6a. Windy spot near a coastal river, not much shelter.
The 25 x 25 main wing of my 14 year-old house has a scissor-truss roof, with basic asphalt shingles in relatively good repair.
I have soffit vents and a ridge vent, but no soffit baffles. I have two layers of unfaced fiberglass R19. The insulation is not installed against the sheathing, but was instead installed as a blanket, in contact with the back side of the finished ceiling.
To make matters more challenging, the finished ceiling is T&G, applied directly to the trusses — with no base layer to reduce air infiltration.
We’ve now been through two winters here. As you can imagine, the wind blows through the soffit vents, through the fiberglass, through the T&G, etc. The comfort is pretty poor and our minisplit is working a lot harder than it should. I’m ready to spend some money to make at least an incremental improvement.
Any suggestions for the most cost-effective way to upgrade this package? Removing all the T&G isn’t viable at this point. I can get access to the space by deconstructing two skylight wells. The soffit is 12″ wide and can be easily removed.
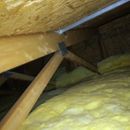
I’ll attempt to attach a photo taken from the deconstructed skylight well, showing the blanket, truss system, and underside of the roof sheathing.
Thanks for any ideas.
–Bill
GBA Detail Library
A collection of one thousand construction details organized by climate and house part


Replies
Bill,
Q. "Any suggestions for the most cost-effective way to upgrade this package?"
A. Sure. Install drywall on the ceiling.
Hi Martin. That is relatively simple re: air infiltration.
Would you also recommend any additional insulation?
Thanks for the help.
Bill,
Here are more details on the tongue-and-groove ceiling problem:
1. In many cases, as long as the ceiling installer didn't use ring-shank nails, this type of ceiling can be disassembled without damaging too many boards. Give it a try, going at the boards very gently and slowly with a flat bar. If the boards pop out without damage, you can reuse them.
2. Once the ceiling boards are temporarily removed, you can install drywall on the ceiling and tape the seams. Pay attention to airtightness at the perimeter of the drywall and penetrations. (An improvement would include installing a continuous layer of rigid foam on the underside of the rafters. Tape the seams of the rigid foam with high-quality tape, and then either install the drywall with long screws through the foam, or install 1x4 strapping, 16 inches on center, on the underside of the rigid foam before drywalling.)
3. Next, reinstall the ceiling boards on the interior side of the drywall air barrier.
4. If the ceiling boards can't be removed without major damage, just install the drywall on the interior side of the ceiling boards -- or improve the R-value of your ceiling assembly by installing a continuous layer of rigid foam, followed by drywall (with or without the 1x4 strapping).
Bill,
Q. "Would you also recommend any additional insulation?"
A. There are two ways to improve the R-value of the assembly:
1. Install a continuous layer of rigid foam on the interior side of the assembly, as described in my last post.
2. Install several inches of blown-in cellulose on top of the fiberglass batts. If you go this route, make sure that you don't block the air channels between the soffit vents and the cramped attic.