Bay window issues
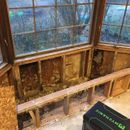
I’m doing some renovation work on a leaky bay window. This bay window is on the ground floor and has nothing structural above it (roof has a separate header, so the structure in the pics is only supporting the bay window itself). There is a stone veneer over the exterior of the bottom of the bay window.
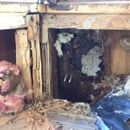
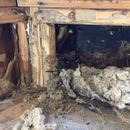
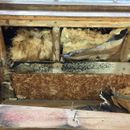
I found rotten sheathing, bad enough that I could wipe it away with my prybar with almost no effort. Some studs show carpenter ant damage, but not enough to damage the structure so I can just replace one or two as needed. The masonry veneer appears to be directly against the outside of the plywood sheathing, so I only have access from the inside.
My question is how best to air seal and insulate this, and does anyone have any ideas to deal with the rotten sheathing without destroying the stone veneer on the outside?
right now I’m planning to air seal in the usual way (caulk and canned foam), put in mineral wool batts, then membrain, then the original stained plywood interior. Under the bench in the bay window I’m thinking of installing some 1” EPS or XPS (I have both left over from other sites). I haven’t opened up the floor yet, which I believe is over a small slab off the wall of the crawlspace, but plan to put a layer of 2” XPS down on top of the slab and seal it to the EPS/XPS on the walls.
The existing “ceiling” in the bay window is stained plywood. I’m planning on removing that, putting 2” of rigid foam on the outside of the header (outside is cold side), 2” of XPS above the plywood “ceiling”, then putting some fiberglass “shake and rake” in on top of the XPS to get as much insulation as I can in the small space. The “attic” above the bay window is a small space but is connected with the vented attic over the main room the bay window is in.
All the rigid foam is leftovers I’m trying to use up, otherwise I’d use polyiso. I can see where water seems to have gotten in under the window from a sill with no taper or drip edge, so that’s another thing to fix, probably with some PVC trim board. Right now I’m just looking for ideas to deal with the insulation and the rotten sheathing.
Bill
GBA Detail Library
A collection of one thousand construction details organized by climate and house part


Replies
Hey Bill.
Do you know how the stone veneer is installed? Is there an air space between the veneer and the sheathing? A WRB?
The grey spot in the first pic is some kind of masonry backer. It looks like it has lath in it, but it’s very flat and smooth so it’s not the old school mortar-over-metal-lath. I think it may be some kind of cement board. There MIGHT be some tar paper between the concrete board and the wood sheathing, but it’s hard to tell for sure. You can see some remains around the edges in that first pic, but it might just be rotted wood too. The wood is VERY rotten there, mostly dried out now, but so crumbly I can brush it away with my finger. There is no air gap, the cement board, which I’m assuming the stone veneer is directly attached to, is right against the sheathing with nothing more than maybe a sheet of tar paper between.
I’m pretty sure this was a DIY job by the previous owners. There doesn’t appear to be any flashing under the windows, so I think water leaked in sometimes in big storms (blown rain, there is a roof overhang so rain can’t get directly inside), then dribbled in under the sill. There is no sign of any caulk. In the spring I’ll replace the 2x4 they used as a decorative sill with some PVC trimboard with a drip edge of some sort.
Renovating this place is proving to be a bit of an adventure. In another room we found a big 2x12 header in a maybe 10 foot doorway with a king stud on one end but no jack stud. We jokingly called it a “queen stud” :-) The nails had all bent and that end sagged maybe an inch. The header held up one side of the roof. It wasn’t difficult to fix, but was a surprise to find.
Bill
Does anyone have any ideas or recommendations? Any info is much appreciated!
Bill
Sounds like lumpy stucco on the outside, with the rotten sheathing on the inside, I think you are pretty much out of luck for an easy fix. Fixing the leaks will go a long way to keep it from getting worse.
You can do a bend-aid, insulate as if the house has no sheathing (air gap, cut and cobble foam+batts) and hope the cement board and stone stay attached.
I think the only proper fix is removing the stone and re-siding, but might be worth it to wait for the stone to fail before a proper fix.
I had the same though as Akos. If you proceed as if the house had no sheathing and create an air gap, you give the masonry somewhere to dry when the sun is beating on it. Basically, you'd be creating the air space it should have had from the beginning. Something like this:
I can’t furr out the studs here due to the way the interior bend and trim are constructed, but I can use some 1/4” fanfold HPS with the “safe and sound” mineral wool that is about 3” to give an air gap of about 1/2”. The thin XPS would still be vapor open(ish) for some drying. There is nowhere to tie the vent gap into otherwise unless I get really creative with drilling some vent holes in the window sill. I don’t have a way to vent the bottom to the outside at all.
Originally I’d been thinking of just using regular full depth mineral wool batts and membrain on the inside, with the thinking being that would allow for drying, but it would be mineral wool batts directly against the old sheathing. Do you think the air gap with some rigid foam like in Brian’s drawing is a better idea here? The downside to that approach is a bit less overall R value, and no real way to actually vent that air space. I can build it either way, just trying to go with the best way — the optimal bandaid, basically :-)
This stone work is a good example of why a lot of not-quite-right DIY projects can have big problems that don’t show up for years. In my wall, if the previous owners put some flashing in, or even just a sloped sill and some caulk, the sheathing probably wouldn’t have rotted out.
Bill