
More Energy-Smart Details


When steel beams extend from a building’s interior to exterior—say, to support massive overhangs—they penetrate the building enclosure and create a significant thermal bridge; steel’s high thermal conductivity leads to heat loss. Such was the case with a recent project I worked on that included adding a ducted cooling system to an in-progress residential build. The homeowners came to us with their building plans completed, and my team was given two jobs: 1. assess the energy impact of thermal bridging created by steel beam penetrations, and 2. integrate thermal breaks into the design such that they are not visible.
Puzzling a solution to penetrations
The roof assembly for this two-story house included four steel I-beams for a continuous exposed structural element running from the rear elevation through the living room and over a covered deck in front. To support the roof, the design called for eight large penetrations through the walls—meaning there were eight interior-exterior transitions that needed a structural thermal break.
We used a heat loss R-value calculator to quantify the effect of thermal bridging, basing the calculations on a standard 8-in. by 12-in. steel I-beam. The results showed heat loss equivalent to that of heating a 400-sq.-ft. room for each penetration. Together, the eight beam penetrations would effectively double the cooling and heating loads. This meant we would need to upsize the HVAC condenser to account for the conductive energy losses from the steel beams.
(It should be noted that this design does not reflect green building best practices, which support control layer continuity and minimal enclosure penetrations. Nonetheless such designs do get built and their details need to be properly addressed.)
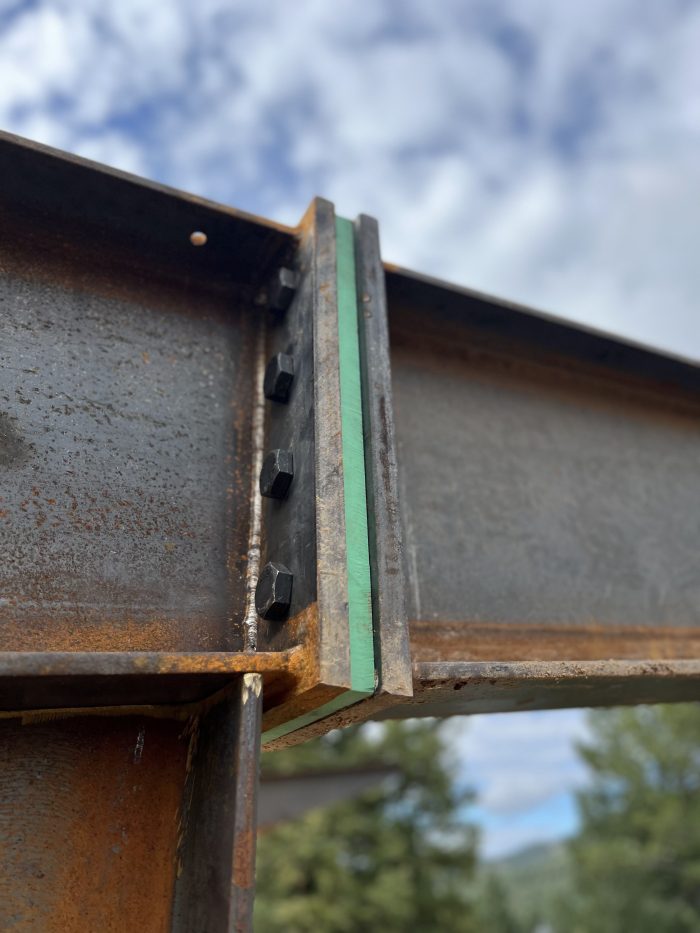
Because we didn’t want to upsize the heat pump condenser, we explored the option of adding a thermal break at the beam instead. That’s when we discovered Fabreeka’s TIM (thermal insulation material) thermal break, a load-bearing, fiberglass-reinforced laminate composite plate for installing between flanged steel connections.

We decided the best location for the 1-in.-thick thermal break would be in-line with the exterior sheathing. Here, we could cut the I-beam, weld a plate on each side of the cut, and bolt the assembly back together with the Fabreeka structural thermal break installed to the inside of the sheathing—in-line with the thermal control layer. The exterior metal plate is flush with the sheathing, and will be covered with a WRB and siding.
To conceal the thermal breaks without compromising the home’s aesthetics, we installed the TIM plates beyond moment-frame connections and within the thermal barrier, thereby concealing them inside the wall assembly.
Additional work to save costs
Executing this detail required collaboration with an engineer experienced in commercial projects to ensure structural integrity. We had to increase the scope of work to account for the additional time needed for detailed calculations and coordination with welders; we even had to work with a countertop shop to cut the Fabreeka TIM panel with their water jet cutter.
By charging per hour, we were able to avoid the over estimation or so-called “learning tax” that many vendors use when faced with estimating a new product. (To incentivize buy-in from trade partners, we transparently communicated the necessity of the detail and tracked the time it took to complete this additional work.)
By fabricating thermal breaks using Fabreeka’s TIM, we reduced the BTU load so we could correctly size the HVAC equipment. We estimate a cost savings of between $12,000 and $22,000 for the homeowner, whose house now has a much better chance at achieving optimal thermal performance.
_______________________________________________________________________
Jake Miller is owner of Transcend Homes in Denver, Colorado. Illustration courtesy of author; colorization by Melinda Vazquez.
Weekly Newsletter
Get building science and energy efficiency advice, plus special offers, in your inbox.


3 Comments
This is a pretty neat solution. I've been using G10/FR-4 (and other epoxy/glass and phenolic/glass composites) and epoxy block for thermal isolation for industrial uses for years, so it's cool that someone has made a specified/approved product for the same type of isolation usage in steel fab.
I'm assuming there's nothing magical about the materials they're using, and it looks like they offer waterjet services, but I'd imagine it's also able to be fabricated with the same types of specialized routing/milling/drilling/sawing cutters that are normally used for glass fiber reinforced composites and epoxy block.
It seems like I have seen other solutions to this same problem that introduced a thermal break in the beam and bridged the gap with 2 low-conductivity but structural "gussets" that bolted onto both sides of the beam's webbing to transfer the load across the break. This avoided the requirement to fabricate and weld new flanges on each side of the gap. Wish I could remember where I have seen it used...
Innovative use of Fabreeka TIM by the 'football bros' of Transcend Homes! Just like a perfectly crafted burger cafe, their precise engineering has seamlessly blended structural integrity with energy efficiency. Kudos on a game-changing play for green building!
Log in or create an account to post a comment.
Sign up Log in