
More Building Science
Post-and-frame construction differs from conventional framing methods in a few ways, as evidenced in the “barndominium” I am consulting on. For one thing, on this project, the posts are 6 ft. on center with no top or bottom plates. The posts resist lateral movement by both their connection to the concrete slab—achieved with a cast-in-place metal bracket—and the horizontal 2x wall girts fastened directly to the posts. In addition, there are diagonal framing members in the corners to help resist racking.
The roof trusses—also 6 ft. on center above the shop that occupies most of the structure—sit in a notch cut into each post. They are tied together with 2x purlins fastened on the topside of each truss. Neither the wall nor the roof has continuous sheathing, which complicates the water, air, and thermal control layers.
All that is to say: Without continuous sheathing, installing a continuous water-resistive barrier (WRB) is challenging.
High-quality membrane, cold-sensitive tape
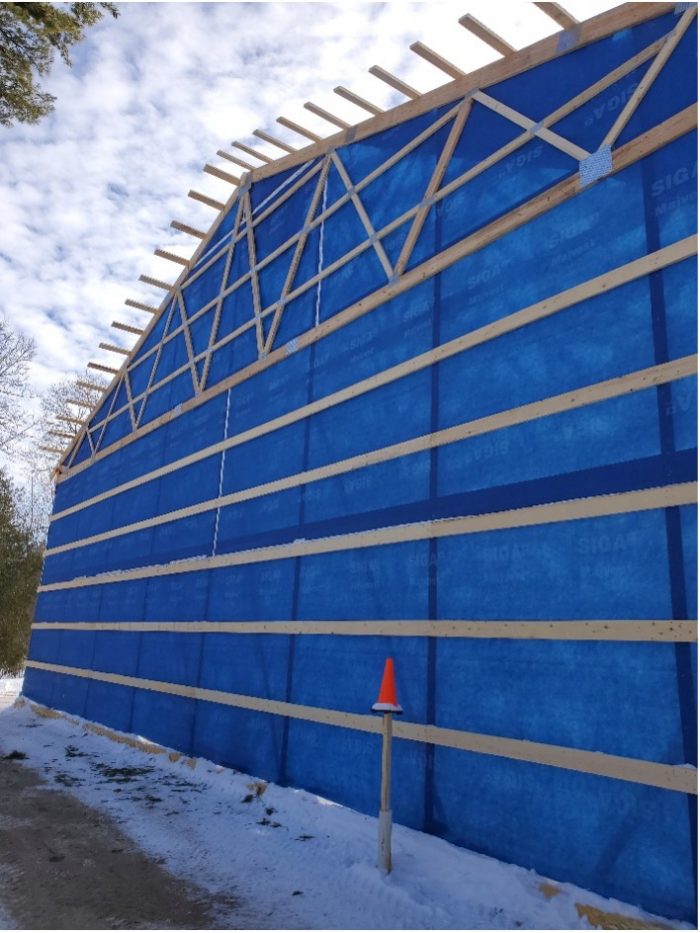
Choosing the right WRB was critical. I considered a few options. I was looking for something durable with a good family of tapes that would work well in climate zone 7. (My choice took the framing crew far outside their comfort zone.) I spec’d Siga’s Majvest 200 because it fit my criteria. The vapor-permeable membrane was fastened directly to the 6-ft.-on-center poles. There were difficulties with this approach. Working with nearly 10-ft.-wide swaths of Majvest 18 feet in the air in freezing temperatures made me unpopular. (Majvest comes in two sizes, 1.5 meters or 3 meters; I chose the 3-m size to eliminate one tape seam.)
All seams were taped using Siga’s Wigluv 60, which has a low-temperature application of 14°F. There were several times when taping had to be delayed until temperatures warmed. Because the Majvest WRB spanned several feet without a…
Weekly Newsletter
Get building science and energy efficiency advice, plus special offers, in your inbox.

This article is only available to GBA Prime Members
Sign up for a free trial and get instant access to this article as well as GBA’s complete library of premium articles and construction details.
Start Free TrialAlready a member? Log in


9 Comments
Curious...why not install the WRB outside the girts and then use the homeslicker strips for drainage directly behind the corrugated metal siding? I would think this simplifies detailing of the WRB at openings.
My reasoning in placing the WRB behind the wall girts was to eliminate as many fastener penetrations as possible through the WRB. There's probably not a lot of water that ends up behind the metal cladding, there's one seam every three feet with a good, corrugated lap to hopefully prevent water from moving between the seams. If there is ever any moisture, it can freely move down the WRB. Installing the WRB to the exterior of the wall girts would have greatly simplified the assembly, but I don't think the Home Slicker would have worked well, the metal cladding is fastened with screws, the slicker would have caused "oil canning" or small ripples and dimples in the in the steel where each of the screws were fastened through the cladding. The cladding also helps with keeping the building from twisting and racking. I'm not an engineer, but I feel this is best accomplished if the steel is fastened tightly to the framing.
Interesting approach. How compressible is the Benjamin Obdyke Slicker?
Am considering something similar for my project to add a true rain screen. Plan is to rip strips of 6mm corrugated polypropylene to 1.5" and nail in place over the WRB and horizontal girts (bookshelf-type). May add butyl tape (deck joist tape) between the corrugated polypropylene and WRB to seal the nail holes.
In practice, this would be similar to Cor-a-vent SV-3, but thinner. Will likely space the PP strips 1' vertically to help maintain the constant 6mm gap. Have ordered samples of all the material to do a trial run.
The Home Slicker is stiff, I couldn't detect any compression.
I don't think it's that important to have a gap between the corrugated steel cladding and wall girt. The corrugations in the steel provide some drainage. Adding the butyl tape might be enough protection.
I'm planning the last post in this series to be overview of what I would do differently. I have definitely formed an opinion on this style of build.
Another great article Randy! Looking forward to visiting this project again soon!!
Any chance we could get a close-up image of the Benjamin Obdyke Slicker behind the horizontal furring strips?
I am researching how to effectively mount vertical siding, in a rain screen application, on top of a rigid foam layer, so there isn't sheathing or framing directly behind to grab onto.
We were looking at just using something like a Cor-A-Vent horizontally without any wood furring, but came across this comment on another post:
"Coravent offers a batten /furring rated product but it doesn't hold a fastener for your siding. So if your looking to lay it over insulation, they don't recommend it. If you are using a product like ZipR, you can use the coravent as you will have sheathing to drive into."
Here's the close-up of what we did. I thought about a few different ways to keep water moving in this application, this seemed like the easiest option.
Moisture may not get behind the metal siding by penetrating seams, but it certainly will by way of condensation on the back of the steel siding.. It should dry out by draining away and evaporation, however, if the air can circulate well enough in the space behind the siding.. I would personally have tried for a better gap than the the Slicker creates, but only time will tell either way.
The corrugated steel does not seal particularly well at the top or bottom and the panels are a dark grey and 18 feet tall. We probably have a pretty good stack effect moving air at times. Will this be enough? As you said, time will tell.
Log in or become a member to post a comment.
Sign up Log in