If you live in a northern climate and have made a career out of construction, or even if you are a do-it-yourselfer, when the cold months roll around, you may need to temporarily heat a space you are working in. In this post, I will discuss several different heating fuels, the amount of heat they can provide along with current costs, and how the choice of a temporary heating system can affect a building.
An overview of options
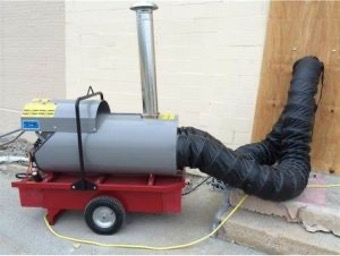
For years, I used fuel oil for a temporary heat source on many wintertime builds. Torpedo heaters, which are primarily fueled by kerosene or diesel, put out a lot of heat in a short amount of time. The one I used the most was a 100,000 BTU thermostatically controlled unit that held 5 gal. of fuel. There were significant drawbacks to this method. First there was the amount of noise it created; it sounds like a jet engine taking off. It also stinks; the exhaust of the burned fuel is vented directly into the structure, impacting air quality in the building.

On top of that, was the cost of operating it. At 100,000 BTU, my heater would go through nearly a gallon an hour costing $4 per hour at current prices. Additionally, the fuel tank needs to be filled outside; were there a fuel spill inside, the smell of diesel fuel could potentially soak into the building materials. The only good thing about this heater was the amount of heat it put out but it came at cost.
(Note that the terms “torpedo” and “salamander” in the context of portable job site heaters are used interchangeably but there are some differences, the primary one being type of fuel used. Torpedo heaters are fueled by kerosene or diesel, while salamander heaters generally use propane. They also have slightly different designs.)
I’ve also used unvented propane heaters as a temp heat source. I had both a torpedo heater and a radiant open flame space heater. Though they were cheaper to operate, around $2.50 per 100,000 BTUs, they had similar problems to the fuel oil heat. Odors, noise, and the risk of carbon monoxide poisoning. On top of that, there is the moisture issue; with propane, every 100,000 BTU produced, approximately 1 gal. of moisture is released into the home. (Natural gas produces even more at 1.25 gal.) Keeping a home as dry as possible during the construction process is important. Dehumidification will almost always be required while finishing the interior due to the concentration of moisture in new building materials.

An indirect heating system is another option. In this case, the fossil-fueled equipment is kept outside the building envelope and a duct moves the heat inside. Combustion takes place outside, so there are no indoor combustion gasses, odors, or associated moisture; there is also less noise inside.
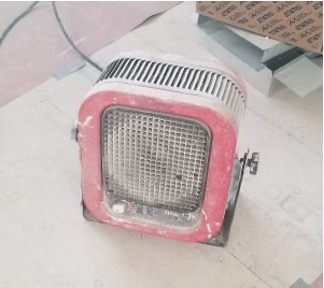
For the concrete-free slab-on-grade home that I was involved with a few years ago, we used two different electric space heaters. The first was a larger unit with two settings, 5000 watts and 3300 watts. We operated it on the 3300-watt setting at night only. During the day, a smaller 1500-watt heater was used. Electric heaters are much quieter than the forced-air torpedo heaters, and they don’t impact IAQ. Their biggest advantage is zero moisture load added to the structure. The disadvantage is the cost. Electricity rates in the area are around $0.14 per kW. At 3300 watts, or 3.3 kW, the cost per hour is a little over $0.45.

Although electric heaters are cheaper to operate, they also have a lower heat output; 3.3 kW produces around 11,250 BTU. We would need nine times that amount to equal the heat output for the larger gas heaters, increasing the cost to $4 per hour, which is roughly the same as the fuel oil heater. Luckily, the amount of heat the electric heaters produced was more than enough due to the robust building envelope—another advantage to building tight, well-insulated homes.
How much heat are we talking?
At roughly 130,000 BTU, fuel oil produces the most BTU per gal. Natural gas is next at 100,000 per therm. Propane has around 92,000 BTU per gal., and electricity produces 3412 BTU per kW. (This older post talks about heat output and the costs of different heating fuels; even though the fuel costs are outdated, the information is still useful.)
Why not just use the permanent heat source to heat the home during construction? We can if it is a radiant heat source (no moving air) but forced-air systems include ductwork and we don’t want construction dust and debris to accumulate inside the ducting.
Temporary heat is often necessary for keeping construction moving during cold weather but know that moisture, carbon monoxide, and air quality are all potential issues. (Soot can also be a concern, especially if interior finishing is in process.) In short, the type of heat supply can affect not only workers, but also the structure and its operating systems, so choose wisely.
____________________________________________________________________
Randy Williams is a builder and energy rater based in Grand Rapids, Minnesota. Photos courtesy of the author.
Weekly Newsletter
Get building science and energy efficiency advice, plus special offers, in your inbox.


10 Comments
There is this video from Matt Risinger's Build Show Youtube channel about heating and cooling jobsites that I found was quite informative.
https://www.youtube.com/watch?v=W8E0VJTlvkQ
I've seen that video, great approach for temp heat. There are a few contractors in my area that take that approach (it's rare I see temp AC in my market). The second photo in this post gave me the idea for the article, this was a sub-contractor's temp heating equipment. The RH in that home was 90%, outdoor temps were in the 20°'s with indoor temps varying depending on how close you were to the heater, but the temp near the outside wall was in the low 30°'s, slightly below the dew point. I could not feel any moisture on the plywood sheathed walls, but I'm sure they were taking on moisture. The house wrap that covered the windows on the other hand was wet.
I use a 150k Btu propane heater with an inline thermostat. For temporary heat in buildings not yet airtight it works OK as some fresh air gets in between cycles. Used the Knipco type years ago to keep capped basements warm, burned kerosene, was available at quite a few gas stations back in the day.
Quite a choice we cold climate builders face, carbon monoxide poisoning or pneumonia. I really like the idea of the electric temporary heater, just need enough electricity.
Doug
I have a couple job sites I have to keep warm every winter in Minneapolis. This year I’m moving to all electric temp heat. Almost all my projects have either an electric range or dryer plug so I’m setting up 5000w units that can be plugged into either. Would be great if someone made a portable heating unit with interchangeable plugs.
deluca_eric,
"Would be great if someone made a portable heating unit with interchangeable plugs."
What a great idea!
You can buy an adapter on Amazon for about $20. Of course you know that no matter how many adapters you have, the one you need will be one you don't have.
Yeah true. But whether I use a clunky adapter or a 14-50 with the unused neutral lug removed, I’m essentially limited to the lesser of the circuit ratings (about 5000w in this case). Which is well under the limit of what a 50amp range circuit can support.
What I’d actually like to have is a variable output heater that is smart enough to know what plug is connected and can output more (or less) heat to stay below the circuit’s continuous load capacity.
Many electric vehicle chargers do this pretty seamlessly for example. Don’t see why a heater couldn’t as well.
Do you move from site to site that often? 50A can do about 10,000 W continuous, 30A can do about 6,000. What about a heater that just has a switch with two power settings of 6,000 and 10,000 W? You just switch it depending on the outlet?
We use these DeWalt models on our commercial apartment projects up in VT. They work good and have the switch in the back for 30 AMP or 50 AMP. Since all the units have dryer plugs we can move them around easily as we finish different levels.
When you don't need them stove and drier cords abound. Put the appropriate outlet on and you're off and running. I've done that for everything from a refrigerated truck to my homemade bagel boiler. They sell adaptors for RV's which also could do the trick.
Log in or create an account to post a comment.
Sign up Log in