In an article in the Energy Vanguard Blog, I wrote about the plumbing work I did to begin the retrofit of my hot water distribution system (and the lessons I learned!). I’m bypassing the original too-long, too-big copper pipes with shorter, smaller runs of PEX tubing. My goal is to get faster hot water and reduce the amount of water wasted while I wait. Since then, I have finished the three runs I’m changing. And I have some results to share with you.
The existing hot water distribution system
My house was built in 1961 and has a poorly designed hot water distribution system. The schematic below shows the water heater, the trunk line, and the branches to the three fixtures I’ve improved. (The water heater is actually in the basement below, not the foyer. The red dots are the hot water fixtures.) The primary bathroom isn’t really that far from the water heater, as you can see. But the hot water pipes don’t take the most direct route to the lavatory and shower.
The hot water rectangle for my house isn’t as bad as it could be. The water heater is near the middle of the house, and the bathrooms (basement and main floor) are stacked and close to the water heater. The kitchen is pretty far away, and the laundry room is farther. The hot water rectangle is 50%, which is bad for a two-story house.

The hot water rectangle is just one part of the problem. That indicates the fixtures and water heater are spread out so the pipes are longer than they could be. The other issue is that the pipes are too big. The trunk line is 3/4″ copper all the way to the kitchen. The branches are 1/2″ copper. That’s a lot of water in the pipes that gets in the way of the hot water traveling to the fixture.
Weekly Newsletter
Get building science and energy efficiency advice, plus special offers, in your inbox.
The retrofit
I’m not changing out the whole plumbing system (not yet anyway), but I’m fixing three of the most used fixtures: the shower and lavatory in the primary bathroom and the kitchen faucet. I built and installed a manifold that lets me run three PEX tubing lines to those fixtures. And now I’ve got my two bathroom fixtures fixed.
The schematic below shows the new runs for those two fixtures. Both now are served by shorter, smaller pipes with a lot less water in them. I could have made the lavatory run even shorter if I had rotated the manifold 180°, but that didn’t occur to me until I made the sketch here.

The results
If you look carefully at those two schematics above, you can see that the lengths of the shower and kitchen hot water pipes are far shorter after the retrofit. I couldn’t get as much length reduction from the lavatory, but the reduction in pipe size still improved performance dramatically.
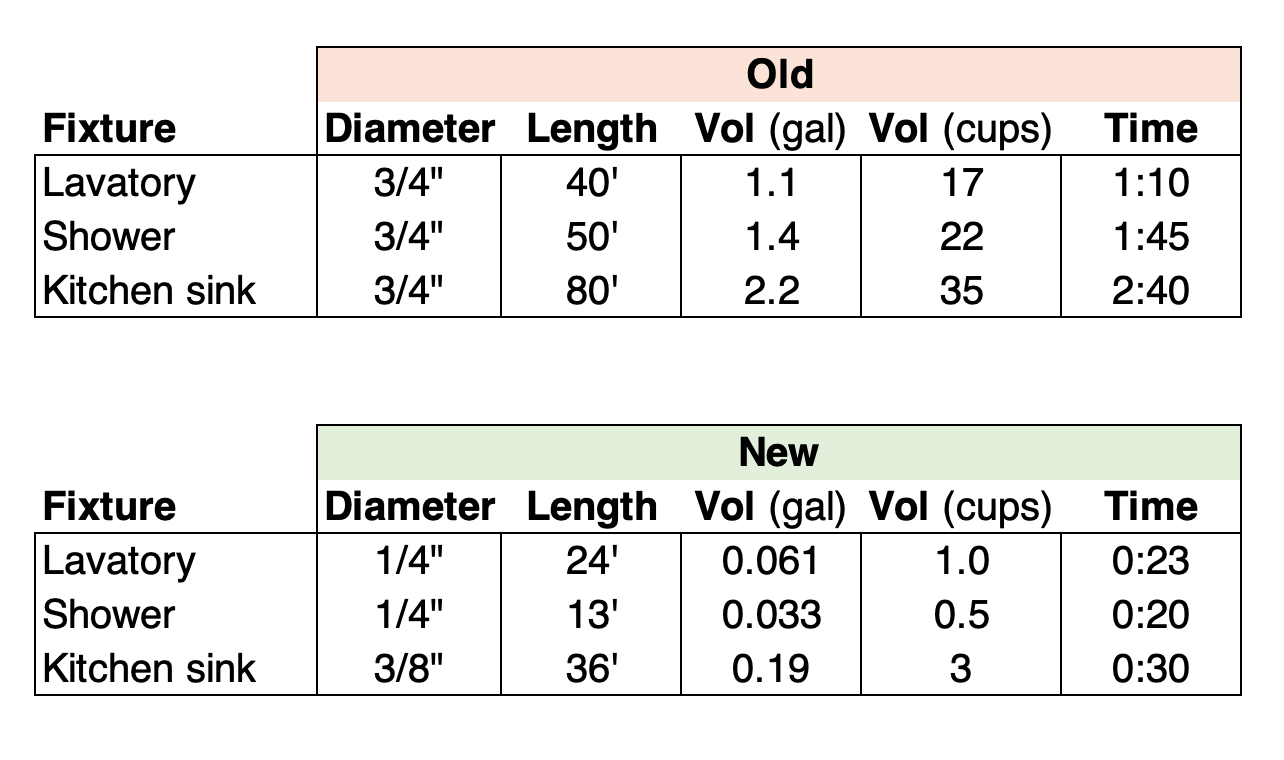
I tested all three of those fixtures for time to hot water and the amount of water wasted while waiting. I did the testing when there had been no hot water call for at least 8 hours, usually first thing in the morning. Here’s a summary of the before and after numbers:

I cut both the length and diameter of these three runs, and that resulted in much better performance. The earlier article showed the lavatory and shower results, but the kitchen sink numbers are new. The volume calculations for all three are also new. I completed that kitchen run about a month after the other two, at the end of August.
One thing to note here is that the volumes shown above aren’t the whole volume between the water heater and the fixture for each run. They’re the approximate volumes affected by the retrofit. There’s still a few feet of 3/4-in. copper pipe at the water heater and the manifold and also a few feet of 1/2-in. copper pipe connecting the new PEX line to the fixture.
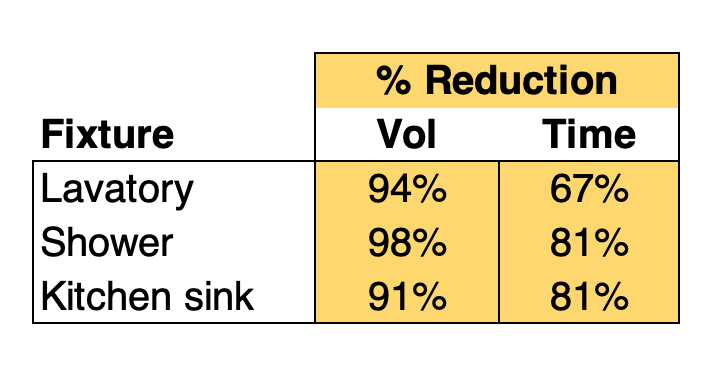
To give you a little more perspective, the table below shows the percent reduction in the volume of water in the pipes and the time I wait for the hot water to arrive.

As you might suspect, I’m quite pleased with how this has turned out. That’s not instant hot water, but it’s a huge improvement. With this improvement, I actually use the hot water in the lavatory sometimes. It also means that I won’t have to turn on the lavatory and bathtub hot water faucets at the same time as the shower to speed the hot water along. Yay!

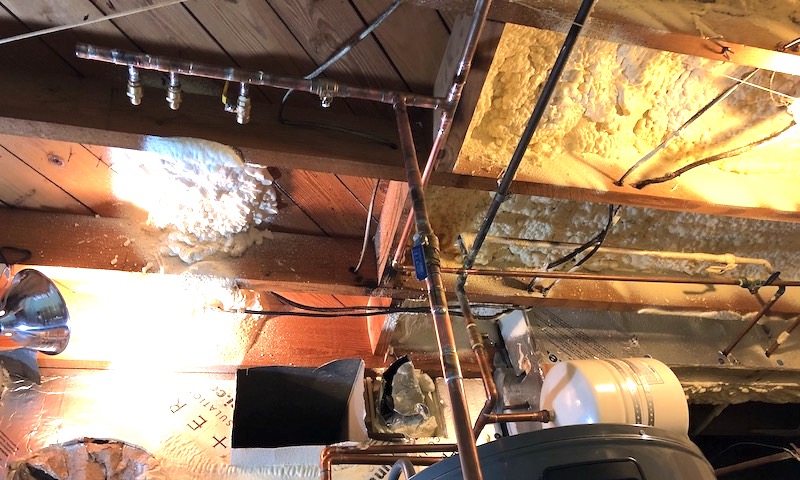
I still have room to improve upon those numbers. The majority of the volume of water is in the vertical pipe from the water heater to the manifold and in the manifold itself (photo just above). I’ve got those pipes mostly insulated now (see lead image), but there are still some gaps. If I go nuts on insulating and air-sealing around those pipes, I’m hoping the water in there will stay hot.
Wrap-up
There you have it. Getting faster hot water is a matter of reducing the length and diameter of the hot water pipes. I used two 1/4-in. PEX lines here, but you need to be careful in sizing your pipe if you do this. Going all the way down to 1/4 in. works for runs less than about 25 ft. long and only if you have enough pressure. See my article on my friend David Wasserman’s hot water retrofit for more details.
And yes, another way to get hot water would be to use a recirculation system. If you go that route, choose the demand type system, not the continuous. Even on a timer, the continuous recirculation system uses far more energy than the demand system.
____________________________________________________________________
Allison A. Bailes III, PhD is a speaker, writer, building science consultant, and the founder of Energy Vanguard in Decatur, Georgia. He has a doctorate in physics and writes the Energy Vanguard Blog. He also has written a book on building science. You can follow him on Twitter at @EnergyVanguard.


15 Comments
How was the increase or decrease in pressure at the fixtures after the retrofit?
gmgranteh: I think I noticed a little bit of decreased pressure at the kitchen but it's hardly noticeable. I didn't notice any in the two bathroom fixtures.
Here's a great resource for pressure drop in plastic pipe:
https://www.plasticpipecalculator.com/PressureDropHeadLoss.aspx
Great write up and excellent outcome.
Along the lines of the previous question, how was the relative volume at the end points before and after PEX?
Dennis: I noticed very little difference after the retrofit.
I really wish I would have read this about 3 years ago as I was undertaking a full basement gut/remodel. We've had an on-demand system for about 8 years now but have never measured time to "hot" at the taps. I just know it's longer than it was with the tank, correlated now with distance from the on-demand unit.
I suspect the overall energy savings have less to do with the method of water heating, and more to do with eliminating an open flue heater (which ours was) sitting there with 2 1/2 stories of draft above it at -30 C (as it was last night here!). I am also willing to bet $$$ that the endless supply of hot water may in fact lead to higher consumption where as before the tank offered some KISS conservation limitations..namely volume.
Very good. Been doing this for over 20 years in the UK but still find plumbers are sceptical. Love Gary's hot water rectangle, great communicator.
Allison,
It appears your fixture flow rates differed quite a lot between the old and new sets of tests. Using the volume of water and the time in your tables I calculate the fixture flow rates as:
Lavatory: old 0.94 GPM, new 0.16 GPM
Shower: old 0.80, new 0.099
Kitchen sink: old 0.83, new 0.38
None of those flows match the typical Water Sense flow rates of 1.0-2.0 GPM for new fixtures. Can you explain the discrepancies between old and new flow rates and also why all the flow rates appear to be less than wide-open flows?
Thanks.
evan60: Thanks for working through the numbers to keep me honest. I had a little freakout for a minute until I remembered what I had done. If you look at the second paragraph after the two data tables, you'll see why your calculation is off. Here's what it says:
"One thing to note here is that the volumes shown above aren’t the whole volume between the water heater and the fixture for each run. They’re the approximate volumes affected by the retrofit. There’s still a few feet of 3/4-in. copper pipe at the water heater and the manifold and also a few feet of 1/2-in. copper pipe connecting the new PEX line to the fixture."
The actual flow rates are close to what they were before. When I get back to my notebook with the results, I'll check if I wrote them down. If not, I'll measure them and post them here later.
Allison,
Thanks for your reply.
So I think you're saying the water volumes shown in your tables were calculated volumes, from the dimensions of the pipes -- they weren't actual measured water volumes during your tests? Is this correct?
And sorry for prompting a freakout, I'm only trying to understand the methodology & results, no harm intended.
evan60: Yes, that's correct. Those numbers show how much I reduced the volume of water in the pipes. It certainly IS confusing, and I'm glad you asked about it.
“[Deleted]”
Over 10 years ago, I did an extensive renovation to a large 3-family (a three-decker as we call them in MA). The whole building is served by a single 60-gallon indirect water-heater that's fed off a single 65k BTU boiler -that same boiler also provides heat for the entire building. Under these conditions, efficiency matters!
I did some trial with pex tubing and found it to be adequate to have a single hot water 1/4" pex line for each bathroom. I didn’t bother doing a run for each fixture because: 1) It’s not often that the sink and shower need to draw hot water at the same time 2) Even when that happens, the flow goes down at both fixtures but not to the point where they become useless 3) When using one after the other, the hot water line is already “primed”; hot water comes out instantly when you turn on the second fixture 4) It would have been a waste of plastic, time and money.
If I remember it correctly, our city water comes at about 60 PSI at the water-meter. The furthest bathroom has a 85' long 1/4" pex run and it's just fine; I don’t believe that 1/4" pex runs needs to be limited to 25’. That’s an important point since the longer the run the more efficiency is gained by going to a smaller pipe. I doubt that the plumbing "waste” code agrees with that, but I don't care as long as it works and it's not a safety issue. There are only showers in this building (no bathtub). I avoid bathtubs because they take more space, lead to water waste, I didn't want someone to empty the single water heater at once and they make housing less affordable.
I transitioned with a 1/2”to 1/4” reducing coupling as soon as possible after the water heater and then ¼” to ½” once I get to the bathroom as most valves are meant to connect to ½ pipes.
I use Niagara 1.5 gal shower heads; they don't provide a big gush of water but it's decent. I've had a good variety of tenants over the years and never had a complaint about water pressure or volume. I wouldn't change a thing if I was to do it over again.
In encourage plumbing-curious people who feel a little adventurous to try it at home. For anyone who know the basics of plumbing, 1/4 pex + SharkBite fittings make this a surprisingly easy project with limited risk.
Here are some useful sources:
¼” pex pipe
https://www.supplyhouse.com/Viega-32011-1-4-White-ViegaPEX-Tubing-100-ft-coil
½” to ¼” SharkBite-Reducing-Coupling
http://www.supplyhouse.com/SharkBite-U050LF-1-4-x-1-2-SharkBite-Reducing-Coupling
Niagara 1.5 GPM shower head and 1 GPM faucet aerator
Sorry, you’ll have to google these last two as the links I found were 5-line long.
There's a benefit to taking a bath sometimes. Totally removing that choice, in the name of efficiency, seems like an ill advised move.
Giving a small child a bath is far easier in a bathtub, than trying to wrestle them in a shower.
Everyone is far too worried about the maximum efficiency, instead of what will work the best for the people who live in the house, who may in fact by children?
coolviper777,
I suspect that if I removed the bathtub in our house, my wife would pack up and leave.
A sort of related question. Having put a new full basement under our house I am running new plumbing to what will be a new bath and kitchen, and the kitchen and three baths upstairs. I'm nearly done, and having not noticed significant condensation on existing piping in the basement am only insulating the hot tubing runs. Rather last minute I've decided to put blown in batt in the ceiling, filling the bays completely for sound absorption. It's not as good as mineral wool but cheaper to completely fill the bays with blown in F/G so overall effect should be good. Am I wasting my time foam insulating pipes that will be surrounded by blown in fiberglass?
Log in or create an account to post a comment.
Sign up Log in