ABOUT ENCLOSURE AND STRUCTURE
The building envelope, or shell, is the part of a house that you can draw a line around: the roof, the walls, and the floor. The enclosure begins in the ground with the foundation and floor. It extends out of the ground as aboveground walls, and it’s capped with a roof. Each part of the enclosure faces different challenges, but together they must achieve the same goals of stopping or slowing the flow of air, water, and heat while still allowing the inevitable intrusion of water a way to dry out. The parts of the house where this balance is always the trickiest are where the roof meets the walls and the floor meets the foundation. Further complicating matters is the fact that these components don’t always line up — either literally or figuratively.
Green homes are simple
On conventional blueprints, it should be easy to draw a line around the part of a house that sheds water, but it’s not so easy to do so with the air barrier or thermal barrier (simple-shaped houses make this easier). When these lines aren’t clear, there’s a potential weak spot in the design. When the lines are uncertain, there’s a certain weak spot.
Green design looks for ways to combine an air barrier with an insulation layer. Materials that can accomplish a couple of the goals of an enclosure simplify the overall design.
Roofs are bombarded by heat, rain, and hail. Chimneys, skylights, and penetrations from plumbing and ventilation equipment are trouble spots for leaks, so it’s important to get the flashing and weatherization details right.
Walls contend with wind and rain. Most walls receive very little direct sun each day: South walls get the most; north walls, the least. Because they’re vertical, they shed water quickly. Wind-blown rain is more of a problem for walls than just rain. The weak links are the holes: doors; windows; and decks. During a rainstorm, the pressure difference between inside and outside can actually suck water into small leaks around windows and doors, which can become a steady stream.
Foundations see very small temperature swings because they’re buried underground where it’s never warmer than 70°F and rarely colder than 32°F. But unless you live in the desert, the ground is always wet, and that water is always pushing its way in. Water in the soil will wick all the way up to the roof framing if you let it. Capillary breaks such as brush-on damp-proofing, sill sealer, and rigid insulation block this process.
MORE ABOUT ENCLOSURE AND STRUCTURE
A well-designed air barrier requires cooperation from everyone on the job site. Often, the task of training tradespeople falls on the shoulders of the builder, who must be sure that everyone working on the building understands what an air barrier is.
Some products — for example, drywall, plastic, or housewrap — are considered air barriers. But when building scientists talk about a home’s air barrier, they’re not talking about a single material; they’re talking about a collection of materials that reaches from the basement slab, around the entire exterior of the building’s thermal envelope, and across the finished ceiling.
It’s difficult for a builder to construct an effective air barrier if the designer doesn’t know where it’s located and how it will be built. It’s common for some professionals to have a weak understanding of air barriers. Where required, a builder may need to educate the designer, or vice versa, about air-barrier issues.
An air barrier is the sum of many parts
An air barrier consists of materials assembled and joined together to prevent air leakage between the conditioned space and unconditioned space — or the inside and out.
A typical air barrier incorporates more than a dozen materials, including some or all of the following: poured concrete; sill seal; wall sheathing; housewrap; contractor’s tape; caulk; spray foam; gaskets; window glass; drywall; polyethylene; and weatherstripping. If any of these materials are leaky, the home’s air barrier may be compromised.
More information on air barriers can be found in the GBA Encyclopedia article on the topic: Air Barriers.
Measure how tight a house is
A high-quality air barrier is an essential component of an energy-efficient home. Before a new home is occupied, the barrier’s tightness should always be verified with a blower-door test.
Blower-door testing is usually scheduled after plumbing and electrical rough-in work is completed but before drywall is hung. Whether the test occurs before or after insulating depends upon the builder’s preference and the type of insulation being installed.
Before the blower-door contractor arrives, a responsible worker should inspect the entire house for air-barrier problems, paying particular attention to mud sills, rim joists, rough openings, wiring and plumbing penetrations, soffits, fireplaces, and access hatches. The inspection will involve every floor, from the basement to the attic. Several tubes of caulk and cans of spray foam should be on hand to repair any discovered defects.
For more information on blower-door testing, see “Blower Door Basics.”
Handy products can help with air tightness
By now, most builders are familiar with the use of spray foam to seal penetrations in a home’s air barrier. But there are other less familiar products that can also improve a home’s airtightness.
Airtight electrical boxes. Every manufacturer has its own approach to improving the airtightness of electrical boxes, but most types include a flange that seals against the drywall, as well as a system for sealing the holes at the back of the box, where the wires enter.
Rubber gaskets. Although spray foam is commonly used to prevent air leakage through gaps that are too wide to caulk, some builders have been disappointed with the results of this technique. One such builder is Hans Porschitz, a building systems associate at Bensonwood Homes in Walpole, N.H. According to Porschitz, his crew has had inconsistent results when using spray foam to seal SIP seams, especially if the foam is installed in cold weather.
Porschitz has found that EPDM (synthetic rubber) gaskets perform better than spray foam. “The flexibility of EPDM gaskets is far superior to what you can get with either one-component or two-component foam,” says Porschitz.
ABOUT INSULATION
Rule #1: you can’t stop heat, but you can slow it down.
Heat always moves from hot areas to cold areas. In summer, exterior heat will flow toward the cooler interior of a home. In winter, interior heat will flow toward the exterior. The role of insulation is to slow this heat flow. In general, thicker insulation is more effective than thinner insulation.
Many energy consultants have proposed the following rule of thumb: The R-value of insulation installed in a green building should be about twice the code minimum. This is, of course, a guide to planning rather than a hard-and-fast rule.
More insulation is better, to a point
Doubling the thickness of a layer of insulation will double the insulation’s R-value, cutting heat loss in half. Each time that the insulation layer is doubled in thickness, this rule applies. But the energy saved per year by doubling insulation from R-10 to R-20 will be considerably more than the energy saved by doubling insulation from R-20 to R-40 because of the law of diminishing returns.
It’s best to insulate outside the box
The most common types of insulation used in residential construction are fiberglass batts, cellulose, spray polyurethane foam, and rigid insulation. Insulation materials are usually sold with a label indicating their R-value. The higher the R-value, the more effective the insulation. To achieve the R-value on the label, however, the insulation must be installed without compression or voids.
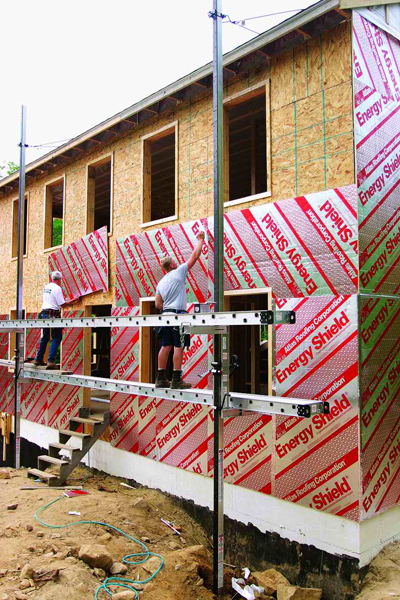
Although residential wall insulation is traditionally installed in stud cavities, the best place to locate wall insulation is outside of the frame. This reduces the thermal bridging effect that studs have in a wall — each piece of framing is a thermal bridge through the insulation. These thermal bridges seriously degrade the performance of the wall.
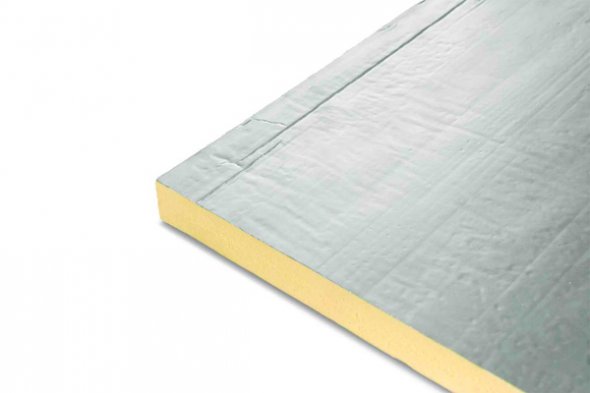
The thermal bridge effect can be partially addressed by using rigid foam sheathing — usually 1 or 2 inches of XPS or polyisocyanurate. Even better are wall designs that place all of the insulation — 6 to 10 inches of rigid foam — outside of the framing.
When insulation is outside of the frame, framing materials stay warm and dry. When stud bays are not filled with insulation, the work of electricians and plumbers is greatly simplified.
Houses that have foam sheathing should not include an interior polyethylene vapor retarder.
For more about insulation, see the “Insulation Overview” section of the GBA Encyclopedia, or the overview in our Product Guide.
ABOUT WATER MANAGEMENT
Wet houses invite bugs, mold, and rot
Moisture comes from the sky, the air, and the ground. When houses get too wet, they attract carpenter ants, termites, mold, and decay fungi, which can destroy a house, make people sick, or both. The materials and techniques used in building a green house have to keep water from getting in as well as promote drying of surfaces that do get wet. This begins at the roof and includes all parts of the enclosure.
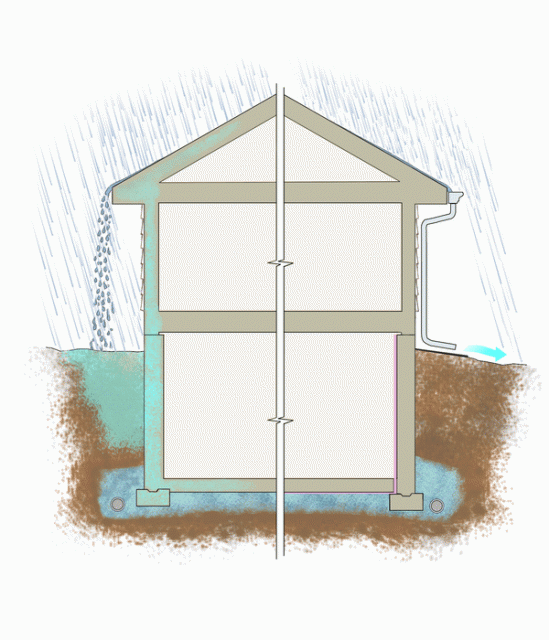
Steep roofs and deep overhangs move water away . A steep roof moves water a lot more quickly than a shallow one, and deeper overhangs carry water away from the foundation while sheltering windows and walls. Gutters can gather all of the roof water and move it away from the foundation to a drywell, rain garden, or other landscaped area, where is can be absorbed.
Wind-driven water can get behind the siding or windows, so including a couple of back-up strategies are a good idea.
- Provide an air space behind siding so that water can drain out and the siding can dry.
- Sill-pan flashing in windows and doors catches wind-driven water leaks and directs the water out to the drainage plane behind the siding.
Soil distributes moisture. Stormwater is directed away from a foundation by sloped grade and carried off by a footing drain, but a lot of moisture is held in and distributed throughout the soil. This soil moisture can wick into a foundation through capillarity.
Capillarity can move water to the top of a tree, so it shouldn’t be surprising that it can transport water from the footing to the roof of a house. Without capillary breaks, water is drawn into a foundation through the footing or the wall, and will continues further up to drier concrete, where it can get into the framing.
When moisture moves aboveground into the framing, it may encounter cooler surfaces and condense into liquid. If the wall can’t dry out, the liquid can accumulate and support mold and rot.
Insulating the exterior of a foundation can block moisture and keep the concrete warm. A warm inside surface means that humidity won’t condense into liquid and can cause mold growth. Rigid foam is a good choice under slabs. Rigid or spray foam installed inside the foundation walls stops capillarity and condensation because it prevents warm air from reaching the cool concrete.
ABOUT DRYING OUT
Drying direction is complicated by new materials
When you design or build a roof or wall assembly, it’s important to think about how the assembly will dry, but new materials make this difficult to assess.
Consider wall sheathing: In the last 50 years, we’ve gone from using solid lumber to plywood to OSB. These three products alone have different moisture-absorption tolerances and drying potentials. Their resistance to mold and fungi also differ.
To make things more complicated, there are now rigid foam sheathings, wax-impregnated OSB sheathings, membrane-coated OSB sheathings, and foam-backed cement-board sheathings.
Foundation walls cannot dry to the outside
Because foundations are buried in the ground, they’ll always be damp, so it’s important to keep them from absorbing moisture. Brush-on damp-proofing — or, even better, dimple mats — help keep basement walls dry. Basement walls should be backfilled with coarse granular material to interrupt capillarity and to help ground- and stormwater flow toward the footing drains.
There are two approaches to preventing the inside of a foundation wall from acting as a condensing surface for warm, interior moisture. The first is to keep the concrete warm by installing exterior insulation. The second is to prevent interior air or water vapor from reaching the concrete by installing a layer of rigid foam with sealed seams on the inside of the foundation wall.
Let siding dry
The majority of the leaks in the walls above the foundation occurs at holes in the siding and at bad flashing details. Once water gets in, it’s critical that it gets out. Outside the wall, back-vented siding allows water to drain away after it gets behind the siding. Housewrap can allow moisture vapor to pass from the inside out while stopping exterior liquid.
Plastic vapor barriers can keep walls wet
Plastic vapor barriers are often used inside the wall to keep walls dry, but in fact, they can trap more moisture than they keep out. Most building scientists agree that plastic vapor barriers are unnecessary and counterproductive in all but the coldest climates, such as very cold northern states and most of Canada. The permeability of so-called smart vapor retarders (such as kraft paper, MemBrain, or even asphalt felt paper) can change depending on the humidity in their surroundings. They’re impermeable in dry conditions but permeable when wet. This allows a wet wall to dry out. Another option is to use a vapor-retarding paint and insulation (such as cellulose) that can absorb and release small amounts of moisture.
For more information on vapor barriers, see:
- Vapor Retarders and Vapor Barriers
- Forget Vapor Diffusion — Stop the Air Leaks!
- Do I Need a Vapor Retarder?
Roofs are trickier because they’re sloped, so sometimes a leak inside isn’t anywhere near where it came in from outside. It’s easier to locate a roof leak in a house that has a ventilated, unconditioned attic than in a house with a conditioned attic or insulated cathedral ceilings. The sooner a roof leak is noticed, the less likely it is that the roof sheathing will have extensive rot.
FURTHER RESOURCES
BuildingScience.com:
Water Management Details for Residential Buildings
Sources for airtight electrical boxes:
Bird’s-Eye View
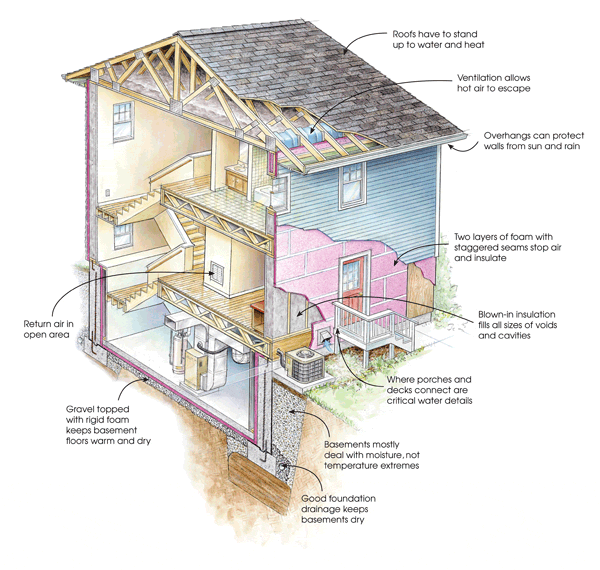
Image Credits: Don Mannes/Fine Homebuilding #172
Three parts united in keeping the outdoors out and indoor comfort in
The roof, walls, and foundation enclose the house, and the choices we make on these three parts of the structure might be the most important decisions we make. All have to accomplish the same things: stop air, slow the movement of heat, shed water, and dry out so that the building won’t support mold growth and rot. The priorities of roof, walls, and foundations, however, are very different.
They all see the same elements — wind, water, sun, hail — but in different proportions.
See below for:
Stop Water

Rain can run up roofs too.
##Water is every house’s worst enemy
Roofs and walls usually have redundant water barriers. For example, a concrete tile roof has a layer of #30 asphalt felt to stop any water that gets through the tiles, just as a brick-veneered wall has a water-resistive barrier to stop any water that gets past the bricks. A basement wall is coated with asphalt on the exterior to repel water, but the system depends on a good footing drain to keep the basement dry if the water table rises.
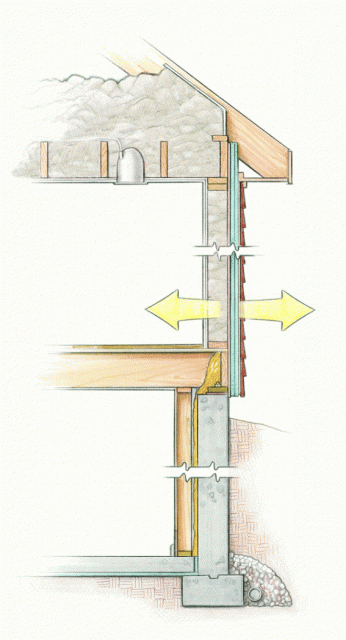
Slow Heat

Image Credits: Dan Morrison
In winter, heat is good; in summer, it’s bad
When you’re paying money to heat a home, it’s important to keep that heat in; and when you pay to cool a house, it’s important to keep heat out.
Insulation in roofs and walls can stop radiant heat and reduce the transfer of conductive heat. Windows can also play a huge role in heat management, and they use a variety of technologies to keep heat in during winter and out during summer.
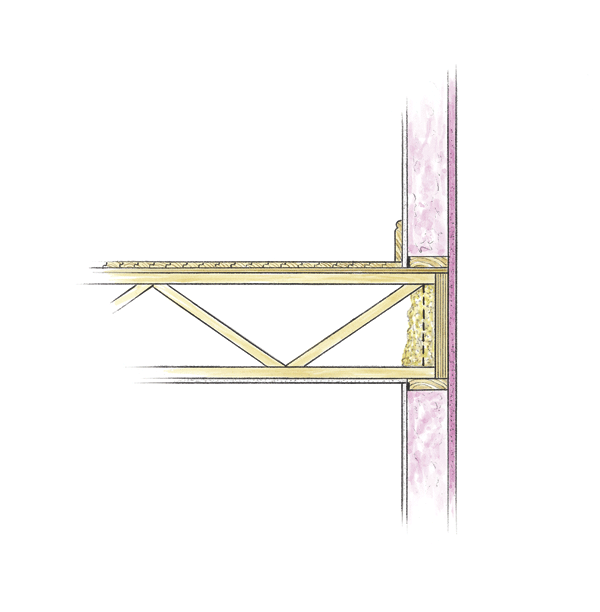
Control Air

Image Credits: Daniel Morrison
Air barriers are crucial: Leaks happen at corners, junctions, and holes
Where the foundation meets the floor framing, the floor meets walls, and where the walls meet the roof are trouble spots for air leaks.
Other problem areas include interior kitchen soffits, plumbing chases, cantilevered floors, and enclosures around metal fireplaces.
Careful detailing at these spots with gaskets, sealants, and spray foams can ensure a continuous air barrier.
Permit Drying

Image Credits: Daniel Morrison
Design a house to dry out (or in) when it gets wet
Moisture from both outside and inside a house can thwart your best efforts at keeping the building dry. Realistically, a little moisture intrusion is inevitable, so it’s a good idea to design a house so that it can dry. Walls that can dry to either the outside or inside are good, but walls that can dry to both the outside and inside are even better. Dry design can be accomplished by thoughtful material and design choices.
RELATED ENCYCLOPEDIA ARTICLES
OTHER CONSIDERATIONS
Site drainage is an extremely important factor in how a foundation performs.
Before you dig, get the best angle on the sun for free heat and light.
Integrated design matters because if everyone isn’t on the same page before you break ground, you’ll waste a lot of time, money, and materials getting on the same page later on.
Let the earth help with heating and cooling. Not far below ground, the earth remains at a steady temperature year-round. Below-grade living spaces are not subject to the same temperature swings as conventional houses, and stay comfortable in both winter and summer with less energy consumption. In hot, dry climates, earth-sheltering a house may allow the elimination of mechanical air conditioning altogether.
Consider prefabricated building components. Ordering panelized wall and roof sections, or whole modules, means less waste at the construction site and gets the house up much faster than conventional approaches.
KEY CONCEPTS
A durable house is good at stopping water and drying out. An energy-efficient house is good at stopping air and heat flow. Green houses are both.
THE DEVIL IS IN THE DETAILS
A good air barrier demands attention to detail
Although some methods of construction — for example, SIP or ICF construction — are often touted for their ability to reduce air infiltration rates, there is no single magic bullet for creating a perfect air barrier. No matter which approach is taken, the devil is in the details.
AIR-SEALING TIPS
* For rigid foam, use multiple layers with staggered seams.
* Pack wall cavities with cellulose or sprayed-in foam.
* Spray-foam the rim joist.
* Seal ceiling holes with canned foam.
* If the house includes ductwork in the attic, insulate the roof rather than the ceiling.
* If the house includes housewrap or foam sheathing, tape the seams.
GREEN RULE OF THUMB
On any job site:
“If you drill the hole, you seal the hole.” Almost every trade has occasion to drill through the air barrier at some point; to pull a wire, insert a pipe, or install a bolt. Everyone on the job should have access to an appropriate sealant or spray foam.
RUBBER GASKETS
Blended rubber ethylene propylene diene monomer (EPDM) gaskets can be used to seal a variety of gaps, including:
- between the sub-floor and the bottom plate of a wall;
- between the rough opening of a window and the window frame;
- seams between SIPs.
DRYWALL AS AN AIR BARRIER
The “airtight drywall approach” (ADA) is a method of air-sealing a house by installing an interior air barrier.
The ADA method requires drywall hangers to install an EPDM gasket between drywall and the bottom and top plates of walls, as well as between drywall and rough openings for doors and windows. The method also calls for air sealing at other locations, including rim joists and attic penetrations.
For full effectiveness, the method requires airtight electrical boxes.
BUILDING SCIENCE 101
How heat moves
Conduction is the transfer of heat through direct contact. When you put your hand on a hot frying pan, you experience conduction.
Convection is the movement of a gas or liquid in response to heat. Hot air rises, cool air sinks. If you place a piece of tissue paper over that hot frying pan, it will float up with the hot air currents.
Radiation is the transfer of heat from one body to another through space. If you hold your hand above the frying pan, you feel the heat from radiation.
The reality is that all three of these mechanisms work together in different proportions all the time. Consider, for example, a typical vented attic with fibrous insulation in the attic floor:
- The sun heats up the roof shingles (radiation);
- The shingles heat up the felt paper, plywood, and rafters (conduction);
- The hot roof assembly heats the air in the attic, which rises out the ridge vent and sucks air in through soffit vents and leaks in the ceiling (convection).
Attic floor insulation doesn’t stop the convective currents — air goes right through it; but it does cut radiant heat. If the insulation can keep the radiation at bay, the ceiling framing and drywall will conduct heat into the living space at a slower rate.
GREEN POINTS
LEED for Homes 3 points available for durability management, ID2 (Innovation & Design Process) in addition to mandatory measures.
NGBS Under Chapter 9 — Indoor Environmental Quality: up to 10 points for moisture management (903.4).



5 Comments
Insulate outside or 50-50?
In struggling to keep up the ever advancing field of 'green building' I've just recently noticed reference to the idea of insulating outside the box, as mentioned above. I was recently at a green building conference in Boulder, CO where the keynote said that it was best to have 50% of the insulation in the cavity and 50% wrapping the 'box'. As an educator, I want my students to know the latest in best practices. Maybe that full length article coming soon will help me gain clarification?
Hi Rachel
Rachel, are you still at S.E.I.?
Good question about the best place for wall insulation. There is no single answer to the question. For more on the topic, you might want to read my latest blog, "Getting Insulation Out of Your Walls and Ceilings."
It's never easy
Hi Martin,
Yes, still trying to keep sustainable building alive here at SEI, home to the ever popular PV Design & Install courses.
Just saw (but haven't read) your lastest blog this morning, thanks for posting. It's an amazing website you are involved with here, the best resource out there for educators such as myself.
Hardi plank siding on battens
I plan to install 1/2" battens (to provide an airspace behind the cladding) on the exterior sheathing and then use a sprayed on WRB. The battens will be 2' on center but is that too great a distance apart for Hardi plank siding? I am concerned that since that is a very flexible product the siding will have a tendency to get wavy. Any comments? Thanks for your time.
Response to Tony Butchart
Tony,
According to the HardiePlank installation instructions, "HardiePlank lap siding can be installed over braced wood or steel studs spaced a maximum of 24" o.c. or directly to minimum 7/16" thick OSB sheathing," so I think you'll be fine. If you have any further questions, you should contact a representative from the James Hardie Company.
Log in or create an account to post a comment.
Sign up Log in