
Humidity control is becoming a bigger deal than it used to be. As Joseph Lstiburek, PhD, PE said to me one time, “the gap between stupid and hurt is narrowing.” Building codes and best practices are getting better, which is reducing the drying potential of homes. The result is—or can be—moisture damage in walls, floors, and ceilings. That can lead to expensive repairs, reduced comfort, and indoor air quality problems. That means there are a lot of places where a dehumidifier is practically essential now. So today, I want to go through four ways to duct a dehumidifier, in order of best to worst.
1. Independent ducting
The best way to duct a dehumidifier is to give it its own independent ducts. The intake side is connected to a grille (or maybe multiple grilles). The supply side is connected to a grille or register (or maybe more than one). It’s the simplest way to set up a whole-house dehumidifier.

Pros
- Simplest ducting method
- Easier to get the airflow right since there’s only one blower affecting the pressure in the ducts
- Dehumidifier does not need to be near air conditioner
Cons
Weekly Newsletter
Get building science and energy efficiency advice, plus special offers, in your inbox.
- May require more space for ducts
- Because the dehumidified air is warm, you have to find a place to send it where it won’t create comfort problems
2. Dry air sent into air conditioning ducts
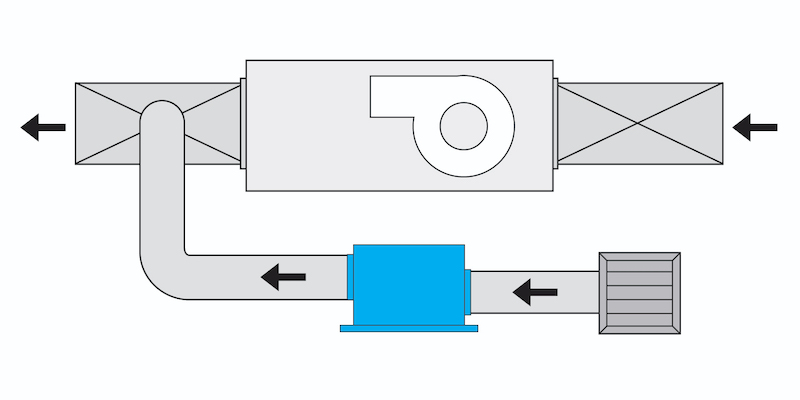
The second best way to duct a whole-house dehumidifier is to send the dry air into the air conditioning ducts. This makes things more complicated because now you have two blowers moving air and creating pressure differences in the ducts. You also have two choices. The dehumidifier intake will have its own grille, but you can put the dehumidified air into either the return or the supply side of the air conditioner.
From the diagram below, you can tell which is the better choice: the supply side. I’ll probably do a whole article on the reasons behind that setup, but for now let me just keep it simple. When you put the dry air into the return side, you’re taking away some of the air conditioner’s job. Normally, the return air going into the air conditioner needs both cooling and dehumidification (sensible and latent cooling) for those of us in humid climates. By putting dehumidified air into the return side, the entering air is drier. The AC does less work, and the dehumidifier does more work. So you end up using more energy and running the dehumidifier more than you would in the better configuration shown below.
Pros
- Dehumidified air gets tempered with conditioned air before entering the conditioned space.
- Dehumidified air gets distributed throughout the house or zone.
- Can reduce the amount of ducting needed compared to independent ducting
Cons
- May need to increase the supply duct size to handle the additional airflow
- Increased energy use if you put the dehumidified air into the return side
3. Bypass method
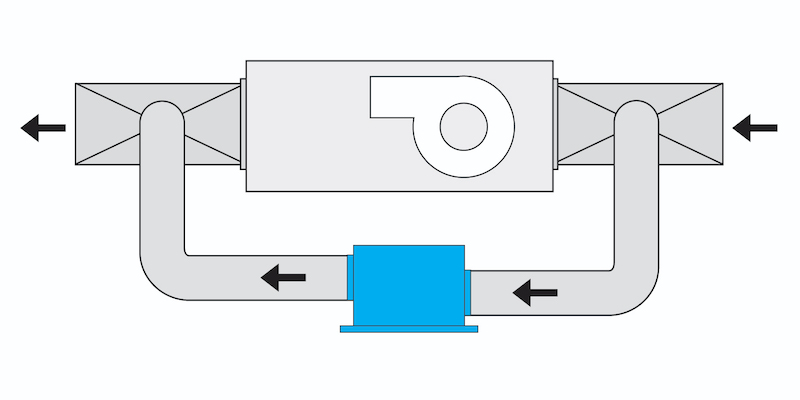
In this configuration, the dehumidifier intake pulls air from the return side of the air handler, dehumidifies it, and then sends it into the supply side to mix with the conditioned air. Some of the air bypasses the air handler, hence the name. This method can reduce the amount of ductwork needed.
Pros
- Can reduce the amount of ducting needed compared to independent ducting
- Dehumidified air gets tempered with conditioned air before entering the conditioned space
- Dehumidified air gets distributed throughout the house or zone
Cons
- Return and supply ducts may need to be increased to handle the additional amount of air flow
- May need damper to prevent backflow through dehumidifier
- Will need a method to prevent short-circuiting when the air handler is not running; this could be a second damper or having the air handler wired to keep running whenever the dehumidifier runs
4. Injection Method
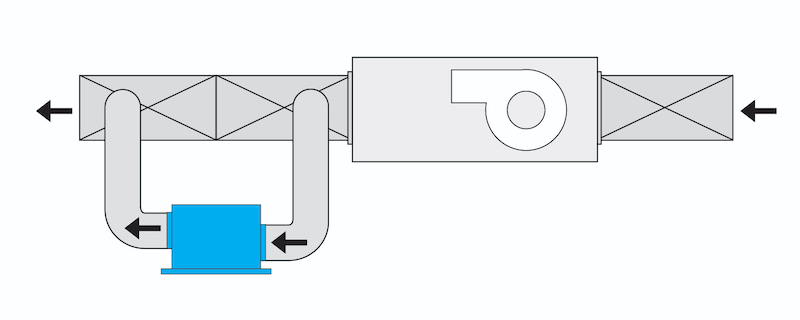
The final method here has both the intake and dry air sides of the dehumidifier connected to the same side of the air handler. In the diagram below, they’re connected to the supply side, an approach promoted by engineer Andy Ask. Putting them on the return side has the same problem of reducing the moisture removal capacity of the air conditioner mentioned in method 2 above.
Pros
- Can reduce the amount of ducting needed compared to independent ducting
- Dehumidified air gets tempered with conditioned air before entering the conditioned space
- Dehumidified air gets distributed throughout the house or zone
- Can increase dehumidifier efficiency because of cooler entering air
Cons
- Air handler must run whenever dehumidifier runs to prevent short circuiting
- May need damper to prevent backflow through dehumidifier
- Increased energy use if you put the dehumidifier on the return side
- With dehumidifier on supply side, dehumidifier capacity can be lower because of cooler entering air
- With dehumidifier on supply side, this method is appropriate only for hot-humid climates with lots of air conditioner runtime
- Not every dehumidifier can handle cooler entering air in supply-side injection method
Final notes
For simplicity of design and operation, independent ducts are your best choice. Connecting to the air conditioning ducts complicates things because you have two fans moving air and creating pressure differences. You have to consider the relative air flows when you connect two duct systems because you want the dehumidified airflow to be less than the air conditioner airflow. Some of the configurations above also require larger ducts, dampers, and different control methods (i.e., running the air handler whenever the dehumidifier runs).
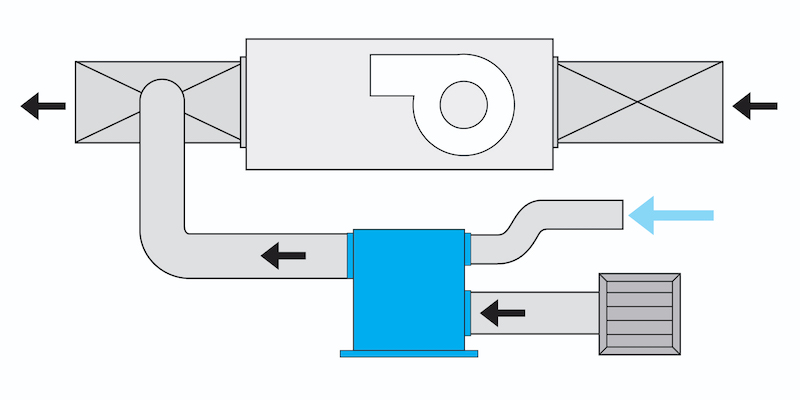
One other ducting issue I didn’t mention above is the ventilating dehumidifier. The lead photo shows one ducted to bring in outdoor air as well as dehumidifying air from the home. The R/A duct (return air) is the intake for recirculated air from the home. The F/A duct (fresh air) is bringing in outdoor air. They both go through the dehumidifier and get distributed to the house. You can set up this type of system using any of the four ways to duct a dehumidifier described above. You just have the additional duct bringing in the outdoor air. The diagram above shows a ventilating dehumidifier set up using the second method.
There, that’s not so hard, is it? Of course, we can always make it more difficult. One way to do that is to throw an energy recovery ventilator (ERV) into the mix. Fortunately, David Treleven has covered how to combine heating and cooling, dehumidifier, and ERV ducts.
And finally, ducting a dehumidifier has the same requirements for good airflow as ducting for heating and cooling systems.
_______________________________________________________________________
Allison A. Bailes III, PhD is a speaker, writer, building science consultant, and the founder of Energy Vanguard in Decatur, Georgia. He has a doctorate in physics and writes the Energy Vanguard Blog. He also has written a book on building science. You can follow him on Twitter at @EnergyVanguard. Illustrations by Laureen Schlecht, courtesy of Energy Vanguard.




6 Comments
In method 2, Dry air sent into air conditioning ducts, is a damper needed to control which direction the dehumidified air travels through the ducts? If the HVAC air handler blower is on, the dehumidified air would obviously travel in the direction of the HVAC supply air. But if the HVAC air handler blower is not on, couldn't the dehumidified air go either through the supply ductwork or the return ductwork? Or both? Would that be a problem?
If you look at the "recommended installation" for a Santa Fe brand whole-house dehumidifier (https://www.santa-fe-products.com/wp-content/uploads/2021/05/Ultra98-120-Recommended-Installation.pdf) they show method 2 with a backdraft damper in the line leading from the dehumidifier output to the supply ductwork. In a duct design supplied to me Energy Vanguard included Santa Fe's diagram with a super-imposed drawing showing a 90-degree elbow located INSIDE the supply ductwork to direct airflow away from the air handler.
I think I'm going to go with an independent ducting arrangement.
I think the injection method is even worse than you say. You list as a disadvantage:
"With dehumidifier on supply side, dehumidifier capacity can be lower because of cooler entering air"
But it's not only that the air is cooler--it's also lower humidity. So you are trying to dehumidify the driest airstream available, and you have to run a colder coil to get much of any useful effect. If you had the A/C set to only do sensible cooling and not remove any humidity (an odd choice in a humid climate) you would make the dehumidifier's work easier, but once you start pulling moisture out upstream of it, you leave it with a tough job to get the air any drier.
The cooled supply air is very near 100% RH which should make the dehumidifier run much more efficiently using the injection method, as long as the temperature is above the minimum requirement for the dehumidifier.
This is exactly as I had planned to install my own dehumidifier in my new house build, with the air handler triggered on with the call for dehumidification.
To be honest, reading through the Cons for method 4 makes me question #2 (why?), #4 and #5 (I don’t grasp either one, needs explanation).
I think it depends on the type of control the dehum has (TXV/Orfice/EXV/VFD compressor etc). There is a risk that the unit will cycle excessively on a frost prevention strategy due to the low entering temperatures. Even though some units have claimed extended ranges they are often setup for close to room temperature conditions with the presumption of some sensible cooling load on the evap coil prior to hitting the dewpoint. It would be good to see a data log of the units energy consumption versus moisture removed in difference configs.
The problem I encountered with using the A/C blower to distribute air is re-evaporating the moisture on the A/C coil when the compressor is off. That might not apply to a variable capacity compressor, though there was a big energy penalty for my single-speed A/C with dehumidification mode (target RH 55%). My scenario is/was with an ERV in CZ4a, though the same principle applies: With a dedicated DH that relies on the A/C blower, you're paying to condense moisture out of the air stream once with the A/C, then paying again to condense it with the DH after it's evaporated off the A/C coil. (I've since ducted the ERV independently.)
It's similar to leaving the blower fan running (though likely less of the time) as Allison charted for us in this article a decade ago: https://www.energyvanguard.com/blog/This-Thermostat-Setting-Can-Cost-You-Money-and-Make-You-Sick
Log in or create an account to post a comment.
Sign up Log in