I’ve been a licensed journeyman electrician since 2000. (I haven’t worked as an electrician since 2005 but keep my licensing requirements up to date.) Back in those days no one was asking us to seal the penetrations we were making to the outside or into unconditioned spaces for electrical equipment. Even today, with building codes requiring that all air passageways between conditioned and unconditioned spaces be sealed, it’s rare for electricians to do any air-sealing. It’s usually left to the insulating contractor, a member of the carpentry crew, or in the case of holes drilled to the exterior of the building, the siding contractor.

I speak from experience when I say: with a little training, the residential mechanical/electrical/plumbing (MEP) trades are more than capable of sealing the holes and penetrations they make. In fact, the MEP contractors I work with take pride in performing air-sealing tasks because they understand the value.
Finding leaks
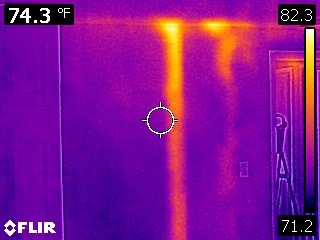
Performing energy audits and blower door tests in older homes has taught me where to look for air leaks. Often, thermal imaging will find the unsealed electrical and plumbing holes that have been drilled into unconditioned attic and crawlspaces. The thermal image above was taken during the summer when the attic space was hotter than the living space; it shows both an unsealed wire penetration (right) and unsealed plumbing vent (left) that connect the home with unconditioned attic.
During the blower door test hot air was drawn down these holes and into the wall cavity. In the case of the electrical penetration, the air was entering the home through the light switch on an interior wall. The plumbing penetration was an air pathway from the basement to the attic. The blower door created an artificial pressure to allow us to find these leaks.
…
Weekly Newsletter
Get building science and energy efficiency advice, plus special offers, in your inbox.

This article is only available to GBA Prime Members
Sign up for a free trial and get instant access to this article as well as GBA’s complete library of premium articles and construction details.
Start Free TrialAlready a member? Log in


3 Comments
This was a super helpful article! Thanks so much. I'll be saving it and working the recommendations into the notes on my future design documents.
Great article Randy! One key point: interior holes should NOT be air sealed with canned spray foam, even if it has "Firestop" on the label. Canned spray foams, e.g. Great Stuff and 3M, ignite at just 240 degrees F. This is significantly lower than the ignition temp for paper or wood. So these foams will ignite first, and contribute to the spread of fire.
Interior holes should be sealed with fire rated caulk, e.g. 3M IC15WB or CP25WB, available from Home Depot and Lowes etc. Applied with a standard caulk/sealant gun, this takes only slightly more time than spray foam. If the gap is larger than ~1/8", pack it first with non-flammable rock wool, then cover that with the fire rated caulk.
New rules for interior, attached garage ceilings are also more challenging. No penetration is allowed in the fire-rated drywall ceiling. Think about that for a minute. Holes for ceiling light cans or standard J boxes? Nope. The best and safest solution are new flush mount LED lights. A temperature (not smoke) detector must also be mounted in the garage, connected to a horn/siren inside the house. The person door must also be fire rated.
I hope this is helpful.
Mark
One more note on canned spray foams: They are banned as fire sealants in commercial construction, and are (currently) permitted for residential construction if the local inspector approves it. Many building inspectors are becoming aware of this risk and will fail an inspection if canned foam is used - requiring tedious and time consuming removal of the foam, replaced with fire barrier caulk. This happened on one of our recent inspections. The inspector saw that we had used 3M fire barrier caulk, smiled and said, "You avoided a problem!"
Log in or become a member to post a comment.
Sign up Log in